In this blog, we will build 3 of the most common and must have workflows, which can be used in almost any company using Power Automate and SharePoint Online. Before we begin, here is the flow of our session
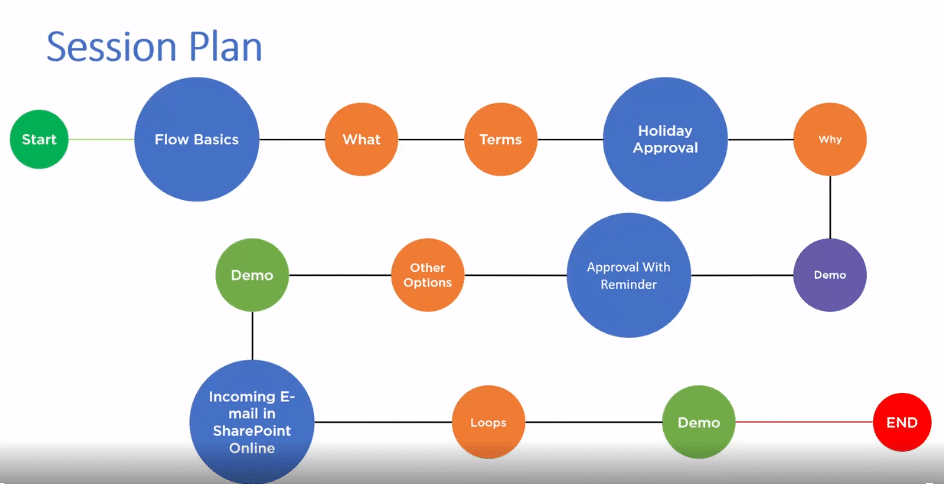
As this was blog was written up from the Power Automate virtual summit and the basics of Power Automate were covered in other sessions from the Summit, we will skip ‘basics’ and jump straight into the three workflows.
Holiday Approval Workflow
Why Holiday approval workflow? Because everybody needs time off and it is one of the most common workflows. This workflow is usually very straight forward with just one approval, and that is of your Manager. But as a Manager, several questions come to mind
- Who will replace you?
- How do I view all my pending requests?
- Do I have enough people working?
So, let’s start by looking at what we need in SharePoint for this workflow.
SharePoint setup
Holiday Request List
We need a custom list in SharePoint which will store all the holiday approval requests that consists of the following columns.
- Title (Single line of Test)
- Start Date (Date)
- End Date (Date)
- Type of Absence (Choice List) Choices
- PTO
- Sick Leave
- Maternity/Paternity
- Other
- Comments (Multiple lines of text)
Holiday Calendar
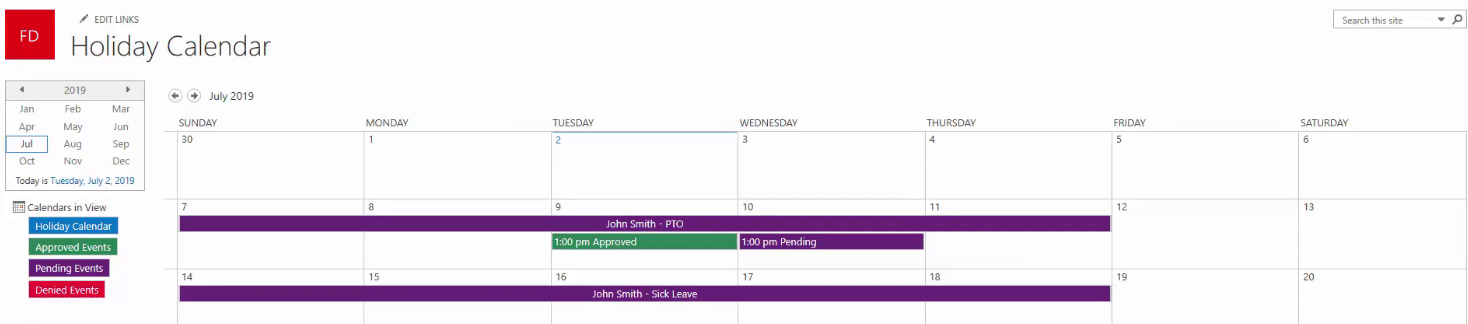
We also need an event list called holiday calendar to show all the leave requests in a calendar view. We also need to apply an overlay on it so that the approved request will appear in Green and all the pending ones will appear in purple. This will allow the Manager to view all the requests and ensure that there are enough people on board to do the work.
That’s all you need in the SharePoint environment, now let’s go to MS Flow and start building our workflow.
Holiday Approval Flow
Let’s start by adding a trigger; I want my Flow to begin when a new item is created, so we will use “When an item is created” trigger.
SharePoint Trigger: When an item is created in SharePoint
- Site Address: SharePoint site URL which has the holiday request list
- List Name: Holiday Request
Office 365 Users Action: Get Manager (V2)
The next step is to get the Manager of the user, for that we will use “Get Manager (V2)” action.
- User Name: Created by (Email)
Tip: Always rename your actions and triggers based on what they do (something meaningful) to avoid confusion in future.
SharePoint Action: Create Item (SharePoint)
The next step is to create an item in the SharePoint holiday calendar list. For that, we will use the “Create Item” action from SharePoint.
- Site Address: Same URL as used in the trigger.
- List Name: Holiday Calendar
Note: You will not see Holiday Calendar in the drop-down options. So, add it as custom value “Holiday Calendar”, and then the properties will be auto-populated.
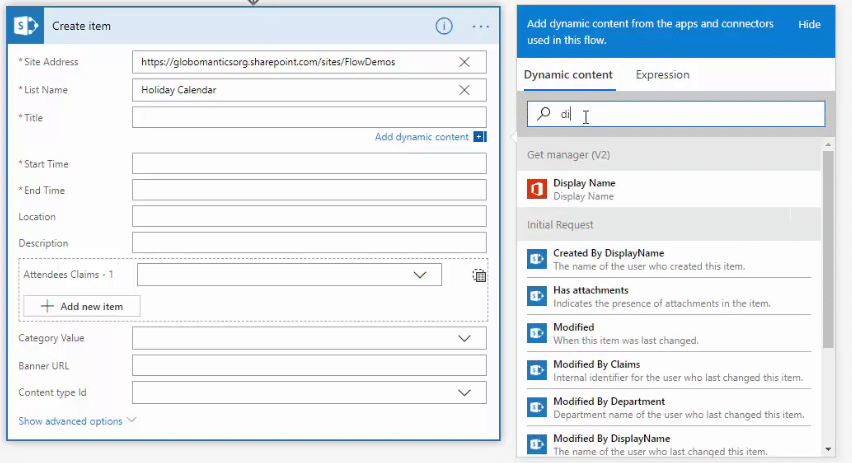
We don’t want the title to be the same as what the user entered in the request to keep it consistent and meaningful. So, let’s set the title value to be the user display name and the type of request and the rest of the settings according to the values below.
- Title: [Created By DisplayName] – [Type of Absence]
- Start Date: [Start Date] from Initial Request
- End Date: [End Date] from Initial Request
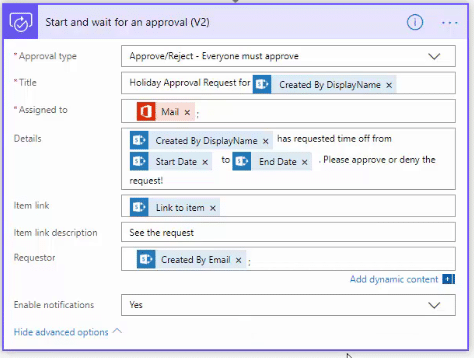
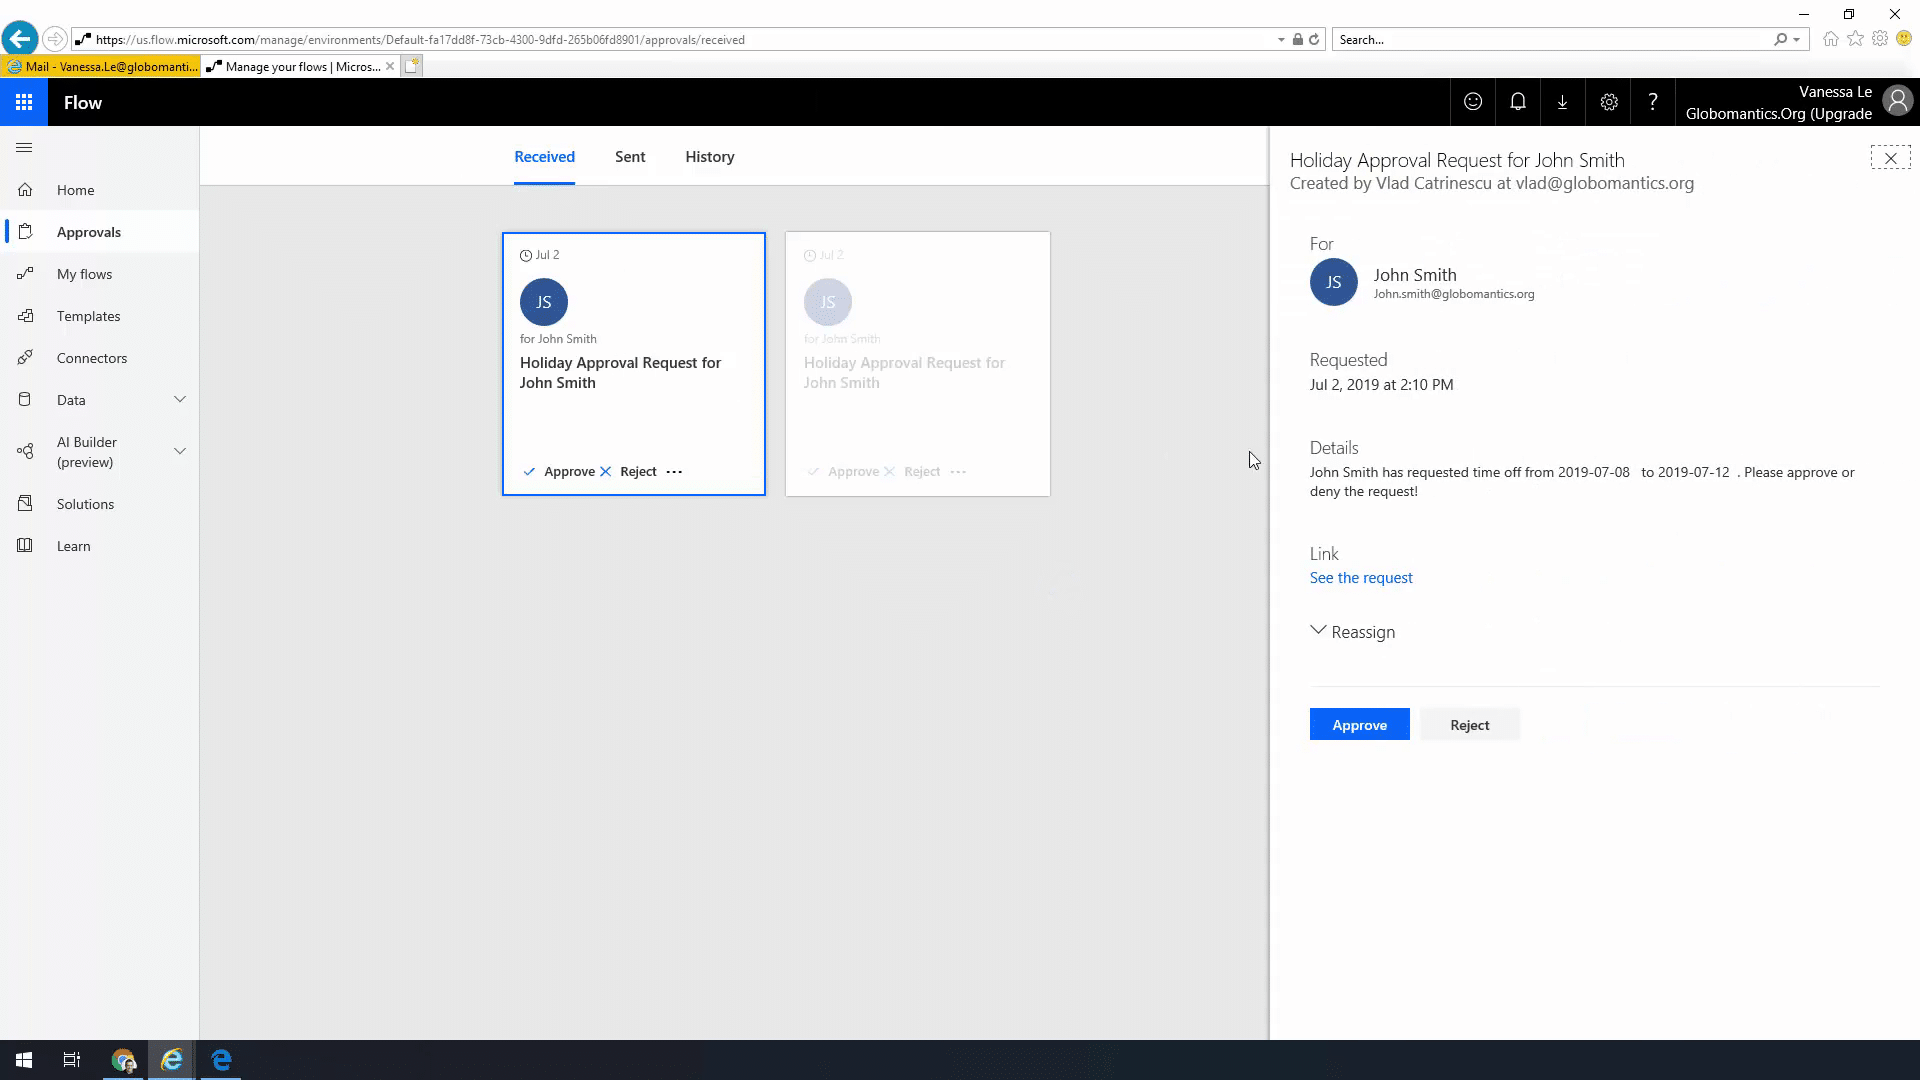
Approvals Action: Start and wait for an approval
Now, we need to add an approval action to the Flow, which will send an approval request to the Manager. There are several approval actions available, but for this Flow, we will use “Start and wait for an approval (V2)” action.
- Approval type: Approve/Reject – everyone must approve
- Title: Holiday Approval Request for [Created by (Display Name)]
- Assigned To: [Mail] “from Get Manager” action
- Details: [Created by (Display Name)] requested time off from [Start Date] to [End Date]. Please approve or deny the request.
- Item Link: [Link to Item] “from initial request”
- Item Link Description: See the Request.
Advance Settings
- Requester: [Created by Email] “from initial request”
Note: If we don’t set the requester, then all the approvals will appear as if they are coming from the person who created Flow. So it is essential to set the requester to the person who created the request.
Control Action: Condition
The next step is to add a “Condition” action which will perform an action based on the outcome of the approval. So, the condition expression will be [Outcome] is equal to Approve.
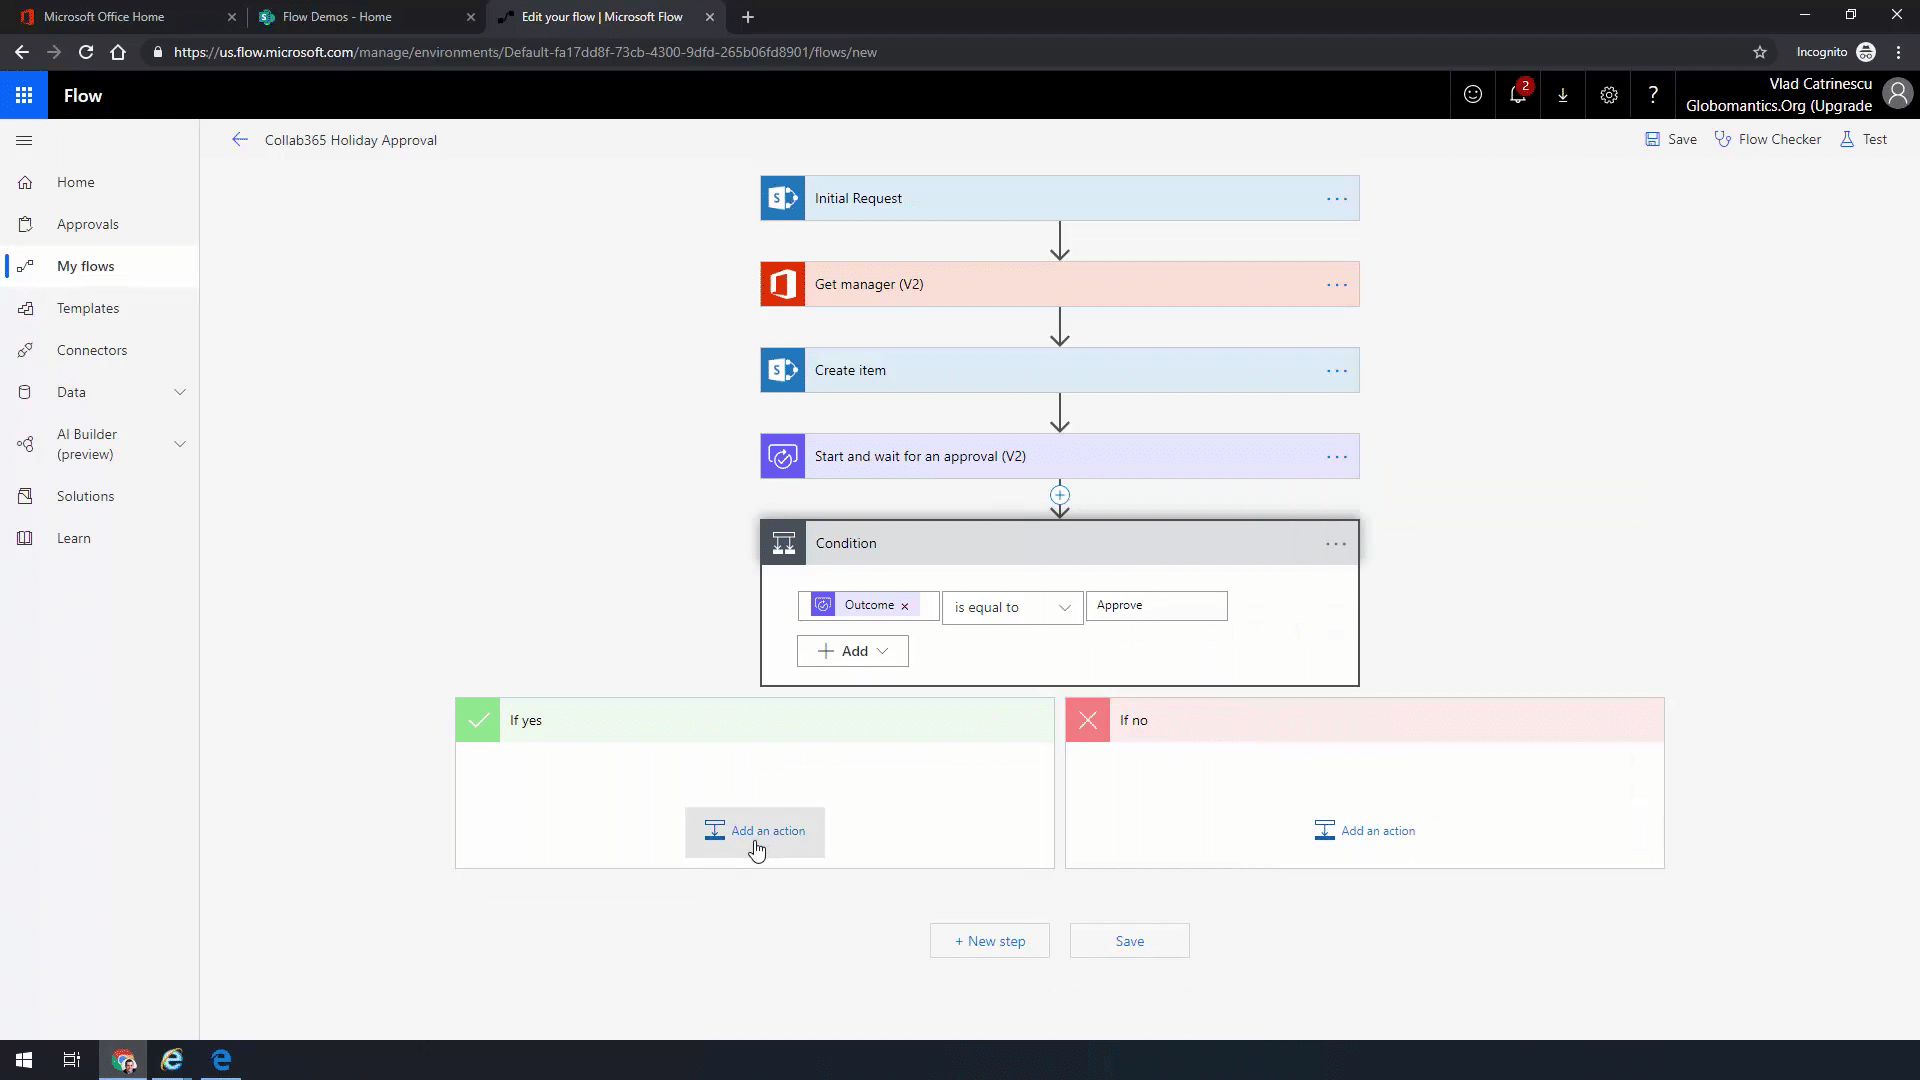
SharePoint action: Update Item
If the outcome is approved, then we want to update the SharePoint item in the holiday calendar. We will add the “Update item” action in the “If yes” branch.
- Site Address: Same URL used in trigger
- List Name: Holiday Calendar
- Id: [ID] “from Create Item”
- Start Time: [Start Time] “from Create Item”
- End Time: “from Create Item”
- Category Value: Approved.
Office 365 Outlook Action: Send an Email
After updating the status of an item in the holiday calendar then, we will send an email to the requester. So, we will add a “Send an email” action.
- To: [Created by Email] “from initial request”
- Subject: Congratulations, your holiday request got approved.
- Body: Enjoy the holiday!-
SharePoint Action: Delete item
In case of rejection, we want to remove the item from the Holiday calendar. So, we will add a “Delete item” action from SharePoint in the “If no” branch.
- Site URL: Same URL used in trigger
- List Name: Holiday Calendar
- Id: ID “from create item”
Office 365 Outlook Action: Send an Email
Finally, we will send an email to the requester to inform them that their request for holiday leave is rejected.
- To: [Created by Email] “from initial request”
- Subject: Oh no, your holiday request got denied.
- Body: You’re stuck at work this summer!
Run the Flow
Now it’s time to test our Flow and see if it works on the first attempt. Go to the Request Holiday list in the SharePoint site and create a new item.
First Request Data
- Title: Hawaii
- Start Date: 7/8/2019
- End Date: 7/12/2019
- Type of Absence: PTO
Now, let’s create another subsequent request this time make it a Sick Leave so that we can see them in the Calendar.
Second Request Data
- Title: Hawaii
- Start Date: 7/15/2019
- End Date: 7/19/2019
- Type of Absence: Sick Leave
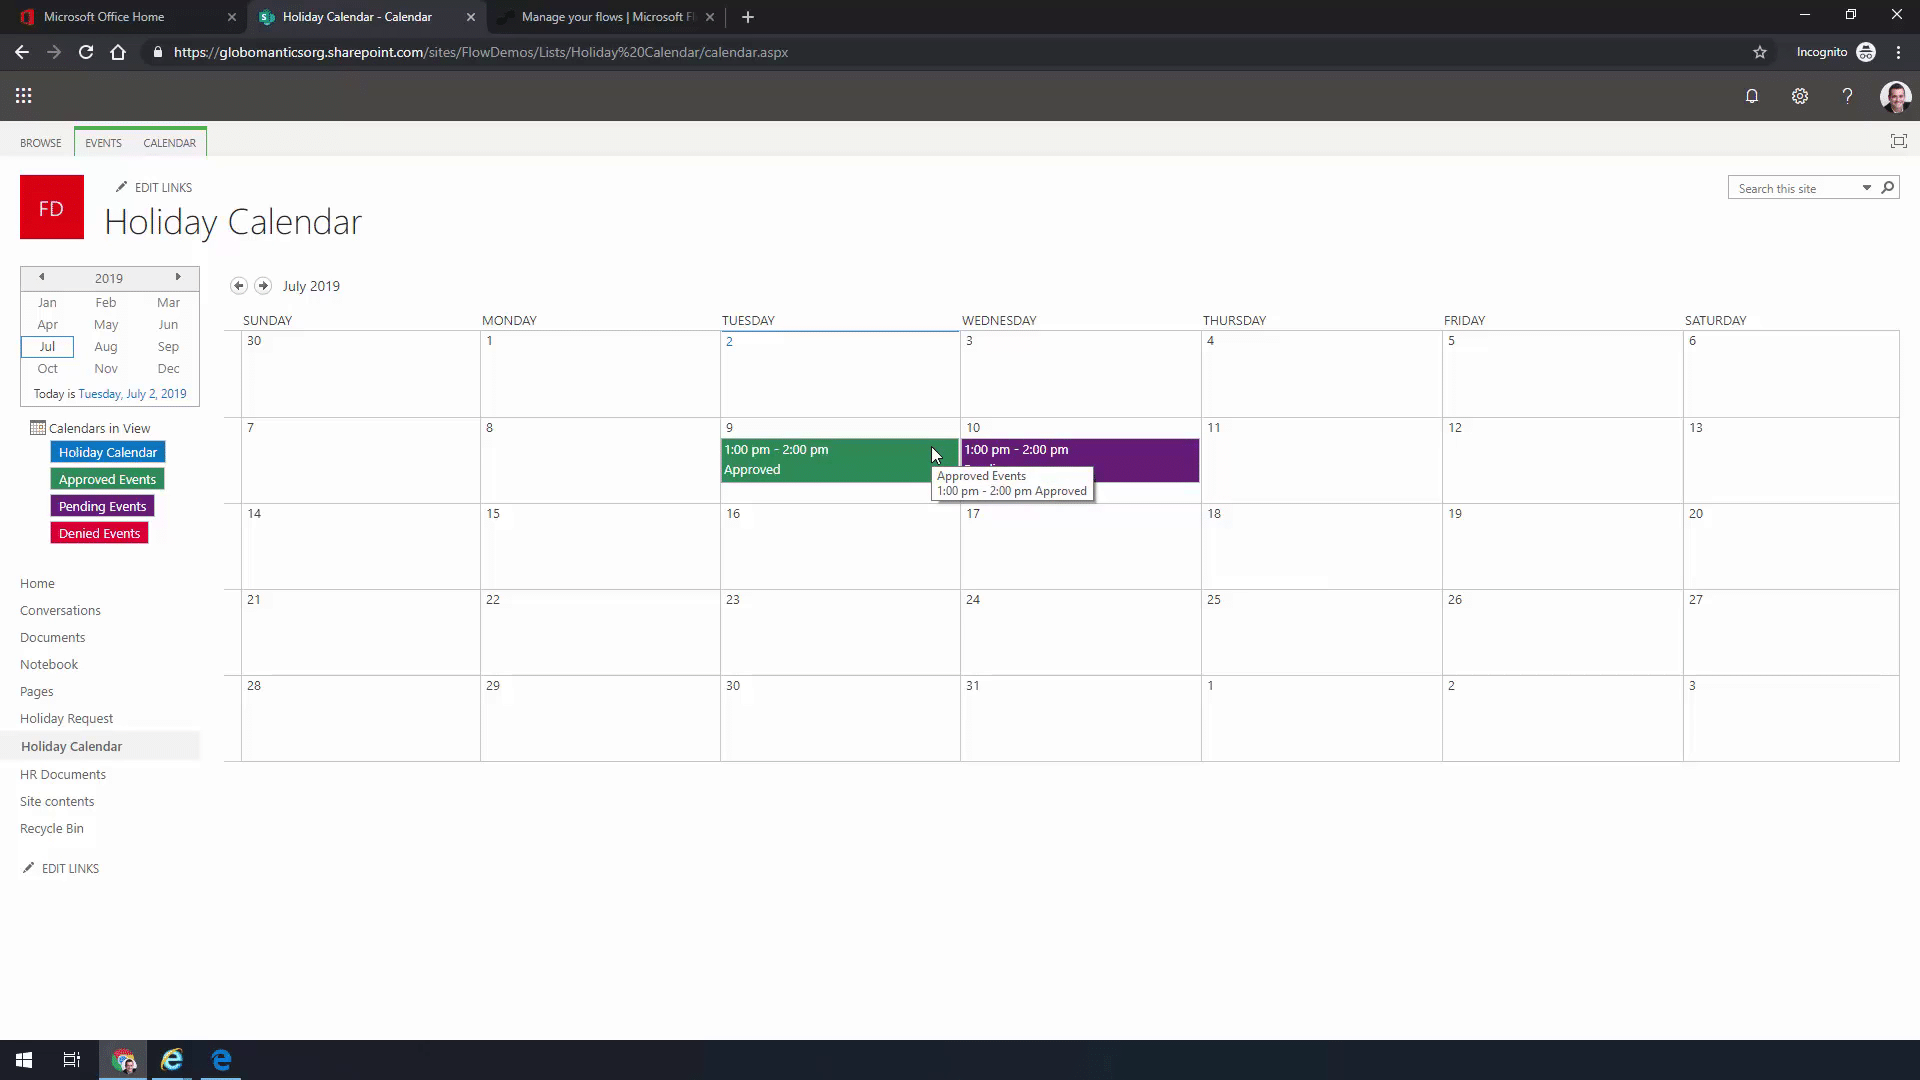
Give it a few seconds, and then let’s go to Holiday Calendar and see if the leaves appear in it. If all goes well, then you should see two new calendar entries for the selected dates.
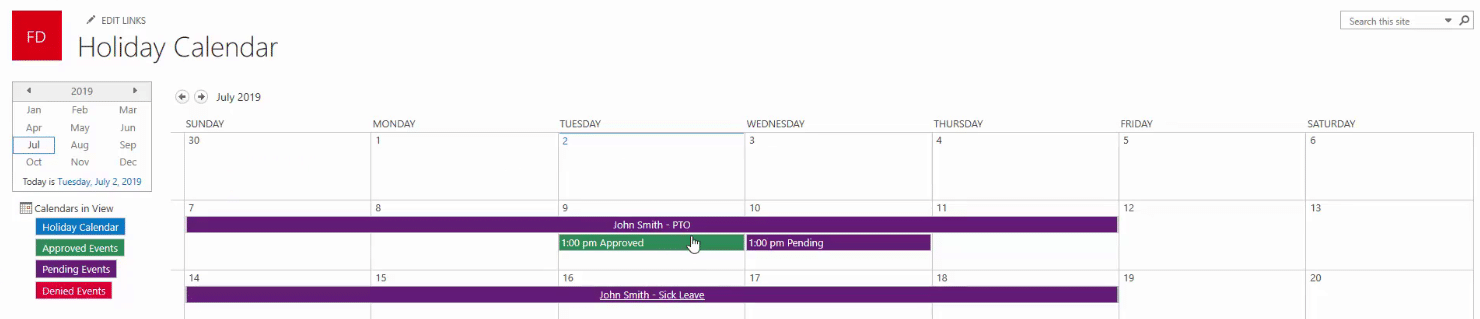
So far so good; unfortunately, you can’t fool the Manager this time, and so the Manager will approve the first leave request but reject the second leave request.
Go back to the Holiday Calendar in SharePoint and refresh the page. One of the leave should turn Green, whereas the other one will disappear.
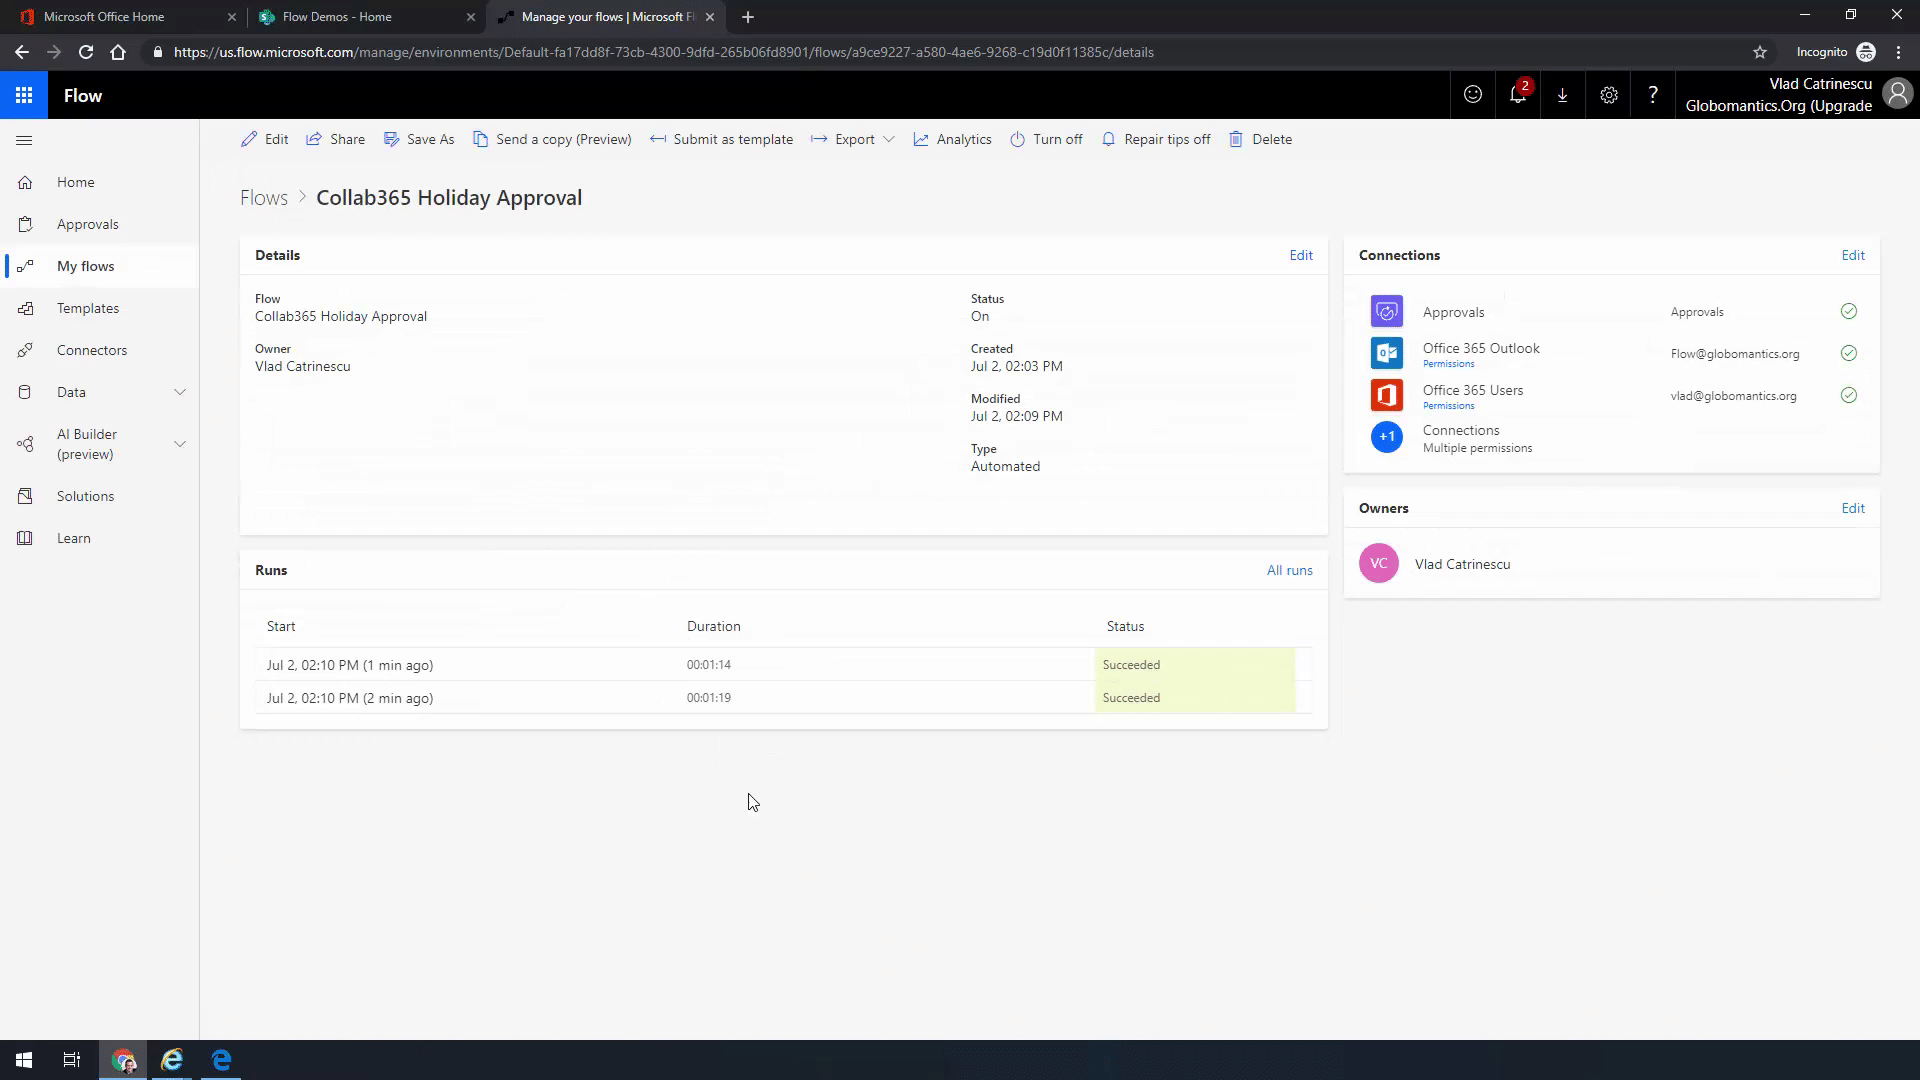
If you go back to Power Automate and open the Holiday Approval Flow, you will see both previous runs were successful.
Approval Workflow with Reminder
Imagine, as a manager, you get many requests for approval every day, and sometimes you forget to complete some of them. In this workflow, we will see how we can send a reminder to approvers about their pending approval tasks. We will use the same SharePoint site we used in our previous Flow, but we will use a different list. For this Flow, we will use the Documents document library.
SharePoint Trigger: When a file is created
We will start our Flow by adding a trigger, and we will use it when a new file is created from SharePoint in our “Documents” document library.
- Site Address: SharePoint site address
- Library Name: Documents
Office 365 Users Action: Get Manager (V2)
The next step is to get the Manager of the user who created the file by using the “Get Manager (V2)” action.
- User: Created By Email
Variables Action: Initialize Variable
Next, we will initialize a variable to store the value of the approval outcome, whether it’s approved or rejected.
- Name: Collab365Approved
- Type: Boolean
- Value: 0
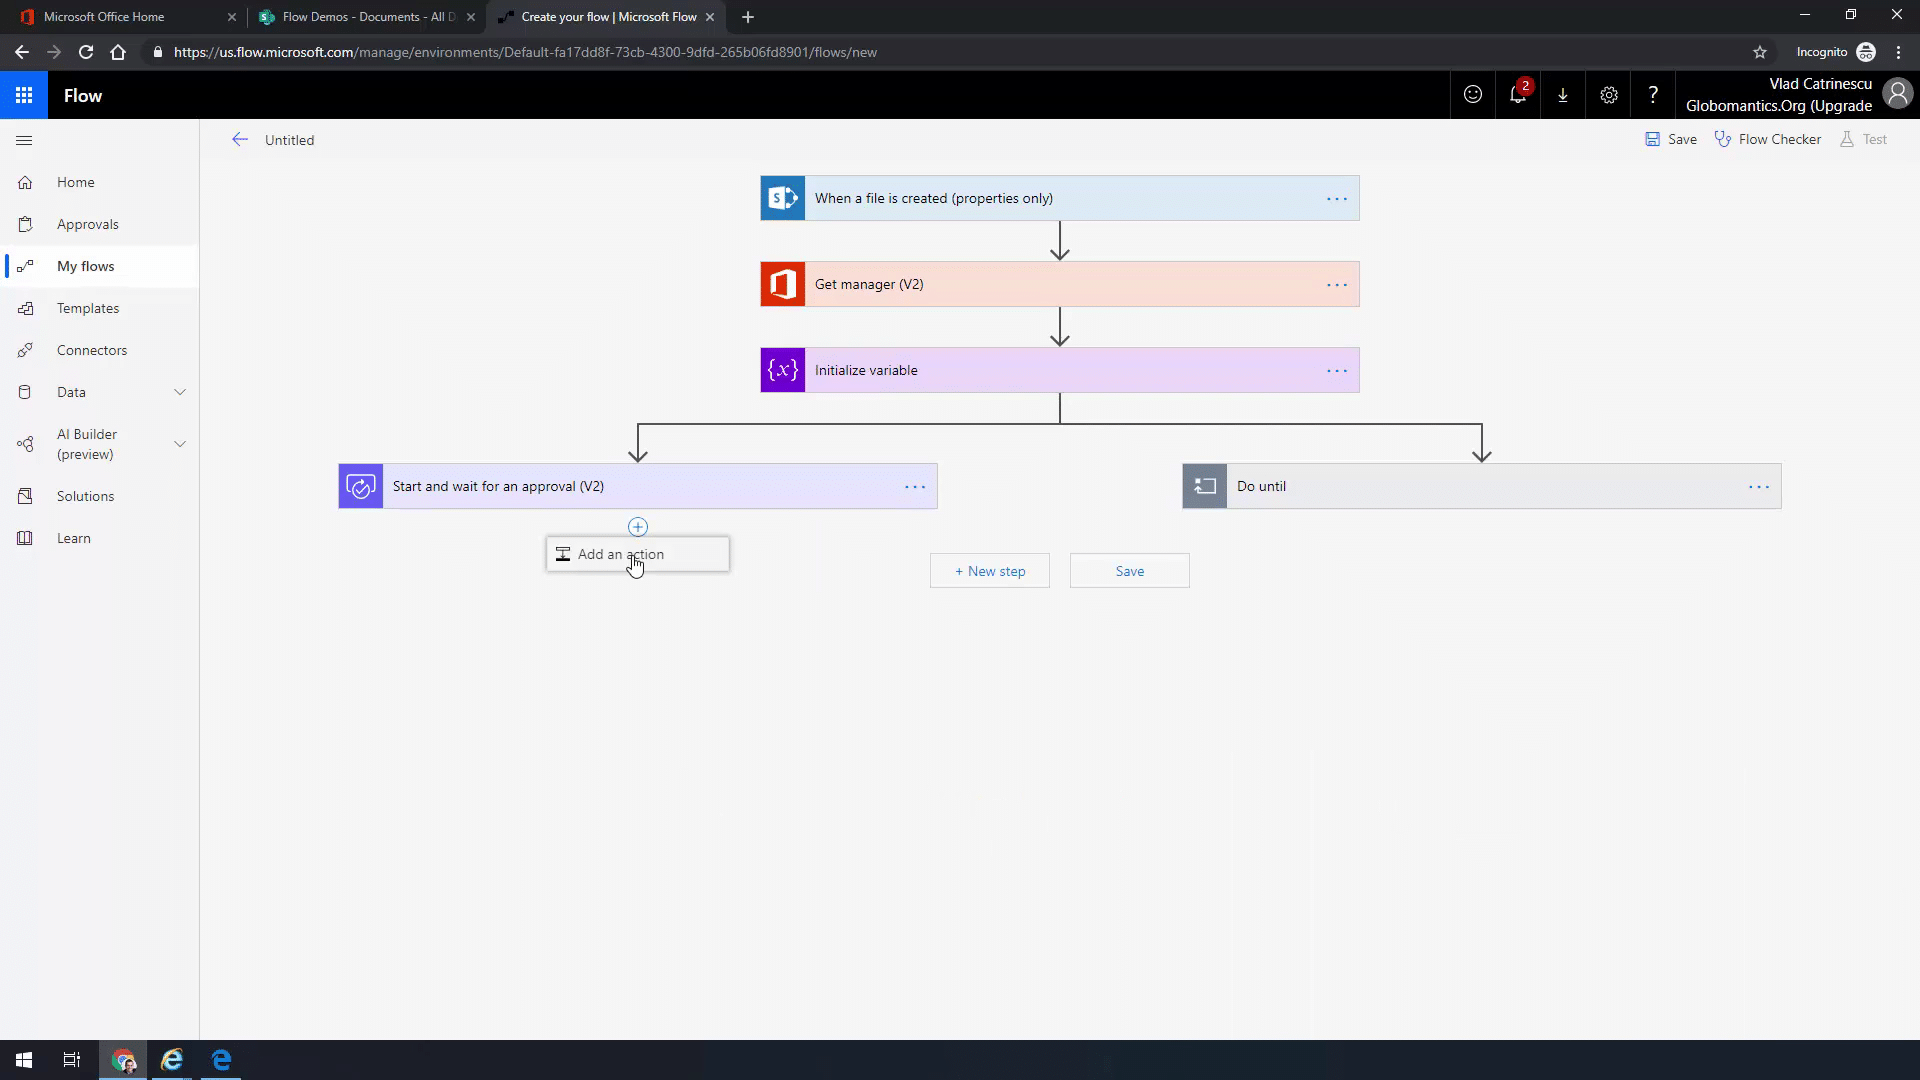
Parallel: Approval process and Email Reminder
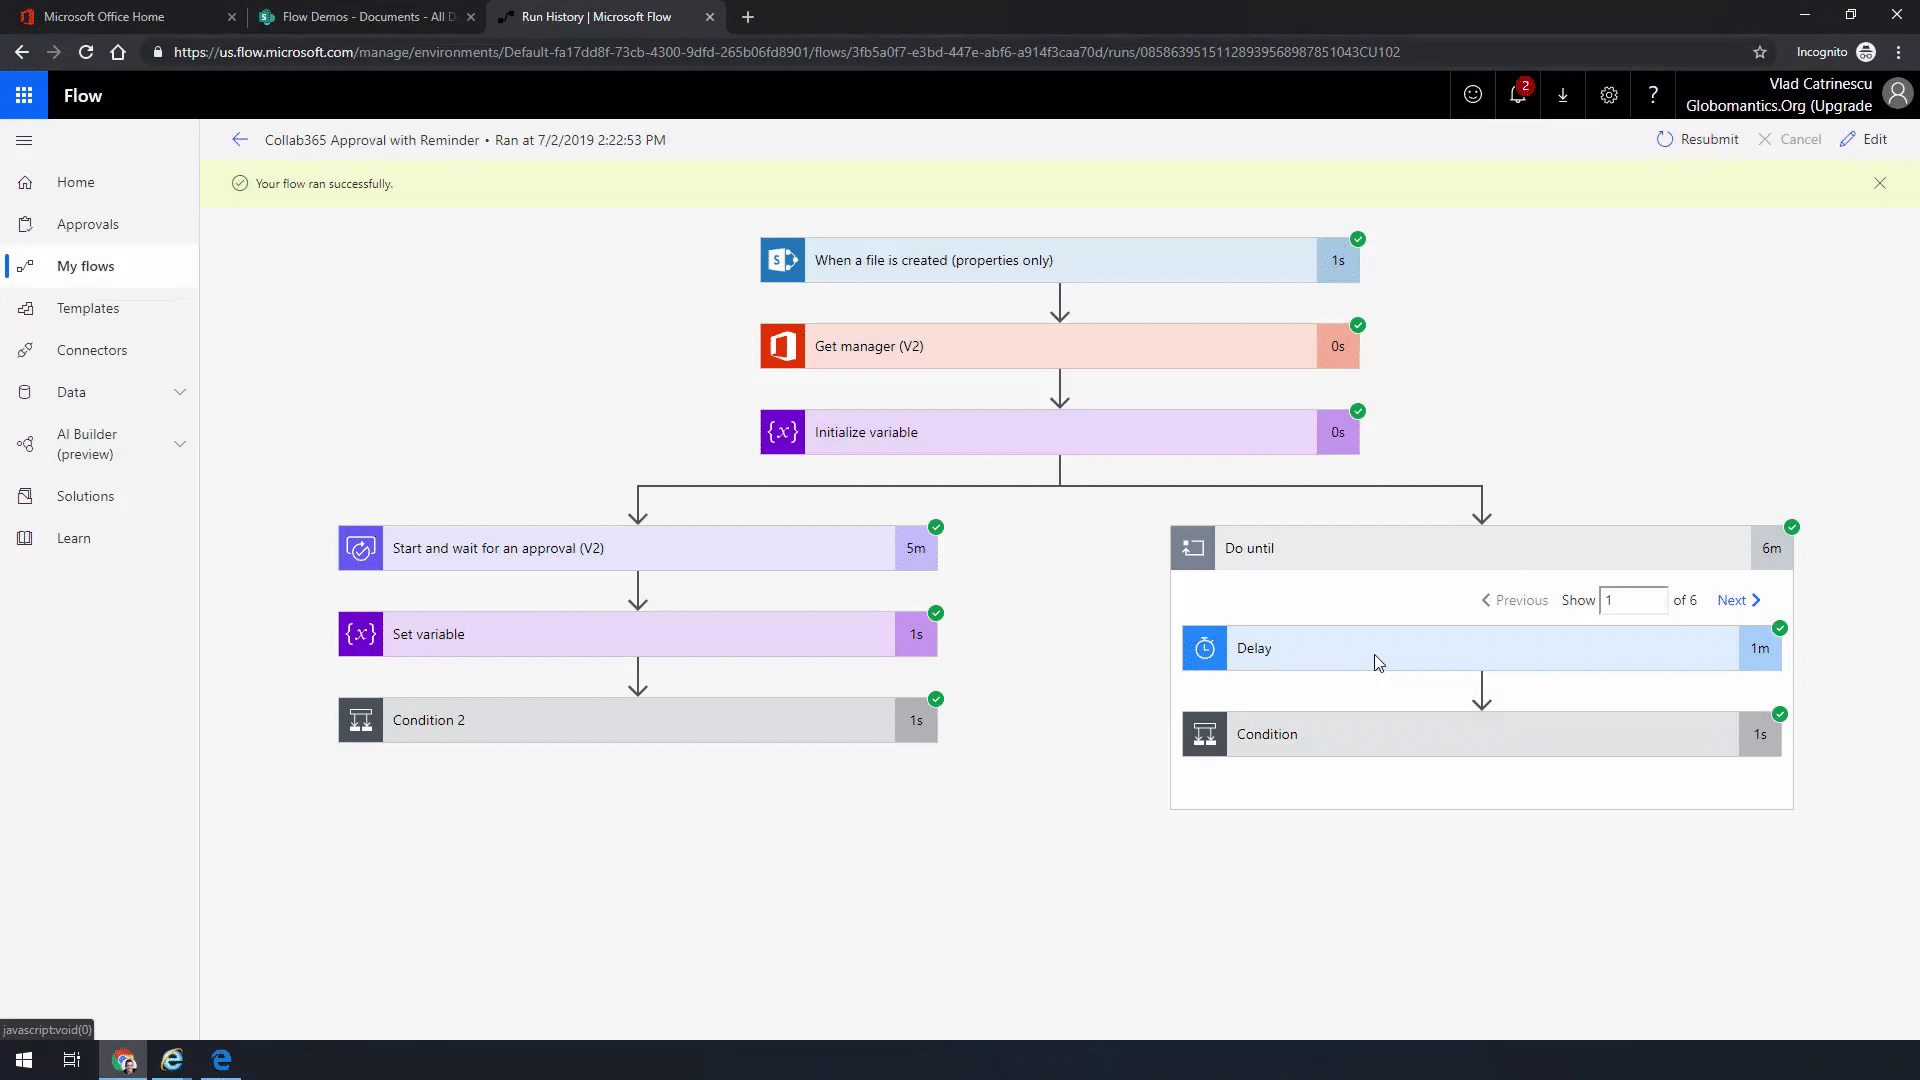
Now, it’s time to start the approval process and at the same time, check the status of approval and if not complete, then send an email reminder. We will add a Start and wait for an Approval (V2) action first and then right before that, click on the plus sign and add a parallel branch.
The Approval action will be in the left branch by default, and in the right branch, we will add a do until action. Your Flow should look like this,
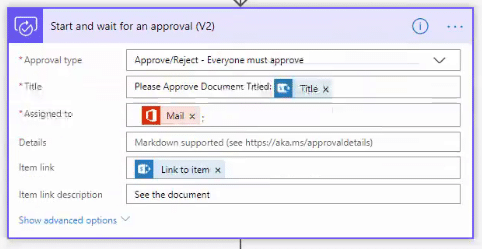
Approvals Action: Start and Wait for Approval (V2)
Now, let’s start by setting up the left branch first beginning with the approval action.
- Approval Type: Approve/Reject – Everyone must response
- Title: Please approve document Titled: [title] “from created file”
- Assigned To: [Mail] “from Get Manager”
- Item link: [Link to item] “from created file”
- Item link description: See the document
After the approval is done, we will set the variable Collab365Approved to “true”.
Variables Action: Set Variable
- Name: Collab365Approved
- Value: 1
- The left branch should look like this
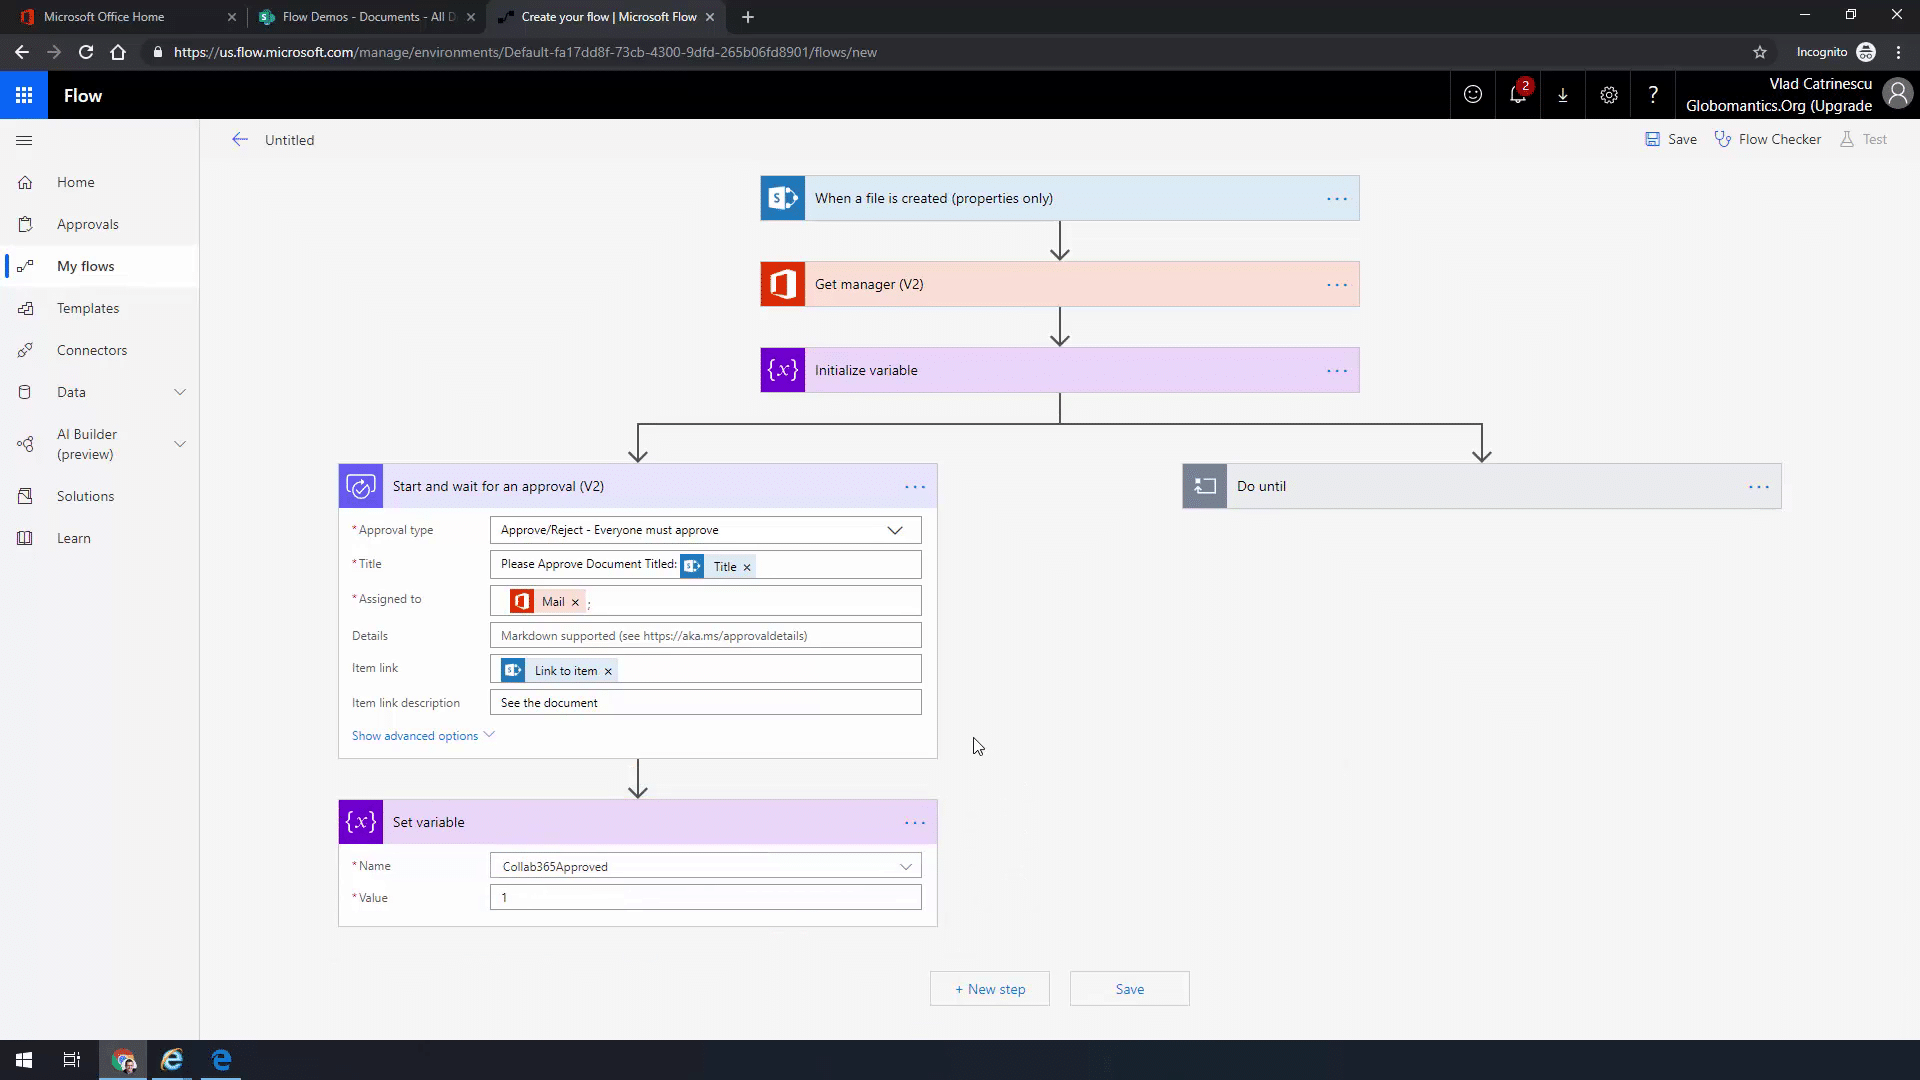
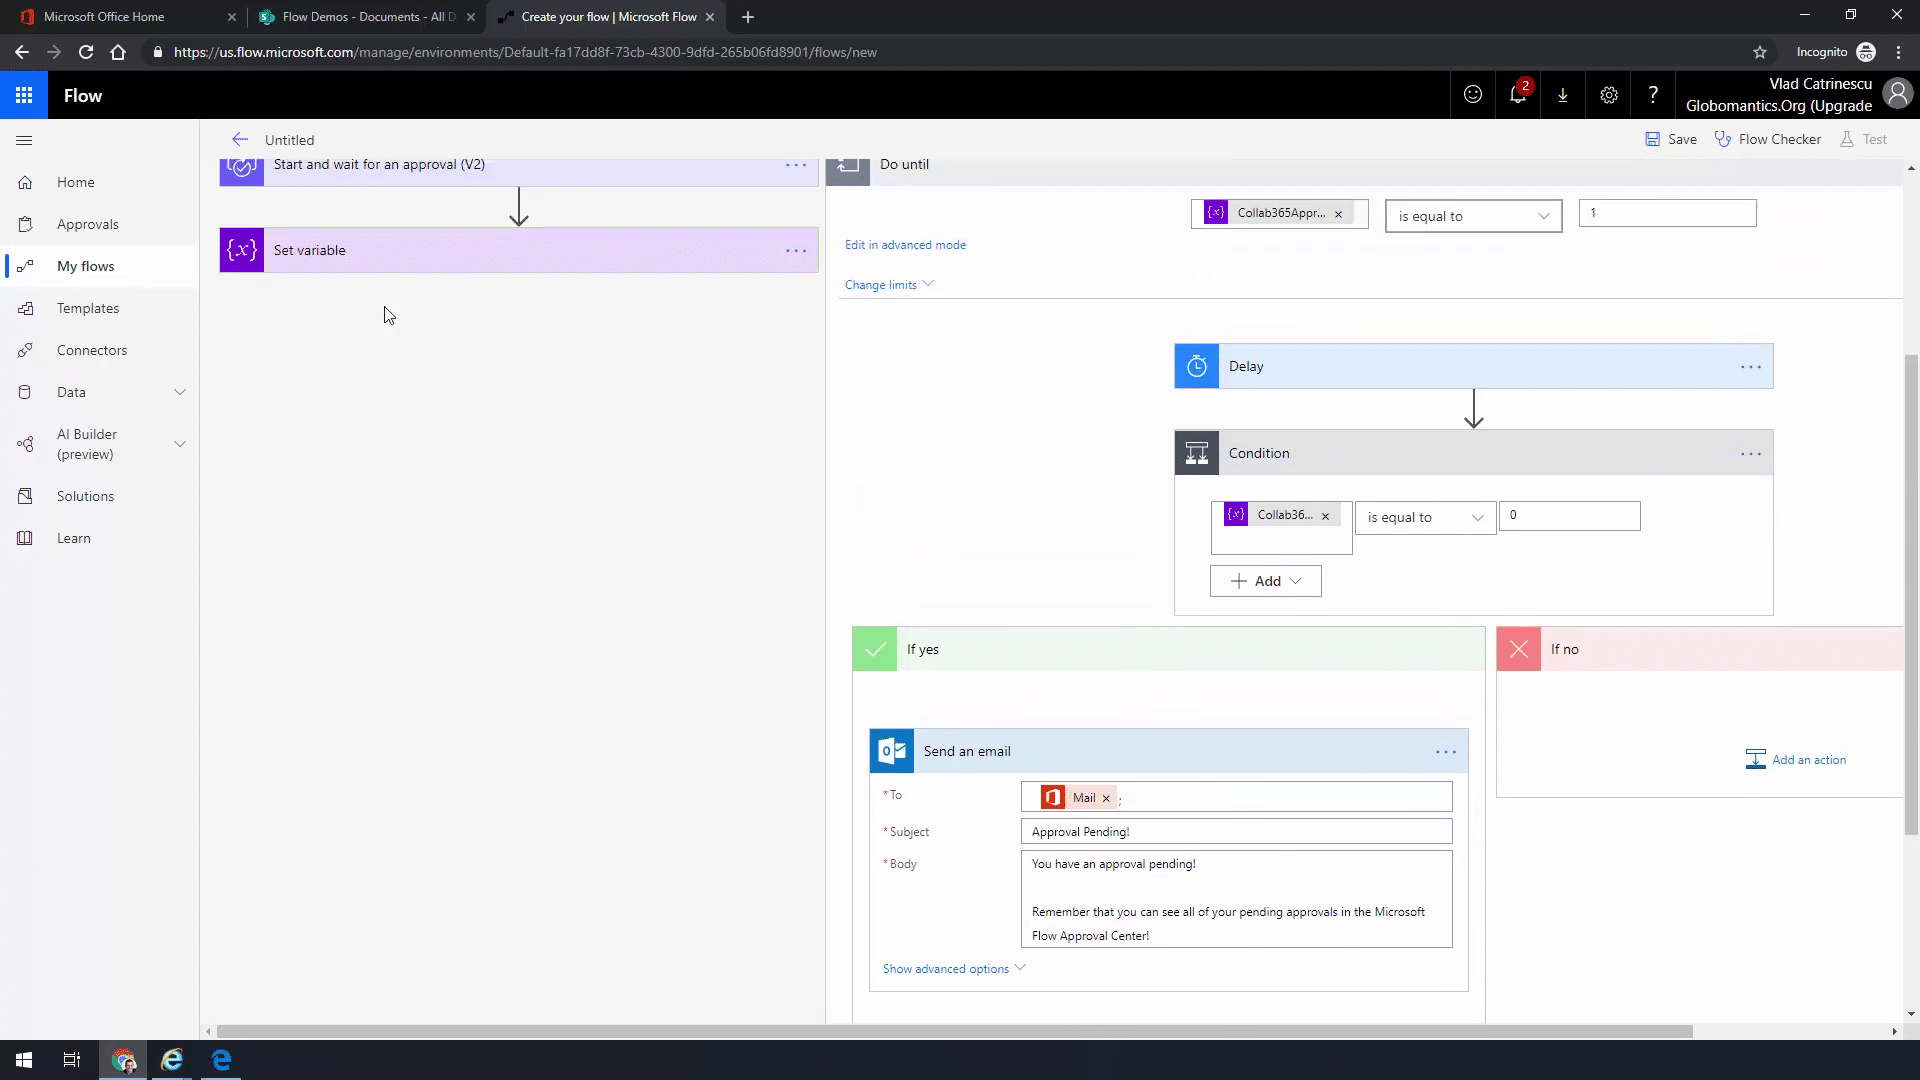
Control Action: Do Until
Now, in the do until action, we will check if the approval has been completed and send an email reminder if Approval is pending, i.e. Collab365Approved “is equal to” 1.
A quick recap of the flow
“So far, we started an approval process, and now we wait until the approval is completed by checking the value of this variable. Inside the body of do-until, we will define the actions to run while the approval is pending.”
Schedule Action: Delay
The next step is to set a delay to define the frequency of how often the do-until activity should be executed. For this Flow, we will set the delay to 1 minute, but this is highly not recommended for the production environment.
- Count: 1
- Unit: Minute
Note: For the production workflow, it should be at least 1 day.
Send a Reminder Email based on a condition
Now, it’s time to define what to do after the delay, and here we will use a condition action to check if the approval is still not completed by using the same variable.
Condition
Collab365Approved “is equal to” 0
If Yes
Send a Reminder if not Approved
So, if the approval action is still not complete, then we will send an email to the Manager for a reminder.
- To: Mail “from Get Manager (V2)”
- Subject: Approval Pending
- Body: You have approval pending! Please see all your pending approvals in the Flow approvals.
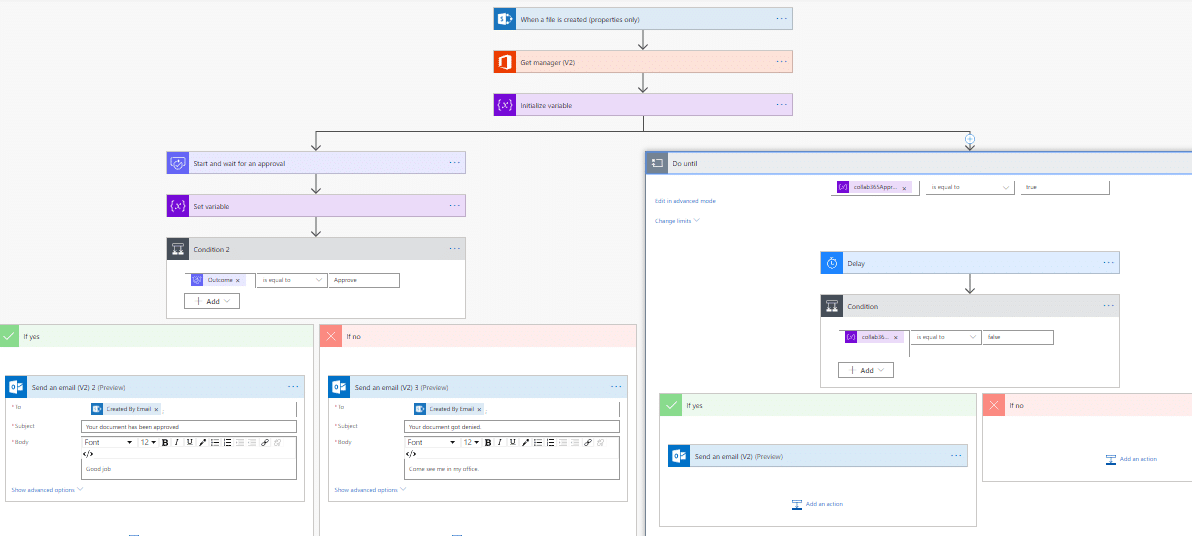
Send an Email to Creator
Similarly, we will also use a condition to check if the approval is completed by checking the outcome value.
Condition
- The outcome “is equal to” Approve
If Yes, then we will send an email to the file creator that the file has been approved.
- To: Created by Email
- Subject: Your document has been approved.
- Body: Good Job
If No, then we will send an email to the file creator that the file has been rejected.
- To: Created by Email
- Subject: Your document got denied.
- Body: Come see me in my office.
That’s all, and this is what the completed Flow should look like.
Run the Flow
Now, let’s run the Flow and see if it works. Go to the SharePoint library and upload a new file in the “Documents” library. Once done now go to your Flow and open the last run.
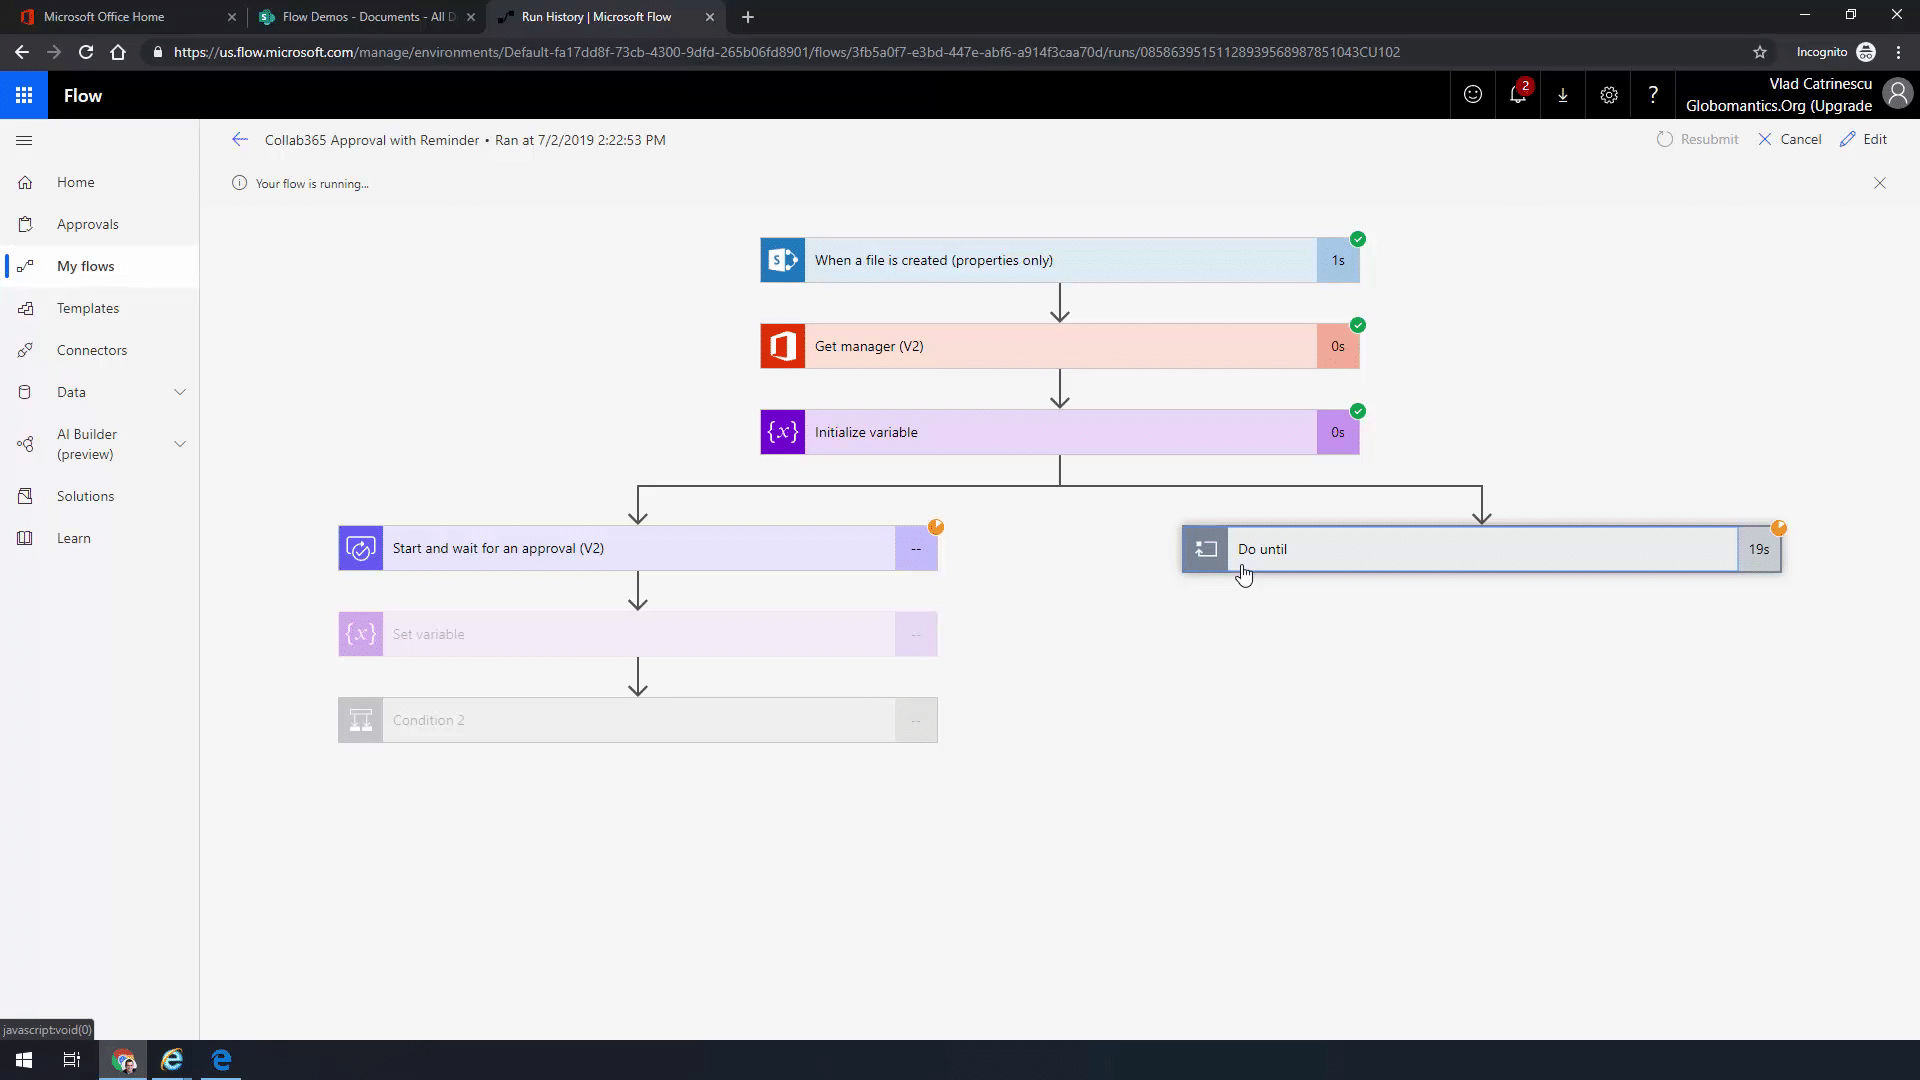
The workflow should be running and waiting for approval. Let’s wait for a few minutes and then go to the Manager mailbox and see if we have got any reminder emails. You should see a few reminder emails in the inbox.
Let’s go to the Approvals in the Flow and approve the task. Once the approval task is complete, the initiator will receive an email that the document is approved.
Wait for a few minutes, then refresh the Flow again and the entire Flow should be completed. This is a great example to show how we can send reminders to users for their pending tasks.
Incoming Email to SharePoint Online Workflow
Sending files in incoming emails directly to a document library is a feature that exists out of the box in SharePoint On-Premise, but we don’t have this functionality in SharePoint Online. However, thanks to MS Flow, we can achieve this functionality in SharePoint Online as well. So, let’s start creating a flow and first off define our trigger.
Office 365 Outlook Trigger: When a new email arrives in a shared mailbox
For this Flow, I will use a shared mailbox trigger called “When a new email arrives in the shared mailbox”. First off, you need to choose a shared mailbox on which you have rights.
- Mailbox Address: “HR Documents”
- Folder: Inbox
Note: Keep the “Has Attachment” setting to No, otherwise Flow will look for attachments in every email which can cause a decline in performance.
SharePoint Action: Create File
The next step is to create a file in the document library, and for that, we will add a Create File action to the Flow.
- Site Address: “Site where you want to store email”
- Folder Path: HR Documents
- Filename: Attachment Name “From trigger”
Note: Once you add that, you will see Flow will automatically put this action inside Apply to each. That’s because Power Automate predicts that there might be more than one attachment since multiple attachments are allowed.
- File Content: Attachment Content
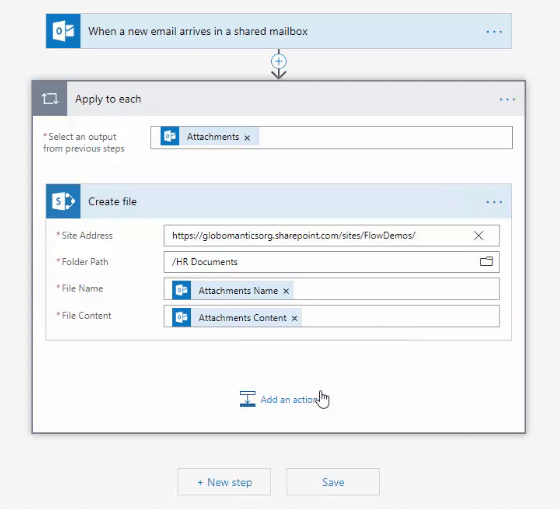
We are going to keep it very simple. However, you can use different settings and even set metadata for the file, but for this demo, this is all that we are going to configure.
Run the Flow
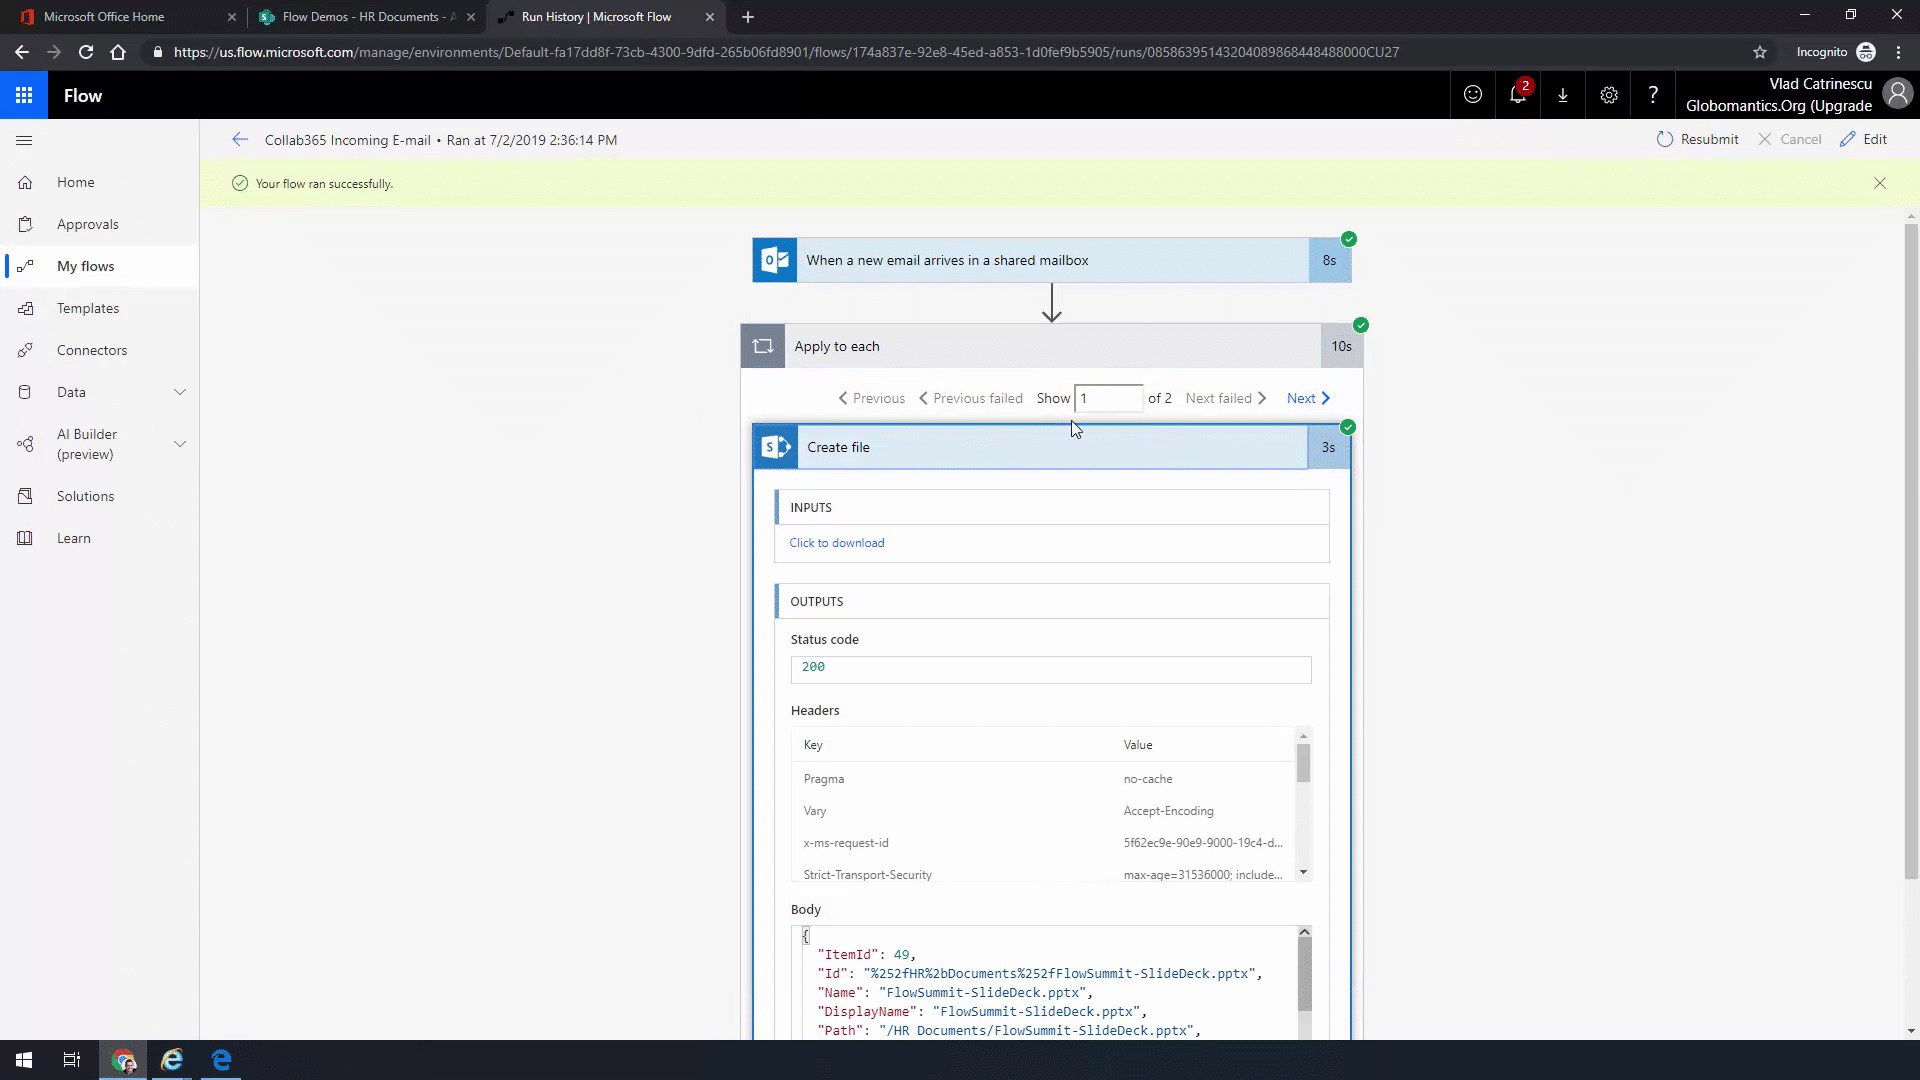
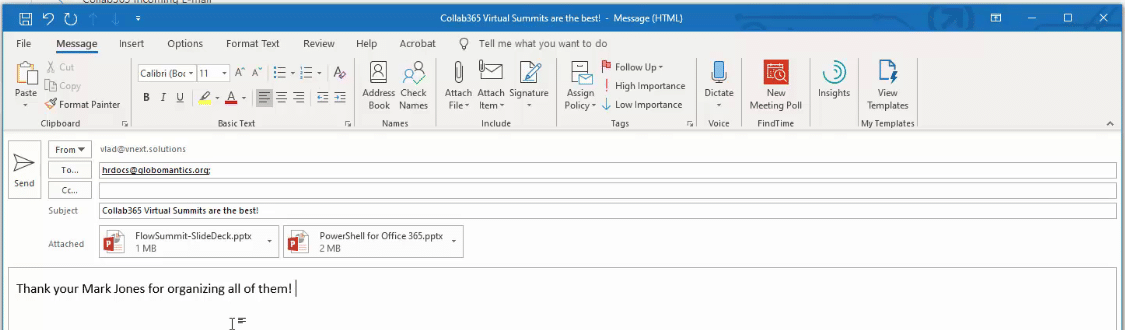
To trigger our flow let’s create a new email and send it to the shared mailbox which you have selected in the trigger. Let’s attach a couple of files to it as well to make sure apply to each work as expected.
Now, let’s go back to our Flow, and it usually takes a few minutes for the Flow to run depending on how soon the Mail gets delivered and which Flow plan you have subscribed to. Once the Flow runs successfully, you can see by expending the Apply to each that it created two files since we have two attachment in the SharePoint Library.