
The Exercise:
So now that we have designed and published ‘Request Form’ and an ‘Employee Vacation Request’ forms in Part 1, we will start a Workflow and make good use of the ‘Start Approval Process’ task in Part 2. We will add additional available fields to the Task Form using a Form Load rule in Part 2.
The required tools are:
- InfoPath 2010 or 2013 Designer
- SharePoint 2010 or 2013 Enterprise environment
- SharePoint 2010 or 2013 Designer
We will design a Workflow to assign Approval Task Process to be associated with our pervious Vacation Request library and customise the task form:
TIP: Find your next Infopath Forms Replacement over in our Collab365.Directory.
Steps:
Open SharePoint Designer (SPD) and connect to the site contain the targeted document library > then open workflow menu form the side navigation window.

From the ribbon menu Click on List workflow and pick the Vacation Form library need to associate the workflow on it. Write the workflow name and put the description. The workflow editor window will now open as shown below;

From the ribbon menu add an action > inside task action sector chose ‘Start Approval process’.

We will see a new action added as a line on the workflow editor.

We’re going to set task process participants users, by clicking on “these users” link and pick the users from SharePoint groups or single users.

In the first field add the participants IDs and there is an option to send the task to the users. In parallel or one at time (sequential) and here is the screenshot for sequential approval task.

So the task will be assigned to Hierarchy Managers group > if approved > Approvers group. No need to add any title or instructions but you need to set the task duration time and due process date if required. Finally we need to trigger this workflow when an item added to the document library. So, we have to Click on Workflow settings form the ribbon menu. Under the Start Options tick the check box for ‘Start workflow automatically when item created’ as shown in the below screenshot.

Save and publish the workflow from the ribbon menu. You will notice that after publishing a new Task, an InfoPath form will be added under the Forms section.
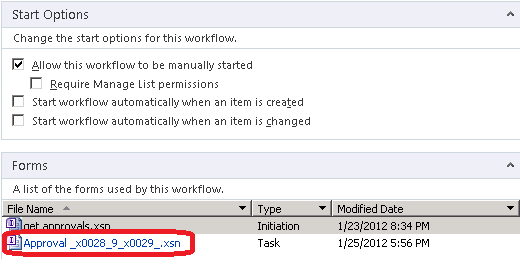
This form will be opened by approvers to approve the vacation request or reject it. We can open it by Clicking on it from the same window above.

It has only the requester Name and little information related to the task. You need to get the request data (Vacation Start Date, Vacation End Date and Justification). How fetching Request Data to Form Task? Here’s how you do it.
Steps:
Now add a new connection > Data Menu >> Data Connection. Choose receive data option.

Choose SharePoint Library or List.
Put the SharePoint site that has the Vacation Request form library.

Select the Vacation Request library.

The following window shows us the available fields on the selected library.

Note: highlighted fields are shown here because the previous step when initiating the Vacation Form we expose these fields. We will select all of them plus the title field.
Keep the above ‘Store a copy of the data in the form template’ option unchecked as shown below.

On the next screenshot leave or uncheck ‘Automatically retrieve data…‘ option then click on finish. Important If checks this option it will bring all the requests and maybe affect the site performance!!!

We have the connection but now we need to get only the current task related request data. As shown earlier we want the request number as a unique value so we will use it later. How to do that?
On the Task Form Load – Add rule to set vacation request connections to bring only the item which has the same tile of the task related. Add new rule to Run these actions: Set a field’s value of the new created connection query title field to be the current task related task discretion. Click the field to be set and Click on ‘Show advanced view’.

Select the vacation request connection > query fields select the title which we will use for the query.

Set the value to be equal the following formula concat(@Description, “.xml”).

Add the second action for query using connection.

The final form load rule’s actions will be like below:

Explore the fields and add them to the task form as extra details or table

Now publish the form. Submit new vacation request the check the document library for the new item.

You will notify that, there is a new column added named as workflow name ‘Vacation Request’. Let’s Click on the ‘In Progress’ link and check the task assigned.

Now we will open the Task form to check the request as an approver.

Conclusion
Thanks, it. Now you have the ’Vacation request details’ as part of the Approvers task form rather than having it separate. In theory this can be done on a SharePoint Server 2013 Enterprise site if you decide to use InfoPath Form.
