
This Post explains three different use cases where Power Automate has been used to remove manual workloads and instead used automation to achieve the same goal. By following the same principles, or finding others relevant to yourself, you will be able to find something in your day-to-day life that you could automate to give you back the most precious of commodities. Time.
When I presented at Ignite the Tour in London in January 2020, I asked a question to the audience.
- How many people use Power Automate to automate business processes, e.g. document approvals?
Unsurprisingly most hands went up - How many people use Power Automate to integrate two different systems i.e. take outputs from one system and then feed it to another?
A large number of hands went up this time, but less than the first time. - How many people use Power Automate to take care of their personal tasks?
Very few hands went up at this point.
What this said to me is that Power Automate is only really seen to be a tool used for business-driven processes. When you consider that Power Automate is a user-facing application, then it makes sense that it can and should also be used for things that you do on a day to day basis that you could automate. Why would you do this? So that you can free up your time to do something else. That could be do something more productive, or more importantly help you to find more of that important work/life balance.
In this post I will recap some of the key flows I have created that save me time, and explain to you the time saving that it has actually given me.
I will also reissue the challenge to you, that after reading this, I challenge you to find something in your day-to-day life that you could automate to give you back the most precious of commodities. Time.
Introducing Power Automate
Before we dive into the detail of the three examples that of how I save time, let’s just recap what Power Automate is.
First things first, the age-old confusion of Power Automate vs. Flow. The product was originally known as Microsoft Flow, however as the capabilities of the platform expanded into Dynamics Business Processes and then UI Flows, the umbrella name of Power Automate was introduced. When we create our workflows in Power Automate, they are referred to as flows. So don’t worry too much if you drop the “F” bomb (flow), it’s absolutely fine!
Power Automate is the cloud-based workflow service provided by Microsoft as part of the Microsoft 365 suite. It is 100% cloud-based, which means that there is no server installable version available. This doesn’t mean, however, that we can’t access our on-premises services, because we can use a data gateway to allow Power Automate in the cloud to talk to SQL, SharePoint or any other services which available on our own infrastructure.
When developing, we create our flows directly within the browser, which means that we don’t need any additional software to be able to create our automations. In the past, we would have used SharePoint Designer to create workflows within SharePoint.
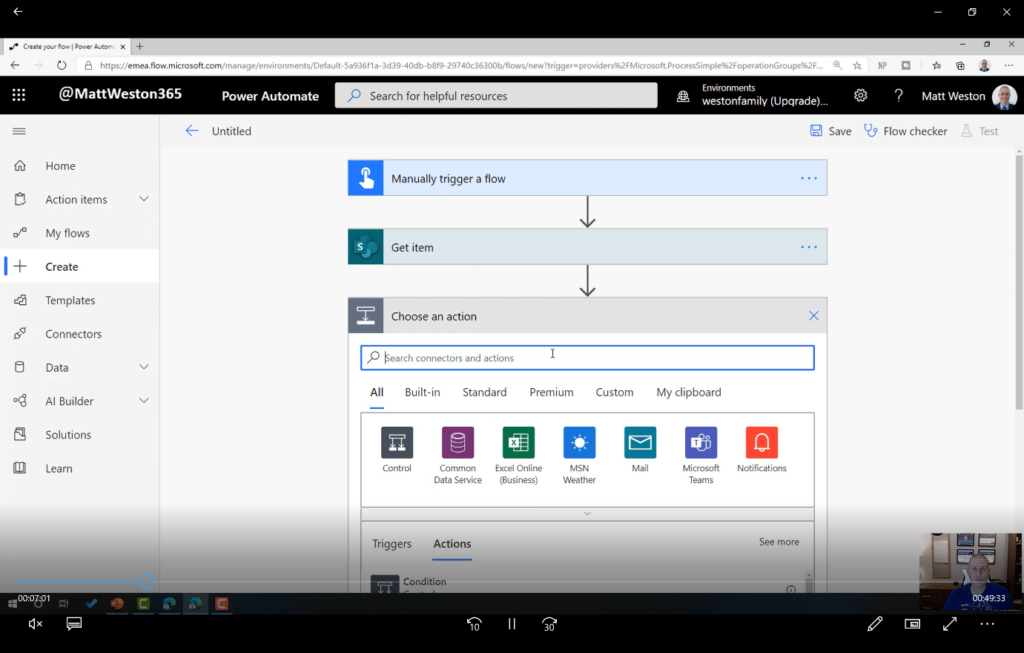
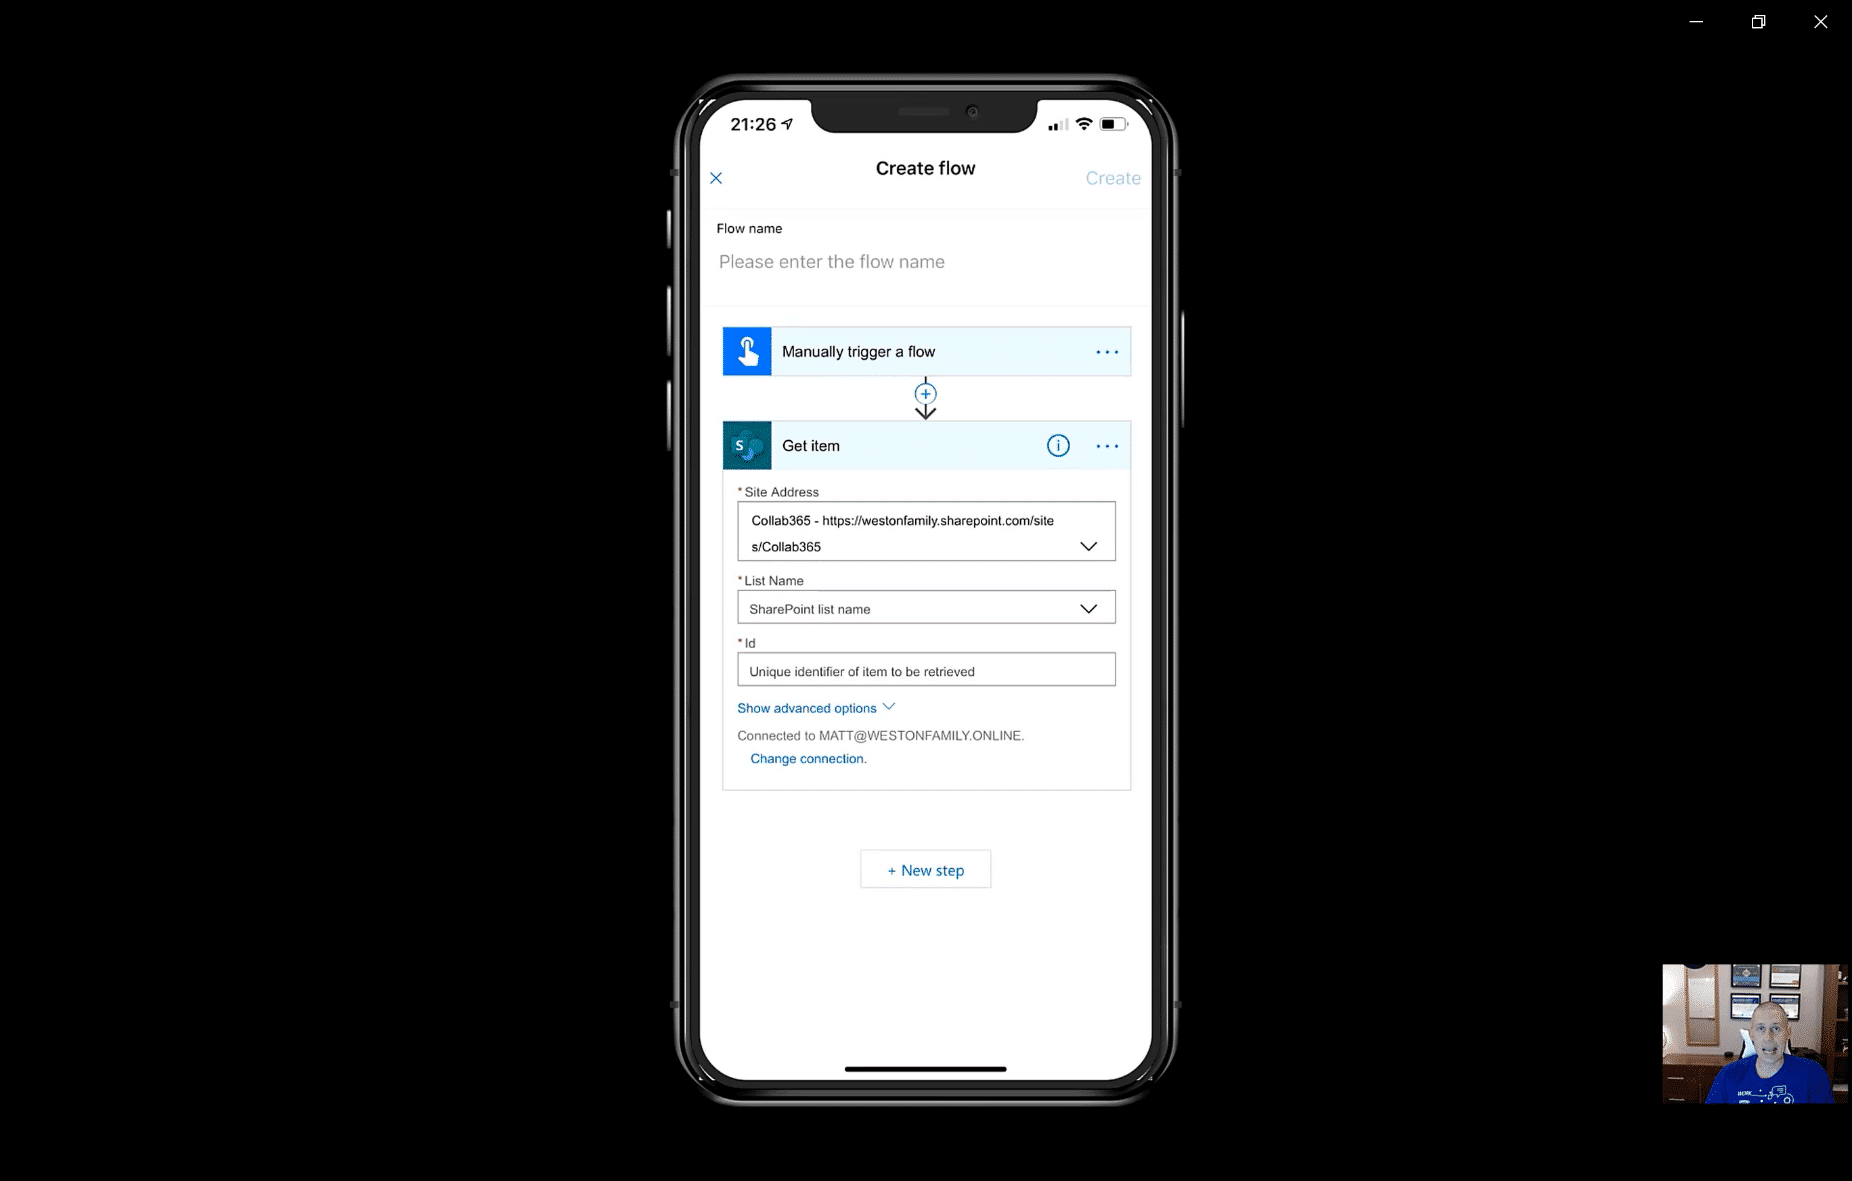
As well as being able to create flows within the browser, we can also create and manage our flows using the Power Automate mobile app, which means that you can create powerful workflows, no matter where you are, or what type of device you’re using.
Now that we’ve had a quick look at Power Automate, let’s look at how I’m using it, and I’m going to talk about three different scenarios:
- Email filing
- Document creation
- Social media management
Let’s look at the first scenario.
Scenario 1: Email Filing
In this scenario I’m going to look at how I use Power Automate to automatically clean up my inbox for me. I need this to be as easy as possible to create new mappings, and to be as flexible as possible. I also don’t want to use Outlook rules, as that takes me a long time to set up mappings for every possible mapping coming in. However, what I want is that when my emails have been read, that they automatically get filed away into the correct folder, so that by the end of the day my inbox is clear.
What do I need for this solution?
In order to create this solution, I am using the following:
- Microsoft Power Automate
- OneDrive for Business
- Microsoft Excel
What are we going to do?
The way this process works is that I have a flow that will run every hour to process my emails. When it runs, it will filter my emails to only find the ones which have been read, and then extract the email address so that it can be used to look for a mapping.
The mapping will be stored within Excel, in a very simple table which is really simple for me to update. I have stored this Excel spreadsheet in OneDrive for Business, as this document doesn’t need to be shared with anyone else. It also means that anyone else within the organisation can create their own copy of this flow, with their own mapping file which is isolated away from mine.
If a mapping is found within the Excel spreadsheet, then it will move the email to the relevant folder within Outlook.
How do we do it?
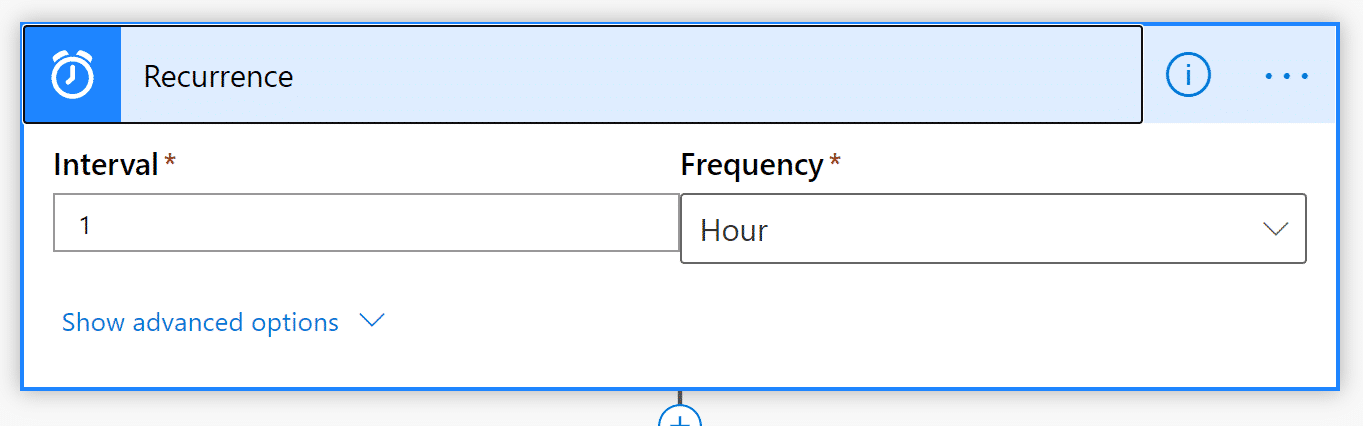
The flow itself is designed to run once per hour using a recurrence trigger. This is configured to run every 60 minutes, however if you choose to, this could run just during the night.
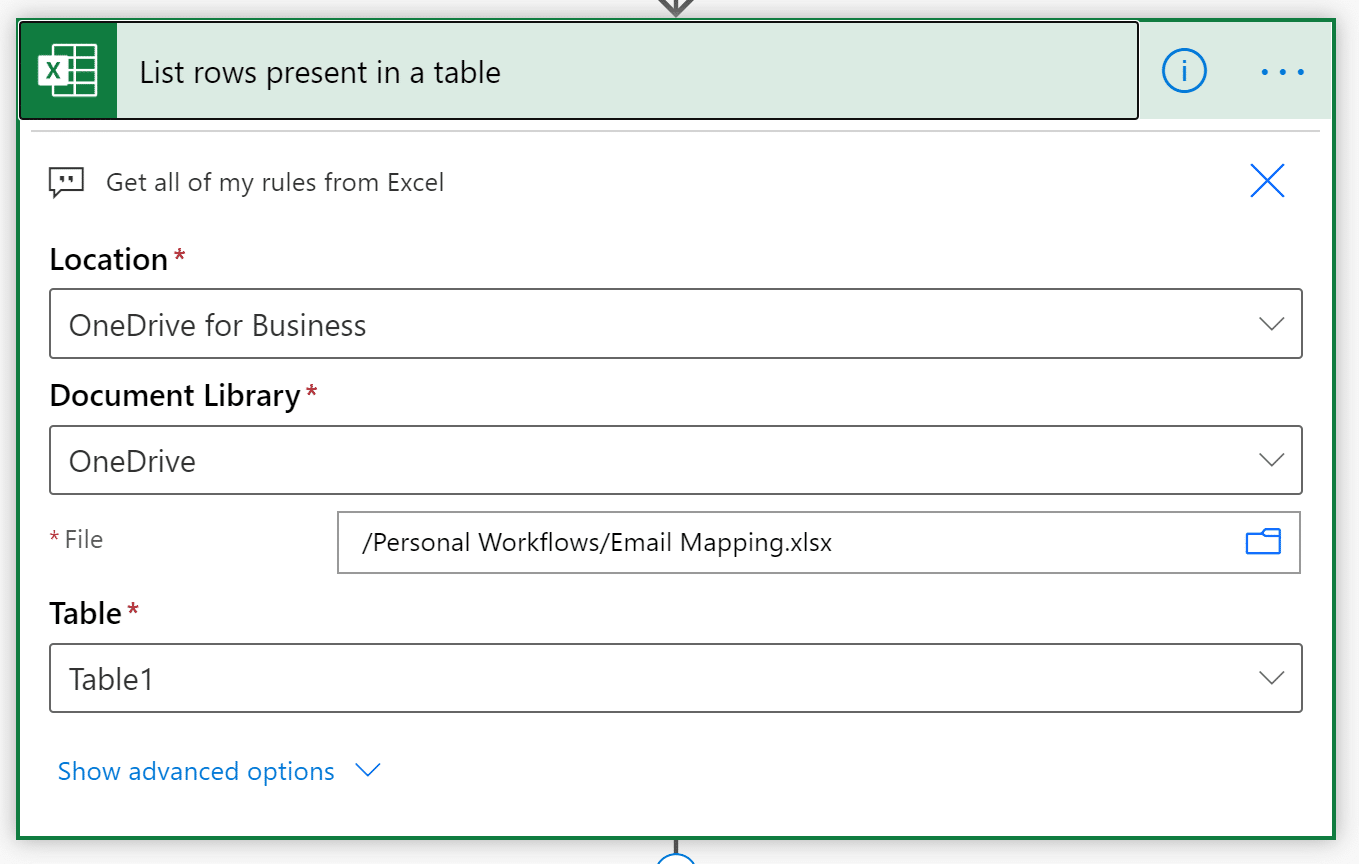
When we run the flow, we just need to grab all of the rows from the Excel spreadsheet that is going to get our mappings. When we use the “List rows present in a table” action from the Excel connector, we just need to provide it a location, select the file and then select the table within the Excel spreadsheet.
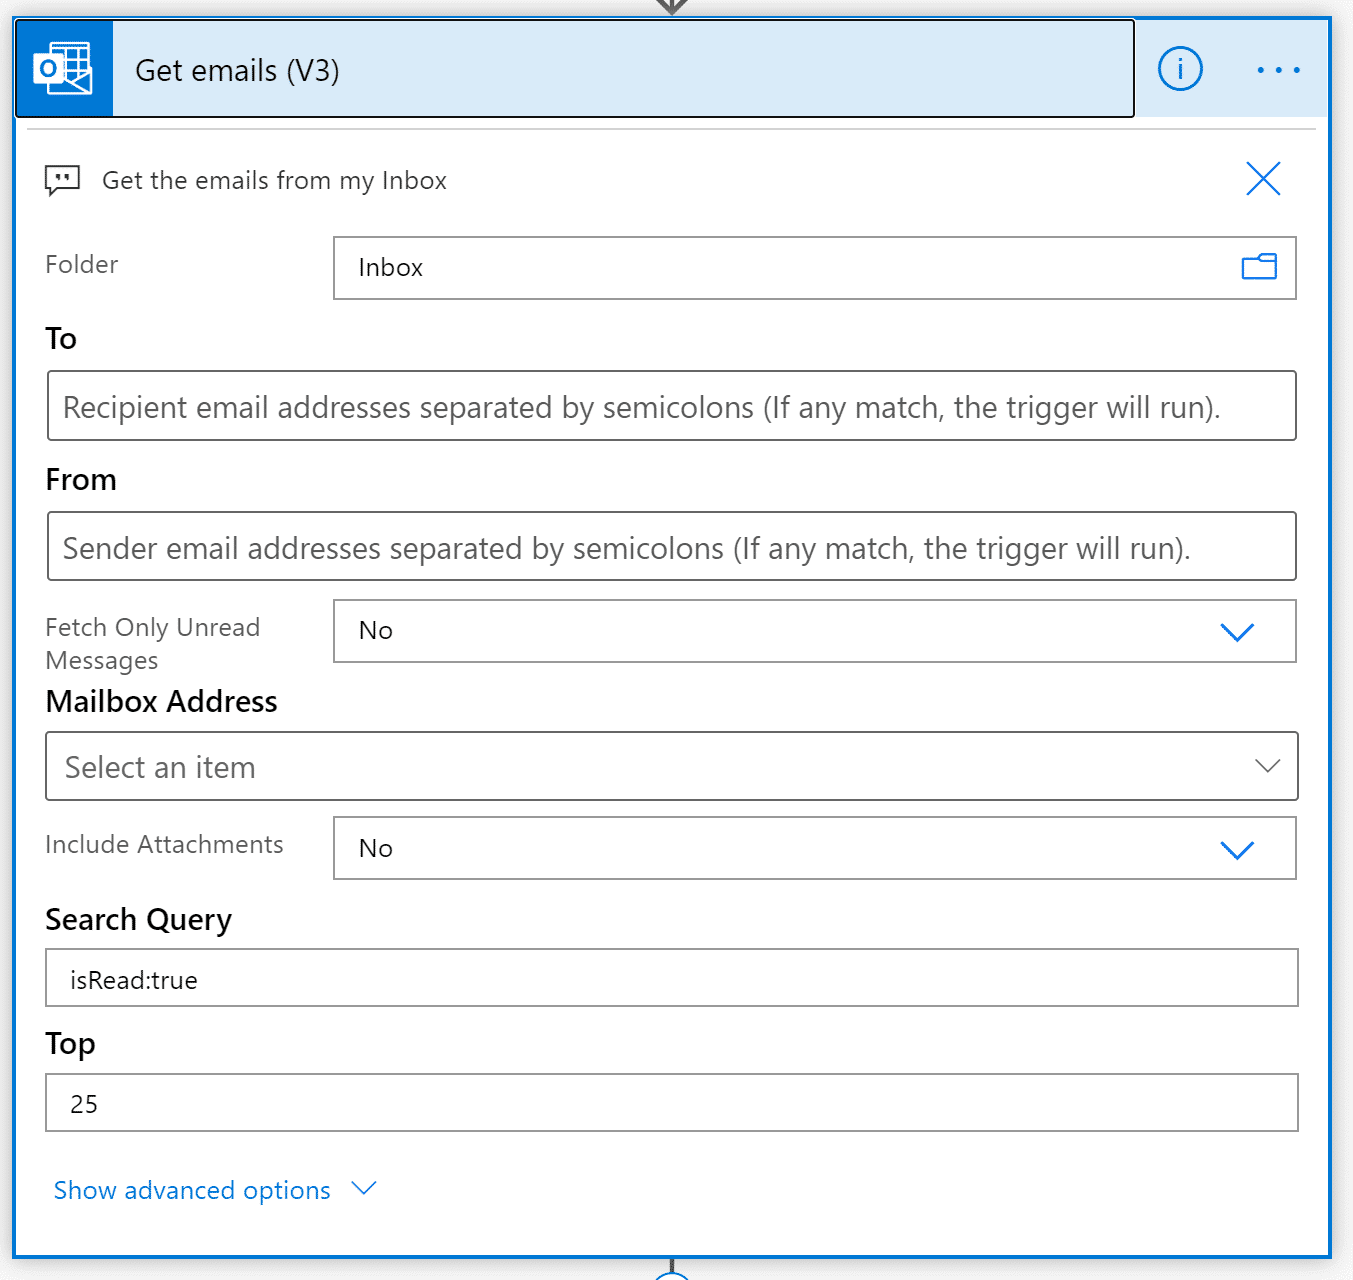
Next, we just need to get the emails from our inbox, however we don’t want to get everything. We can configure the Get emails action to retrieve the emails from Outlook. Notice that with this action we have (V3) in the action name, this means that this is the third version of this particular action, with a number of advancements in each release.
The key parameters that we need to configure here are related to the types of email that we retrieve:
- Fetch Only Unread Messages – This should be set to No, so that we return all emails from the inbox regardless of whether they are read or not. If this was set to yes, it would only return unread messages, which are not what we need to file.
- Search Query – This allows us to specify the search query that we could use within Outlook to return the emails that we want to process. Notice that I am using “isRead:true” which will only return emails that have been read. Try putting this into the search bar in Outlook and you can see this in action.
- Top – This defines how many of the emails are going to be returned in a single batch. You’ll see in my screenshot that this is set to 25 which is the upper limit currently allowed by this connector. So effectively every hour I will process 25 emails.
Once I have my emails being returned from Exchange, then I can start to process each one by using an Apply to each loop. This will take the list of emails and loop through them.
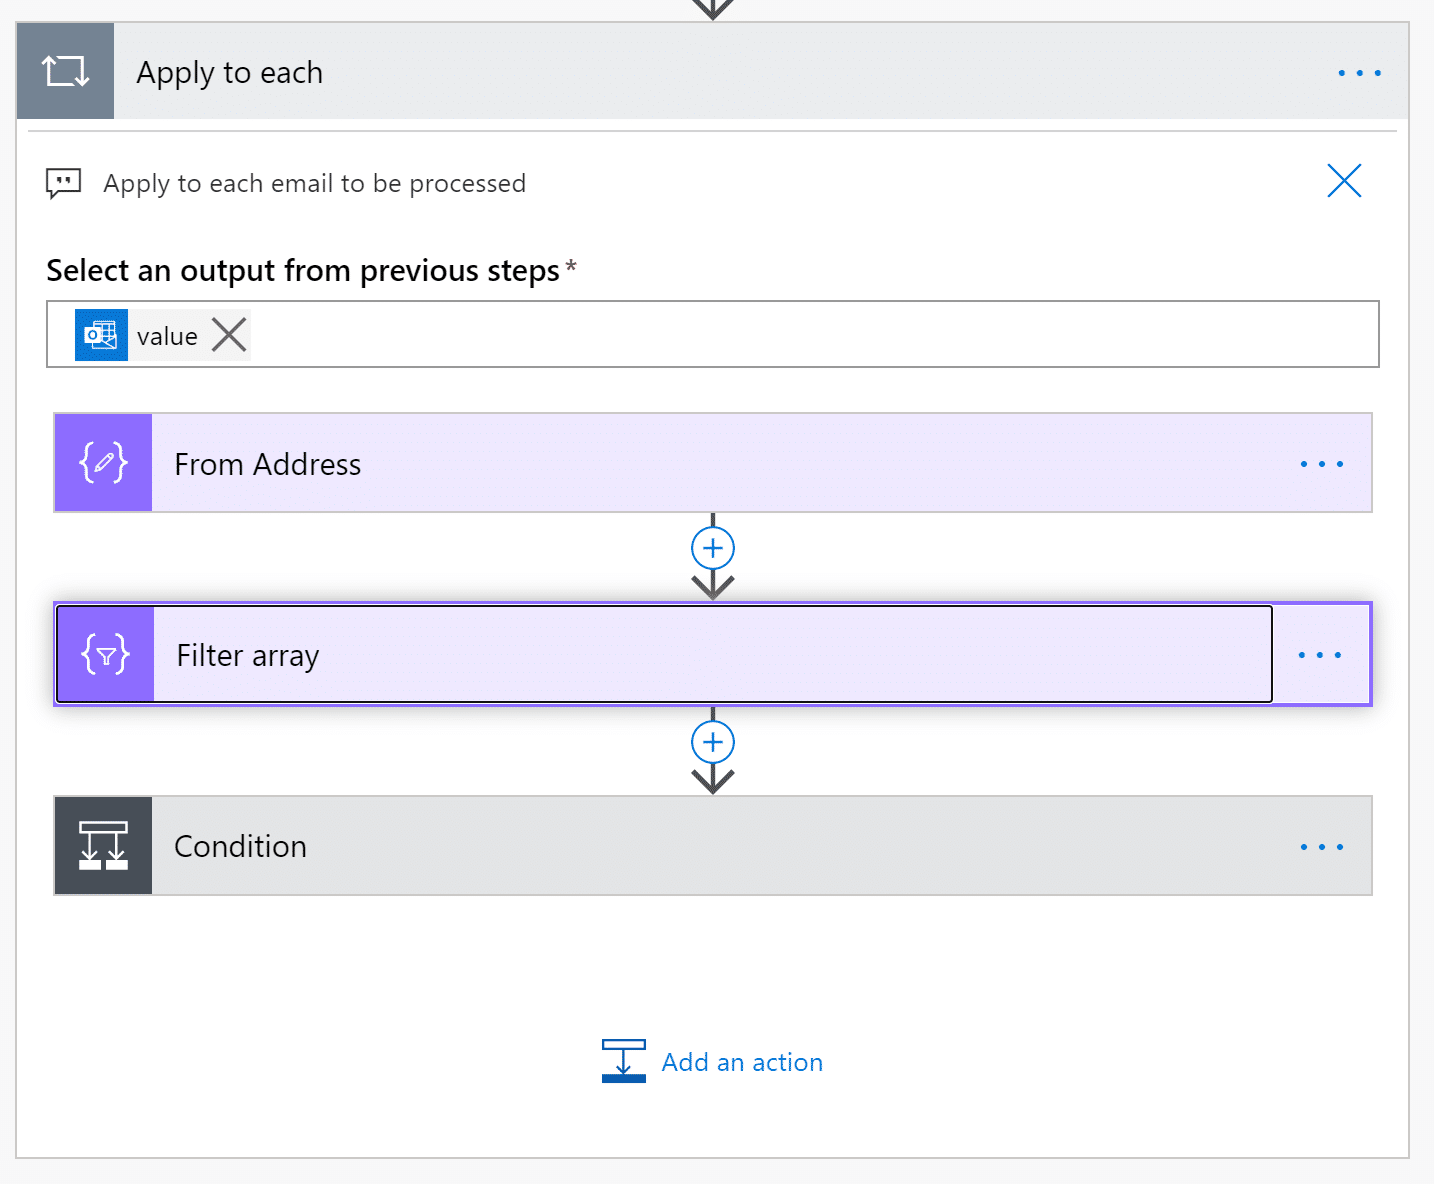
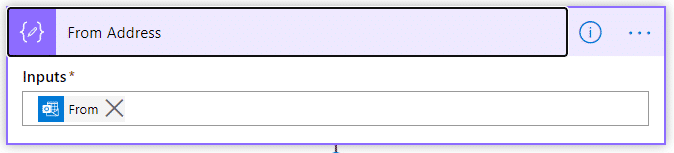
Within this loop, I want to get the email address, which is what I’m using in my mappings. In this instance, I am going to use a Compose action which is part of the Data connector to store my email address. The reason for using a Compose action rather than a variable is because I don’t need to update this value again.
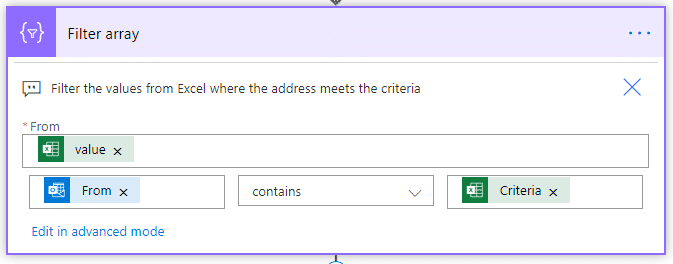
Next, I am going to take the array of rules that I have returned from Microsoft Excel and filter it based on the sender of the email. This uses the Filter array action from the Data connector, and we need to give it three pieces of information.
- From – This is the source data, which in our case, is going to our outputs from Excel. When the Excel action returns an array, it is returned as an array of “value.”
- Rule – This is where we define how we want to filter the array. In this example, I’m going to look for a rule where the email address contains the criteria. Using the contains operator means that I could have “abc@xyz.com” as a rule which will match, or I can use partial matching such as “@xyz.com.”
Once my array has been filtered, we just need to do a quick check to make sure that a rule has been found, otherwise the flow will error. Therefore we can put a condition in to check the length of the rule that has been returned. The condition will use an expression:
length(body(‘Filter_array’))
This expression will return 0 if there are no rules found, so in my condition I will only process the email if the length is greater than 0.
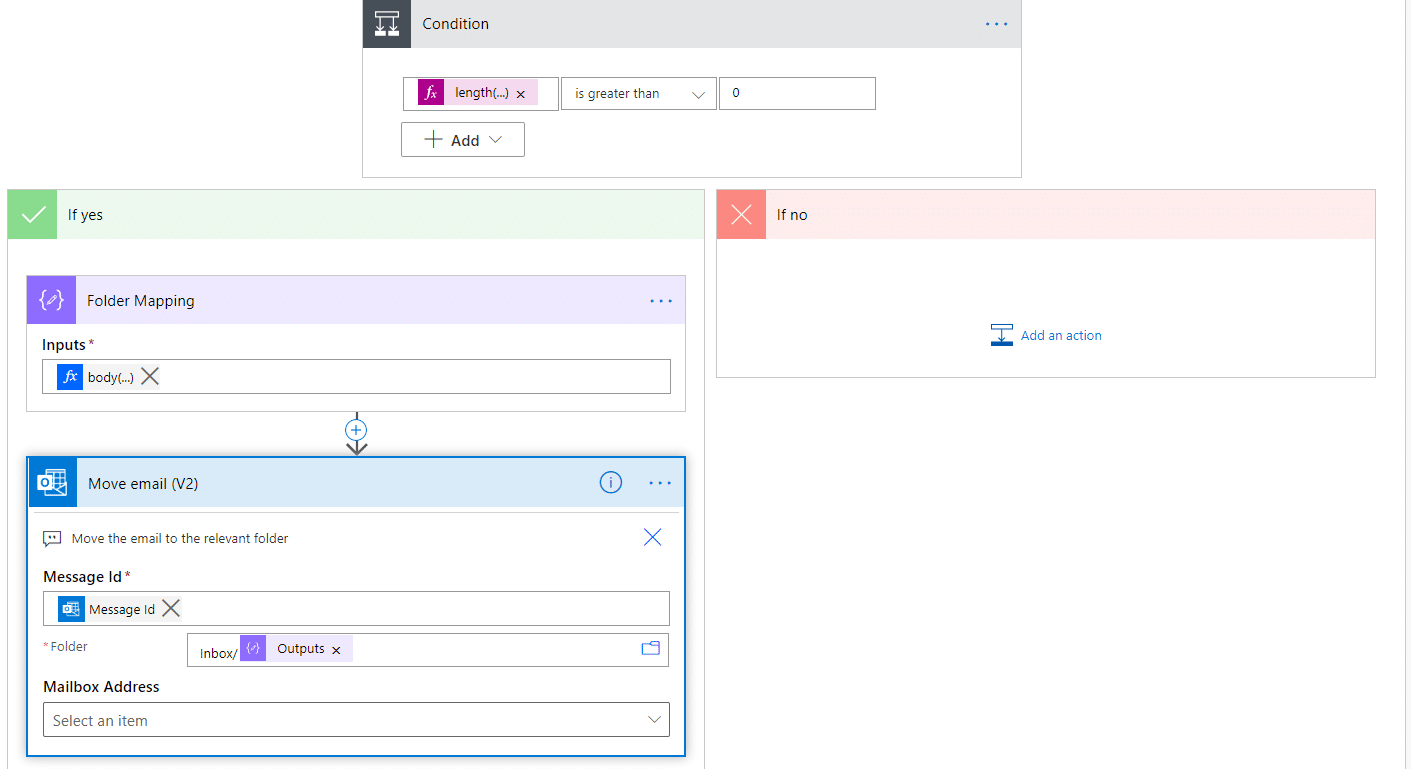
If a rule is found, then again I use another compose action to store the folder mapping from Excel. Then I can use the Move email action to move the email from the root folder of my Inbox to the relevant folder. This action requires the Message Id, which is a unique ID given to the email when it reaches Exchange. This is dynamic content that is provided by the Get emails action.
Then I simply need to tell it which folder to go to. All of my folders live under Inbox, so I have typed “Inbox/” in as the first part of the folder destination, and then taken the output of the “Folder mapping” compose action above. So now my folder mapping would look like “Inbox/Folder 1” as an example.
How much time did this save me?
With this flow, I have automated the action of manually filing the emails once they have been read, and am doing it in a way which takes me seconds to create a new mapping rather than the minutes it would take me to create a new Outlook rule.
Overall, this flow saves me about 30 minutes per day, which means that I can have a lunch break!
Next, we’ll look at how I am using flow to create documents for me.
Scenario 2: Document Creation
This second scenario is a process which I have put in place in numerous use cases now, whether that is ticket generation, joining instructions for courses, statements of work, or even contracts of employment. The whole idea is that I can take a template, automatically populate with some content, and then send it as an email or store it somewhere for further use. The example shown in the video is related to how I generate joining information for the user groups which I run.
What do I need for this solution?
In order to create this solution, I am using the following:
- Microsoft Power Automate with a Premium License
- SharePoint Online
- Microsoft Outlook
What are we going to do?
I’m not going to talk through every aspect of the flow which I have created for my user group, I am just going to concentrate on the part which generates the documents. This is the most important part because this can be applied to the user cases which I have already mentioned and many, many more.
Our inputs can be drawn from anywhere, and in my demo, I took them from Microsoft Forms and from SharePoint, however they could also be derived from Outlook, Dynamics or a third party service. Regardless of where we get the data from, we are still going to prepare our Word document to receive content, convert it to a PDF and then email it as an attachment.
How do we do it?
The first thing that we are going to do to create this flow is to prepare a Word document so that I can then push content into it from Power Automate.
Along the top menu bar, you should see the Developer tab. If you can’t see this tab, please read “Show the developers tab” on the Microsoft site. On the toolbar, you will see a group called “Controls” which allows you to select what type of content you want to place into your document

There are a number of different controls that can be added to a Word document using the developer tool tab; however, not all of them are compatible with Power Automate. For example, if I use the Rich Text control, Power Automate will not see it. For this example, I am going to use plain text and image controls.
Once I have those controls in my document, I need to give them a title so that they appear with a “friendly” name when I use my Word actions in Power Automate. To give it a title, click on the relevant control, and then click Properties in the Controls group on the Developer menu.
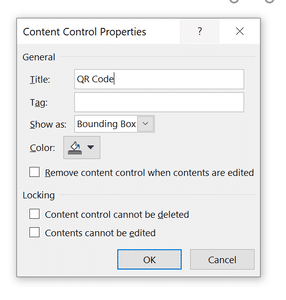
Once you have given the control a title, press OK. Then repeat the same process for any other controls that you have placed on the page. Once you have configured all of your controls simply save your document and upload it into SharePoint so that we can use it within our flows.
Now that our Word document template has been prepared and we have uploaded it into SharePoint, we can then configure our flow to start using it. To populate the Word document, there is a Microsoft provided connector called Word Online for Business, which to me is one of the most useful connectors available. It contains the action to fill a Word template, and also an action to convert a Word document to PDF. These two actions, for me, are an absolute dream!
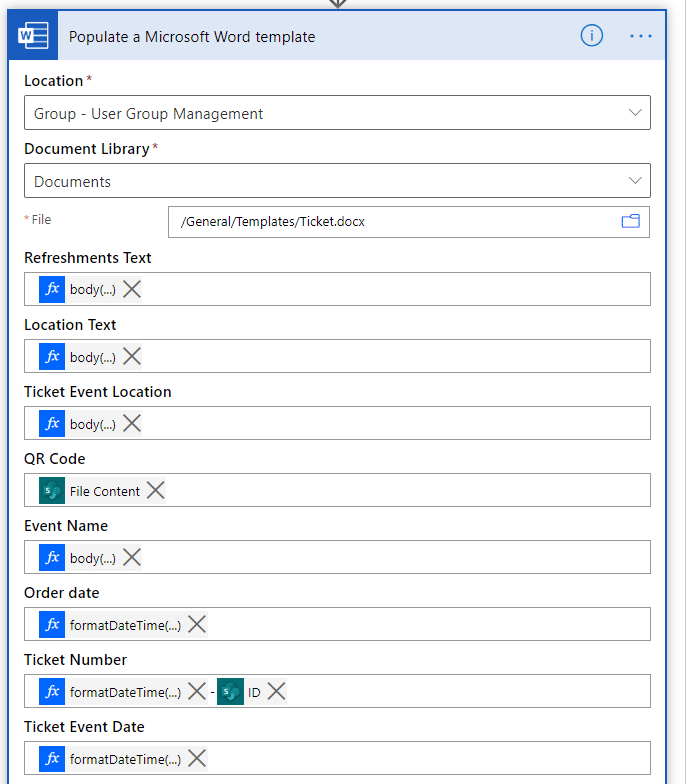
When you use the Populate a Microsoft Word template action, you need to supply it with a location, a document library and a file. The location field differs somewhat to other actions as it presents both O365 groups and SharePoint sites separately. Select the relevant SharePoint Site, and then provide the Document Library by selecting it from the drop-down. You can then select your file using the File selector.
Once you have selected the file, the action will expand with all of the control names that you have specified within your Word document meaning that you can push in either static text, dynamic text, or the output of expressions into your document. The result of this action is that you will have a byte array, which is your document stored in memory. You can then save this document by using the Create File action from either the SharePoint or OneDrive for Business connectors.
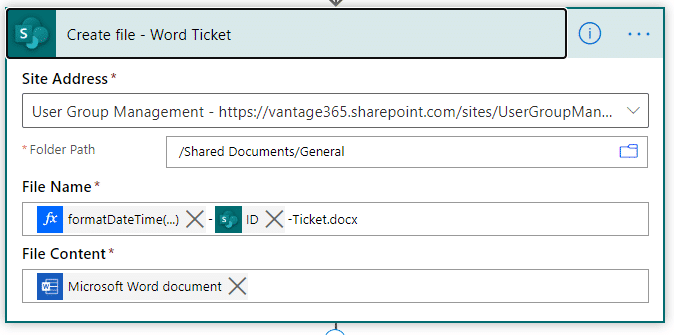
When you are using the Create file action, provide it with the site address and the folder where you are going to store the document. You can then provide a filename, just don’t forget to add the file extension i.e. .docx otherwise, the file is saved in SharePoint but is not recognised. Finally, provide it with the Microsoft Word Document dynamic content.
We now have the document stored within SharePoint and can be used from now to keep stored and tagged, sent as an email attachment, a sharing link generated, or converted to PDF. Really the possibilities now are endless.
How much time did this save me?
In the context of this video I used the example of how I have used this approach to generate tickets as part of my overall User Group attendance management. This flow alone saves me about 4 hours per week, which given that it is community engagement means that I get that time back to spend with family.
Since this video, I have now employed this technique for my HR onboarding process, where I automatically generate everything from offer letters to contracts, and also for my training courses where I generate the joining instructions and attendance certificates.
In our final scenario we will look at how I am using flow to manage the social media presence for my company.
Scenario 3: Social Media Management
At the start of 2020 I started my own business, and one of the things that I needed to do was to keep an active social media profile to help raise brand awareness. So I spent a lot of time posting content to LinkedIn and Twitter, my two key platforms, both sharing information from blogs but also sharing posts that others had posted. What I found was that this took a lot of time and so I set out automating this process.
What do I need for this solution?
In order to create this solution, I am using the following:
- Microsoft Power Automate
- SharePoint Online
- A Twitter account
What are we going to do?
In this flow, we’ll walk through how I take inputs from Twitter, track the posts that are being tweeted and then retweet them at regular intervals to ensure that I have a constant stream of activity out on the company social media account.
The solutions uses two flows, one to find the tweets and store them within a SharePoint list, and the other will take the posts and push them out to twitter from my account.
Get Tweets
The first part of this process is to get the tweets that I am interested in. Since Twitter is a fast-moving social media platform, I have used a recurrence trigger which runs every fifteen minutes to go and find the latest posts.
The first thing I need to do is identify the accounts that I am going to monitor with this solution, all of which are stored within a SharePoint list. That SharePoint list contains the account ID, and also holds the ID of the last tweet. This is important as it allows me to only retrieve all of the tweets since the last ID that I found.
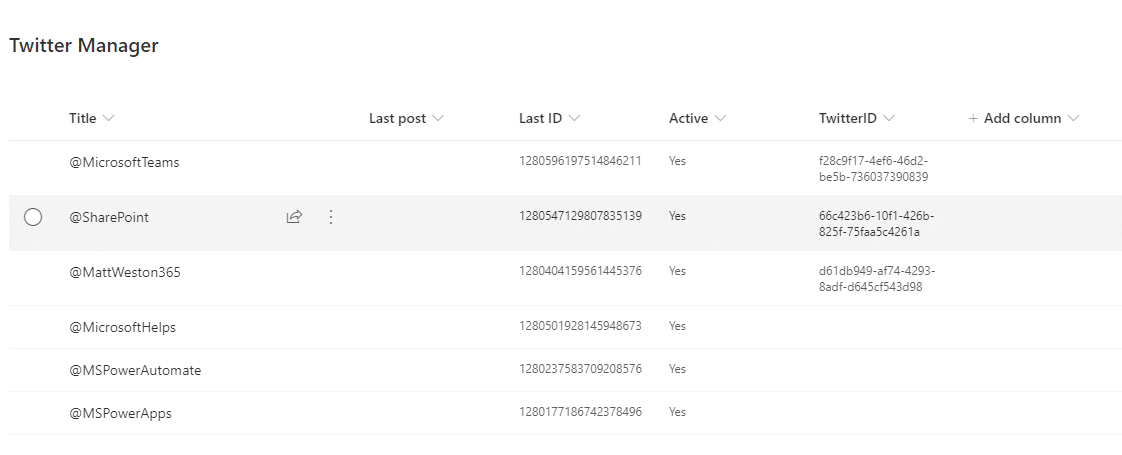
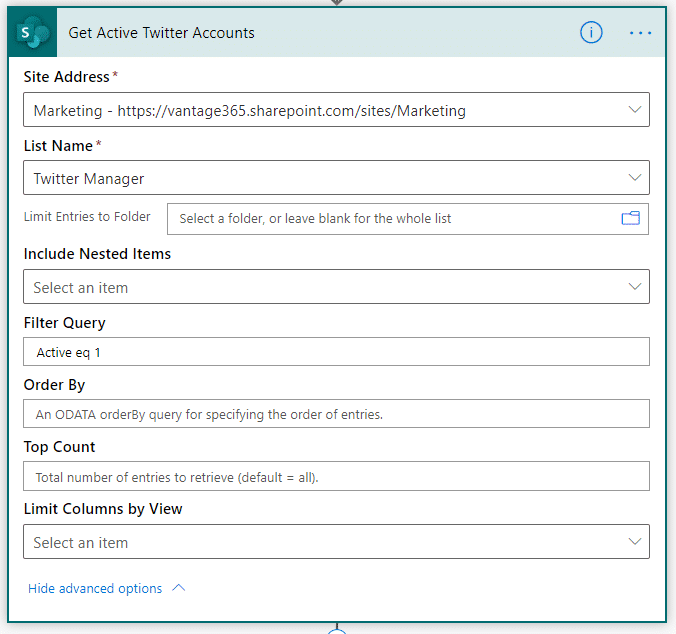
In order to get the twitter accounts from my list, I use the Get items action from the SharePoint connector. I have done a basic filter on the Active column so that I can turn the accounts on and off as required.
For each account that I retrieve, I can then look up the tweets using a search string. You can achieve this same search within Twitter itself if you go to the advanced searching. If you want to test your search string without running your flow, then this is a good way of making sure that it is correct.
The search within my action will discount anything that’s been retweeted already (-RT) comes from the account that I’m monitoring (from: <account name>) and also removes any posts where the account has replied to someone (-filter:replies).
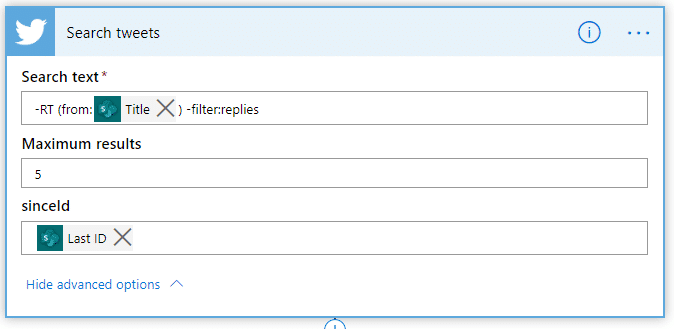
As you can see from the image above, I have also limited the number of results that I retrieve to 5, and also provided the sinceId parameter which is where I can tell it that I only want the posts after my last recorded ID.
Once I have my list of tweets, I use a parallel branch to perform two different sets of actions. This is purely a performance decision so that I have dual actions taking place. One side creates all of the tweets from my search and stores them within SharePoint; the other will simply set the ID so that we can update our account list with the last known ID.
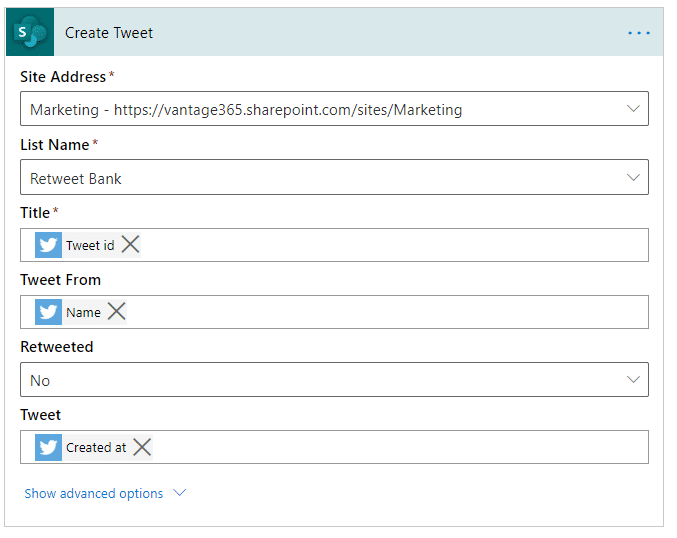
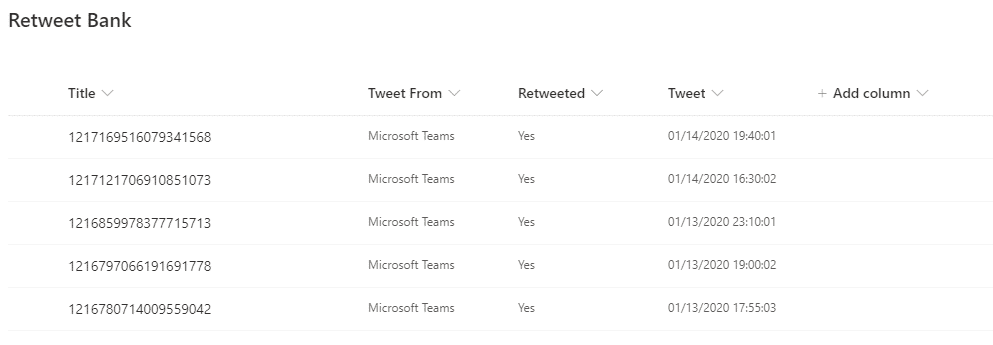
The other side will save the tweet information within a list of tweets stored within SharePoint. This is using the Create item action in the SharePoint connector and has been pointed at a list which I have called my Retweet Bank. I simply provide it with the Tweet id, as this is needed when we repost, who the tweet was from, and when it was tweeted. This would then help me to run some analytics on the account activity if I chose to take advantage of PowerBI.
My list within SharePoint is quite simple, just containing the basic information that is brought back from my flow.
With this tweet farming Twitter for content, I then need a flow to reverse the process by taking the tweets from my Retweet Bank and posting them back out from my account.
Post Tweets
Within this flow we are going to take the tweets that we have within our Retweet Bank and post them back out. Once again, we will have a recurrence trigger to start with that is going to post out a single tweet every five minutes. The reason that I have selected this cadence is because the Twitter API will only us to post 12 tweets per hour, so I post out every five minutes to keep a consistent flow.
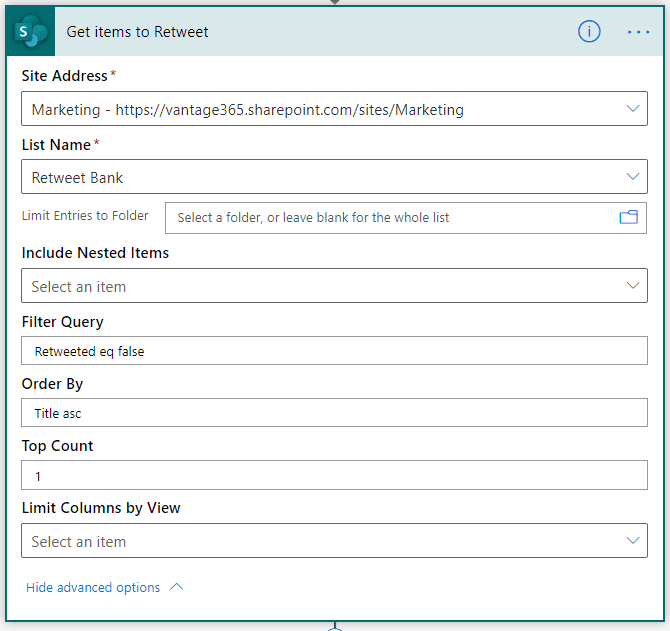
The first action that we have within this flow is a Get items to retrieve the content from the Retweet Bank SharePoint list that we populated in the previous flow, with a filter configured to retrieve the posts that haven’t been marked as posted. Notice in this one that I have configured the Order By so that I make sure I get the oldest Tweet first, and also just retrieve the top 1 so that I only process one item at a time.
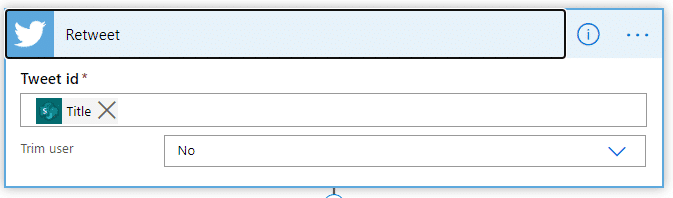
Once I have the tweet from my Retweet Bank, we can simply use the Retweet action from the Twitter connector to post out from my account. All we need is the ID of the tweet which is stored within the title field of the Retweet bank.
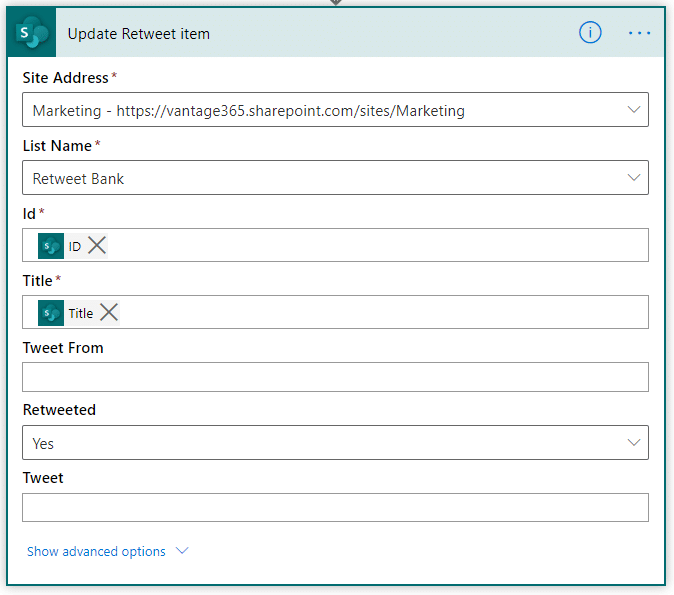
Once we have successfully tweeted, the final thing is to mark the tweet as being posted, which means the next time we get the items to retweet, this one won’t be included.
How much time did this save me?
With this flow, I have automated the action of manually looking through Twitter to find the accounts that I am interested in, looking for specific tweets, and then retweeting the post. This process, which seems quite simple, actually takes a huge amount of time each day. Consider how much time you spend reviewing content on various social media platforms, then you can get an idea for the amount of effort that it would take someone.
In total, this flow saves me about three hours per day, which is a massive amount of time over the week which could be spent on something much more productive than scouring social media!
Finally…
We have now looked at three different use cases where I have personally used Power Automate to remove manual workloads and instead using automation to achieve the same goal. The whole idea behind it is to allow me to spend the time, which I previously spent doing these repetitive tasks, doing something which is much more productive, or doing something which will benefit me more.
Having now seen some of the use cases that I have applied, I will once again set you the challenge of achieving the same yourself, trying to find those tasks that you perform every day that you could instead hand across to Power Automate to do for you.
Once you’ve done that, enjoy all of that free time that you now have because you’re making Power Automate do it for you!
