
This is a Vacation booking app BONUS module created because of many of our challengers embrace the Build It, learn it, Use it and Enhance it (B.L.U.E) framework we favour and began implementing their solution into the real work.
The goal of the module is to support a team who may want to request leave but also need to account for:
- Bank Holidays
- Public Holidays
- Statutory leave
- Non-working days
Instead of assuming 7 days per week can qualify as leave, we want to allow leave to be adjusted according to rules for the items above and remove these from any calculation.
The ebook has been curated from solutions offered by members of the community so if you do find an alternative or easier way, please share it with us and we’ll update the guide.
The guide is UK centric, but the same principles can be applied for other locations.
As a final note, in this guide some areas we sketch out for you but you will need to apply your own logic to assemble the data for your region into the correct format to be used.
If you follow the steps carefully, this should be relatively simple but the eBook is aimed towards someone who has a little confidence exploring and experimenting within Power Automate.
Enjoy!
An Example of the problem
In the UK, Annual leave is calculated by removing weekends and bank holidays from the days eligible for leave in the year.
The reason this is important is that if you book leave in the from a Monday to a Monday (inclusive), you do not want to register 8 days as the total.
If Saturday and Sunday are non-working days, you want only 6 days to be taken from your leave entitlement.
If Monday is also a bank holiday, you also want this to be considered meaning your leave is only 5 days in total assuming you return to work on the Tuesday.
To account for these adjustments, within Power Automate or Power Apps, there are no ‘out of the box’ solutions. So, we have to move beyond the world of no-code and into adding a low-code solution instead.
If you are not a developer, you can still complete this module. It’s designed with the citizen developer in mind. However, some of the concepts (such as API’s and connectors) may be very familiar to those with a development background.
Getting the Bank Holidays
The first step in the process is to gather data relating to statutory leave days – for example bank holidays in the UK.
For power apps to retrieve data, one simple method is to use Power Automate to retrieve information and store it somewhere accessible to the Power App.
Create a SharePoint list as your reference
- Create a new SharePoint list in your Team site with at least a Title and Date
Create a new flow to gather and write the data to the list
- Head to make.powerautomate.com and create a new Scheduled flow.
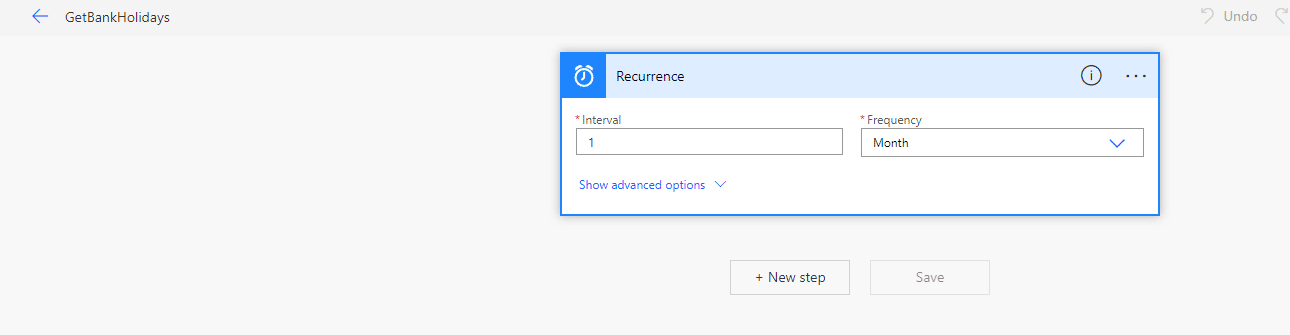
- Call it GetBankHolidays
- Start with a Recurrence Trigger of 1 month.
- You can set this up with 1 year intervals to retrieve the data infrequently but just in case data changes for your location, this should cover most scenarios.
- One suggestion here: A good enhancement would be to add a step in later to this flow to check if the data you are about to write is already within SharePoint.
- General advice is to write to SharePoint as infrequently as possible and generally only when needed. To avoid repeat and unnecessary reading and writing to your SharePoint list, this may be a good idea.
- For now, we will move on and begin to gather data from a reliable source.
Add a Connector
In this step, you are going to get ready to retrieve information from a website into Power Automate.
To do so, you will need to connect to another web location using a protocol called HTTP. This is just a short code for connecting to a website using language it will understand and respond to in a predicable manner.
You have 2 relatively easy options.
- Either use the out of the box HTTP connector by:
- Clicking New Step
- Choosing HTTP from the list of available actions

- Notice this is listed as a Premium Connector (meaning it is licenced separately) so you may not be able or wish to use it.
- If you do decide to use this option, select from the connectors list and set it up by choosing the Method called GET
- Also add the URI. This is the web URL where your data resides – in this case use https://www.gov.uk/bank-holidays.json
- Your connector is now ready and you can move to page 14 and the section entitled “Read the File that has been created”
- If you prefer to create a non-premium connector, there are more steps to follow but you will end up at the same point in this document.
Choosing to Create a Custom Connector
- If you choose to create a custom connector, to avoid having to recreate your flow again when you return to it (or using another tab) add ANY action or step to the flow and Save. You should delete this when you return and implement the custom connector.
- Save your Flow now so you can come back later and add to it.
Building a Custom Connector
This may sound daunting but for the simple use case you will need, it’s quite routine and exposes you to a new way of bringing information into your Microsoft 365 services.
In the UK, the data is hosted in the following location and can be retrieved without any signup or sign in https://www.gov.uk/bank-holidays.json
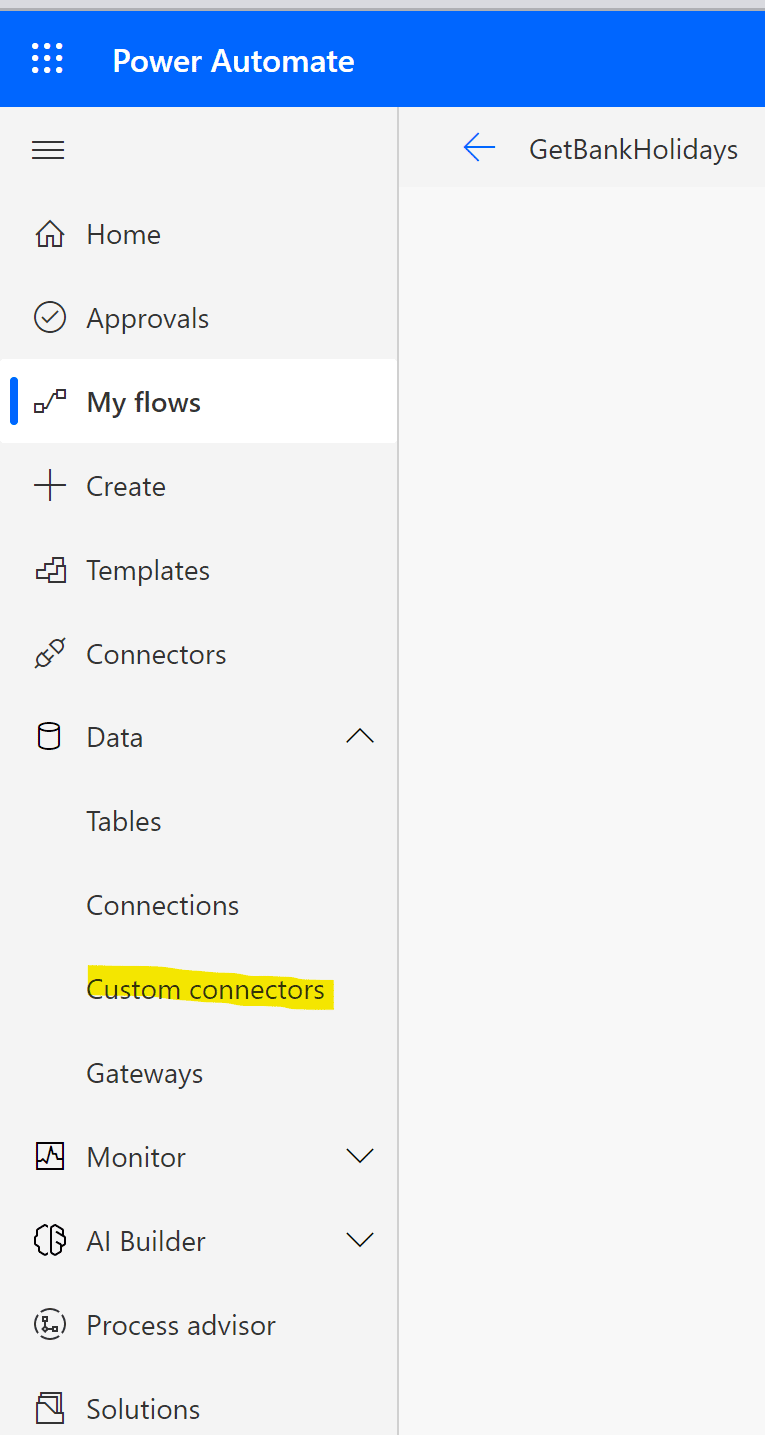
- Head to make.powerautomate.com and open the Data navigation option on the left menu
- Click Custom Connections
- You will be setting your own new custom HTTP connection.
- Click New Custom Connector

- Choose Create From Blank and give it a name (e.g HTTP Custom)
- You can now configure a connection using the following steps.
- Step 1.Provide some general information for this connection
- The Scheme you need is HTTPS
- The Host is www.gov.uk
- The base URL is the forward slash symbol “/”
- Now click Security to head to step 2

Step 2. Set Up Security
- Select No Authentication (this makes the call much easier to configure)
- Click Definition to head to step 3.
- Step 3. Set up the Action you want to perform
- In this step, you will provide information about the action a user can perform with this connection, what data to retrieve and how the data is expected to be structured.
- The data you will retrieve is in JSON format so this aspect may seem a little alien at first if you haven’t experienced JSON before. Don’t worry though, there isn’t much to it.
On the left-hand side, choose New Action:
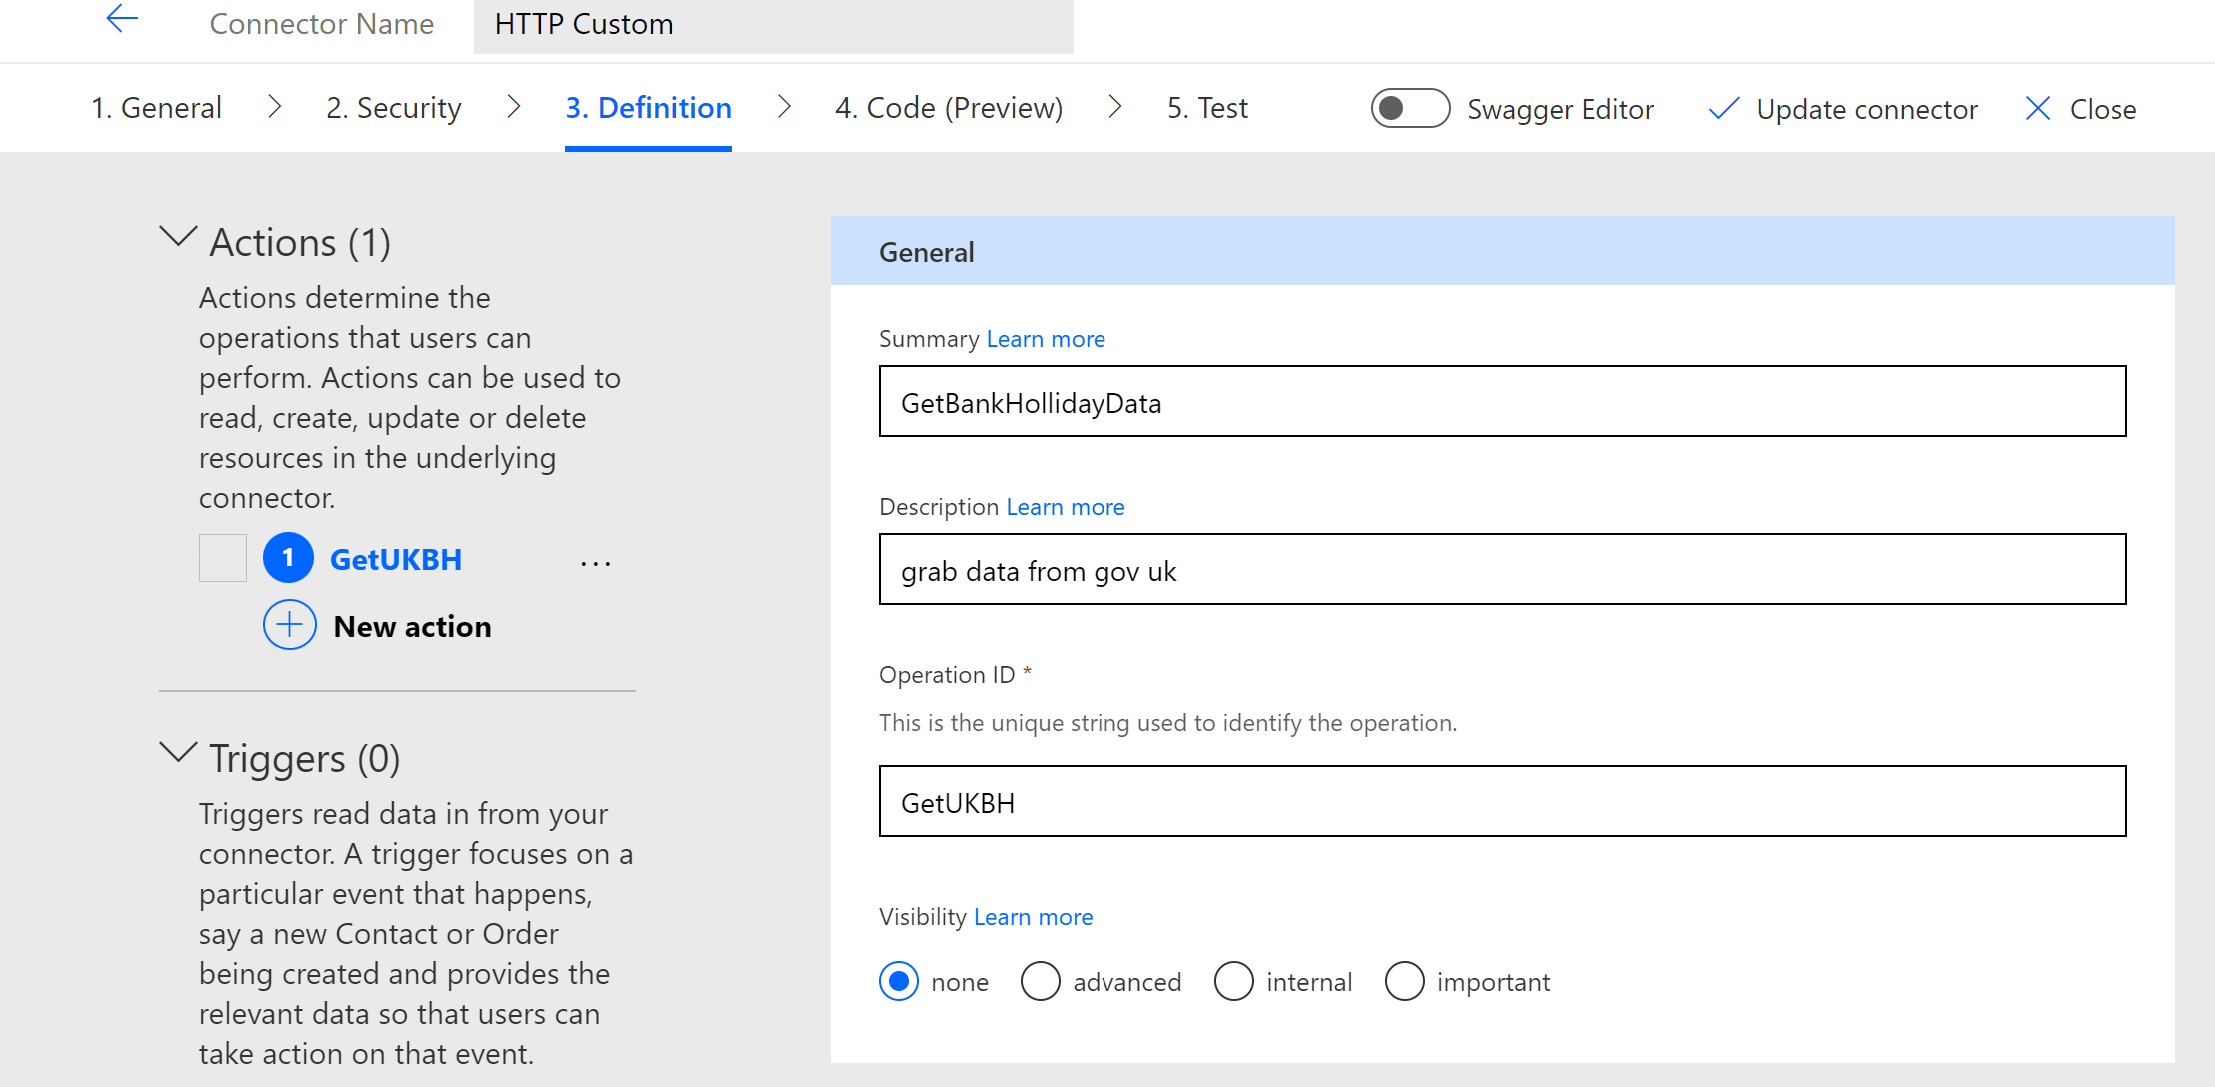
- As per the picture, set up some General details.
- Summary – Give a title for the connection action
- Description – Add detail about what this action achieves to help you recognise it in future
- Operation ID – Starting with a capital letter, name this action. Make this meaningful. This is the name Power Automate will use during your flow.
- Leave all the other fields as default.
Under the Request section, you will form the request to make to the website.
- Choose + Import from Sample
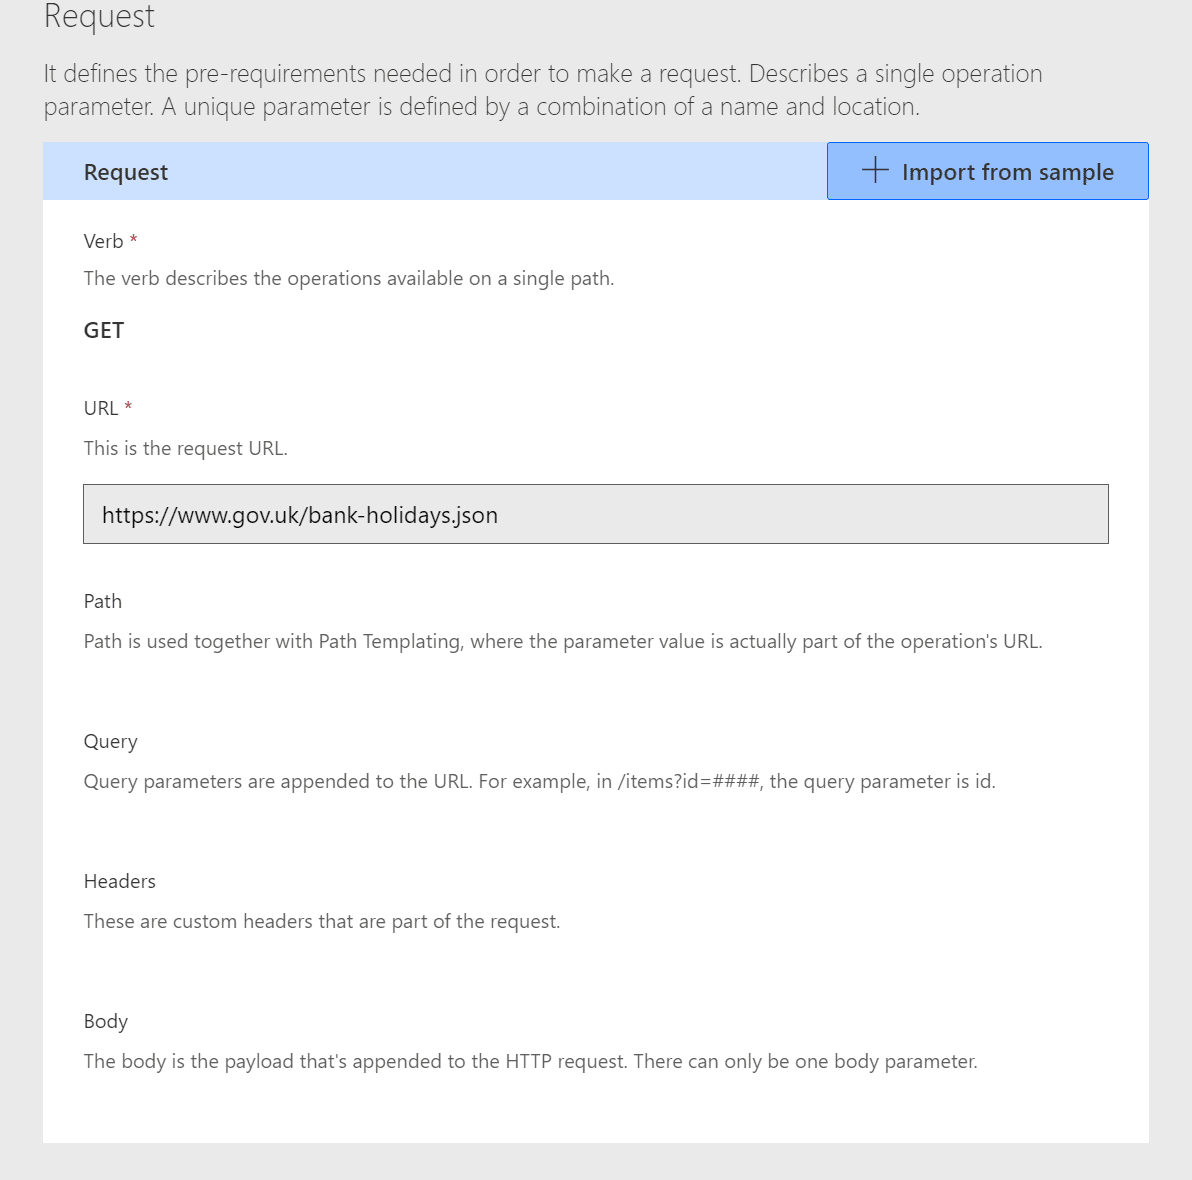
- Options will appear on the right-hand side.
- Under Verb, select Get (this means read data from the source)
- Enter bank-holidays.json
- Click Import
- You don’t need to configure any more information.
- Click the link to Create Connector at the top of your screen (this will switch to Update connector once you have completed should you want to make future changes)
Testing the connection
At this point, all you have done is create the ‘framework’ for your connection. i.e. you have set it up. You haven’t tested it. You will do that now.
- You can now test it by clicking into the test link at the top of your screen.
- Click + New Connection. This will generate a new connection using the definition you created.
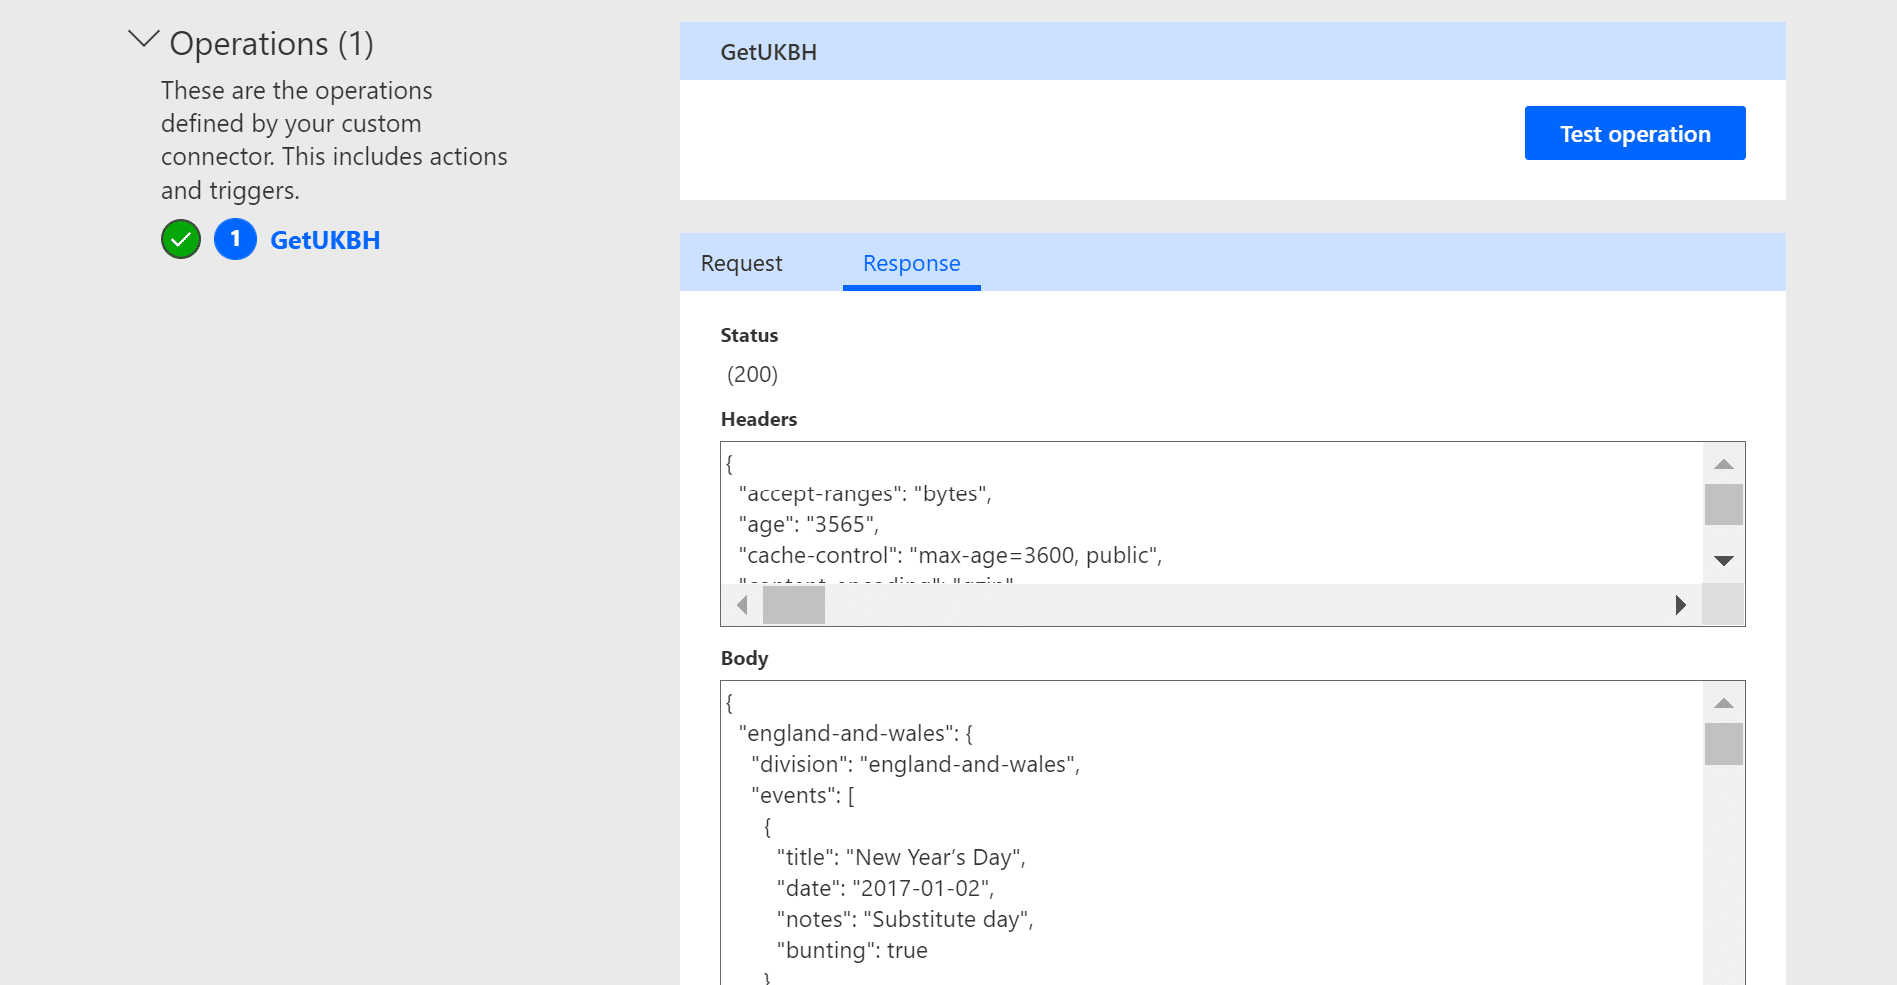
- The Test operation button will be enabled. Click this button.
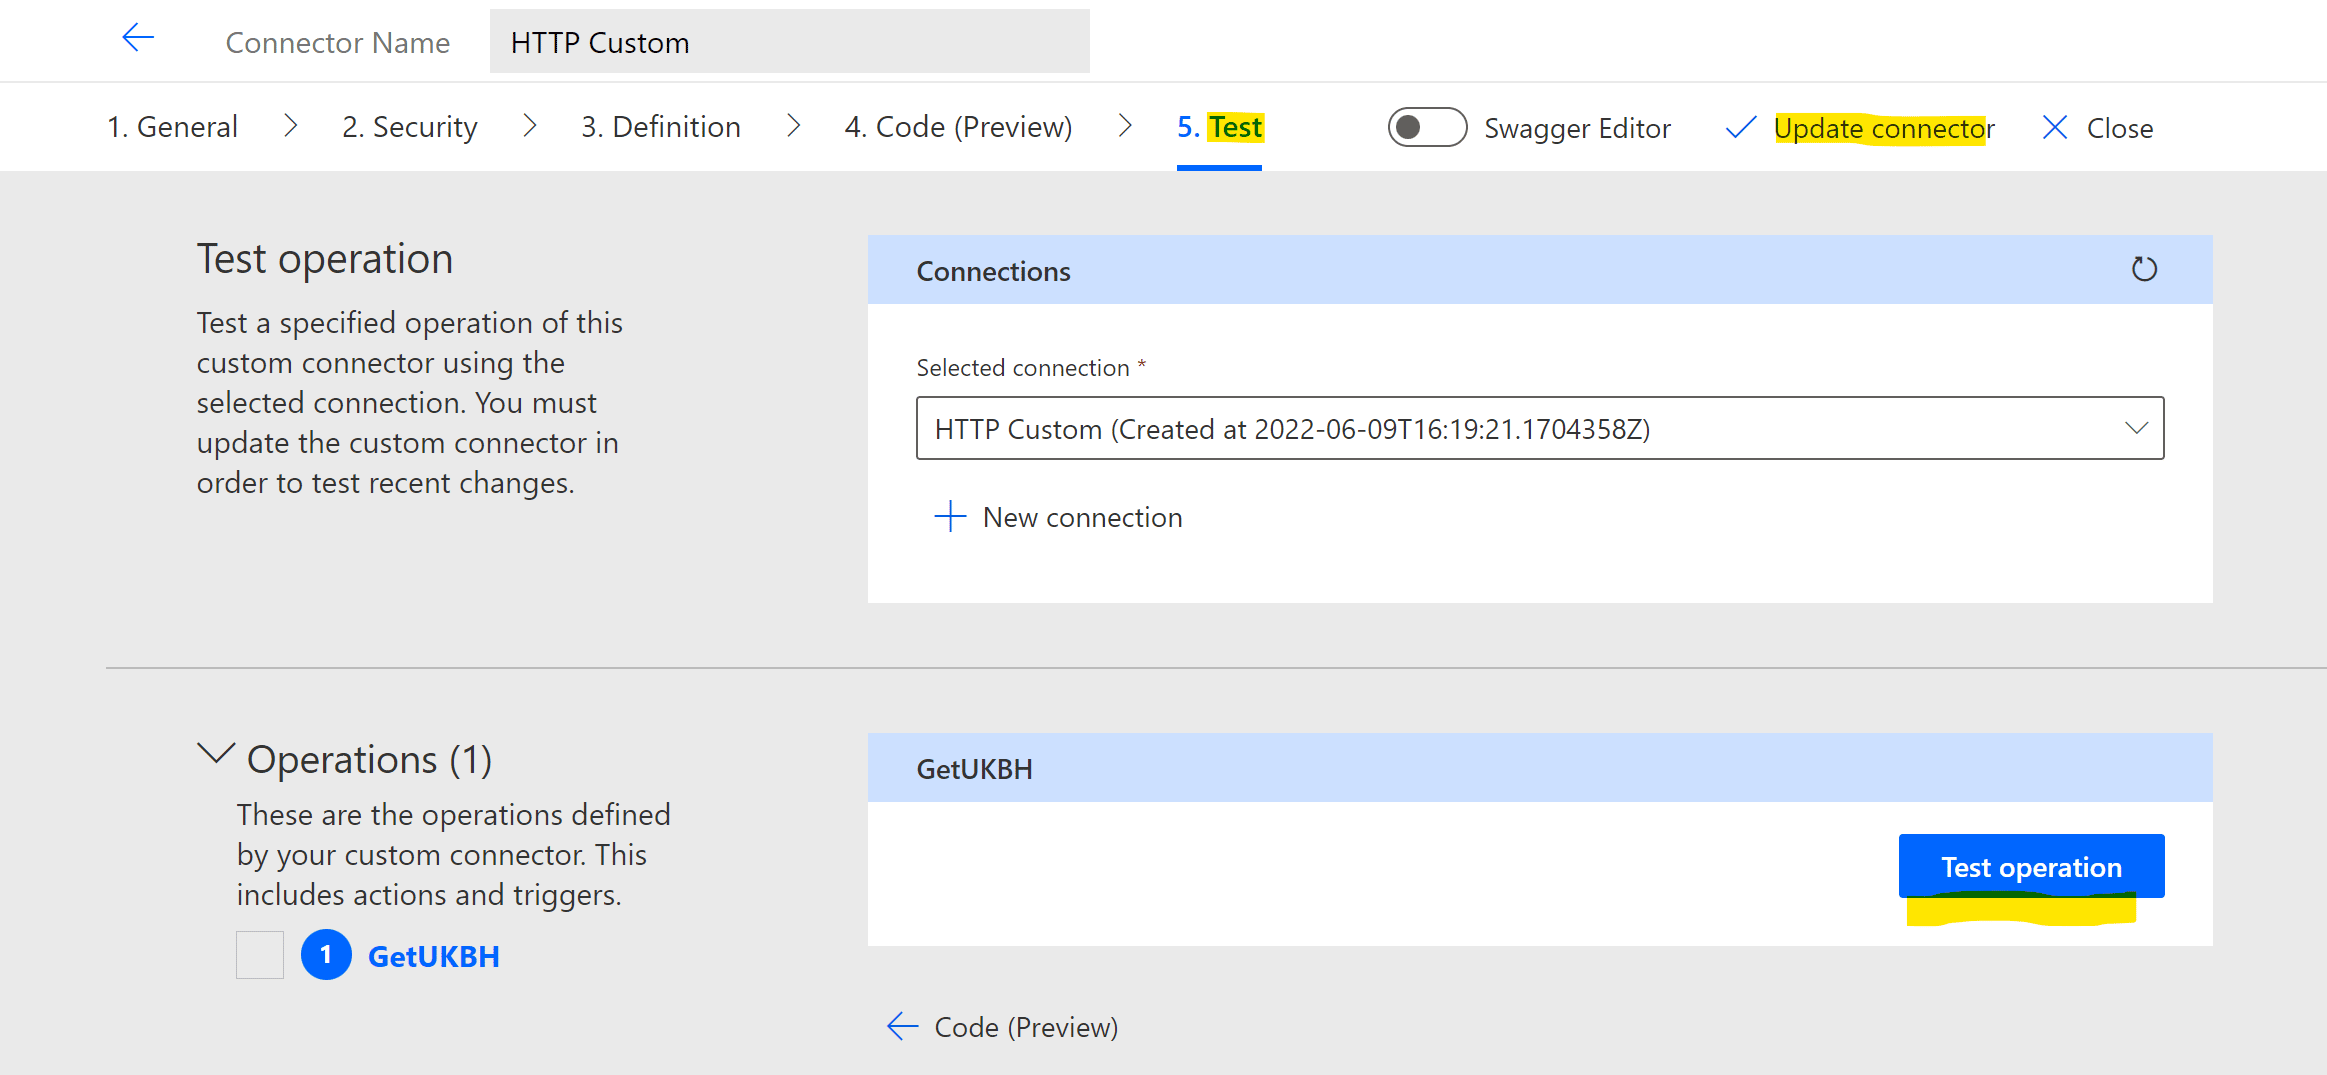
- All being well, under the Operations area on the left, you should see a green tick indicating this connection test has passed.

Create a Usable ‘Instance’ of the connection
- Now you are ready to use the connection.
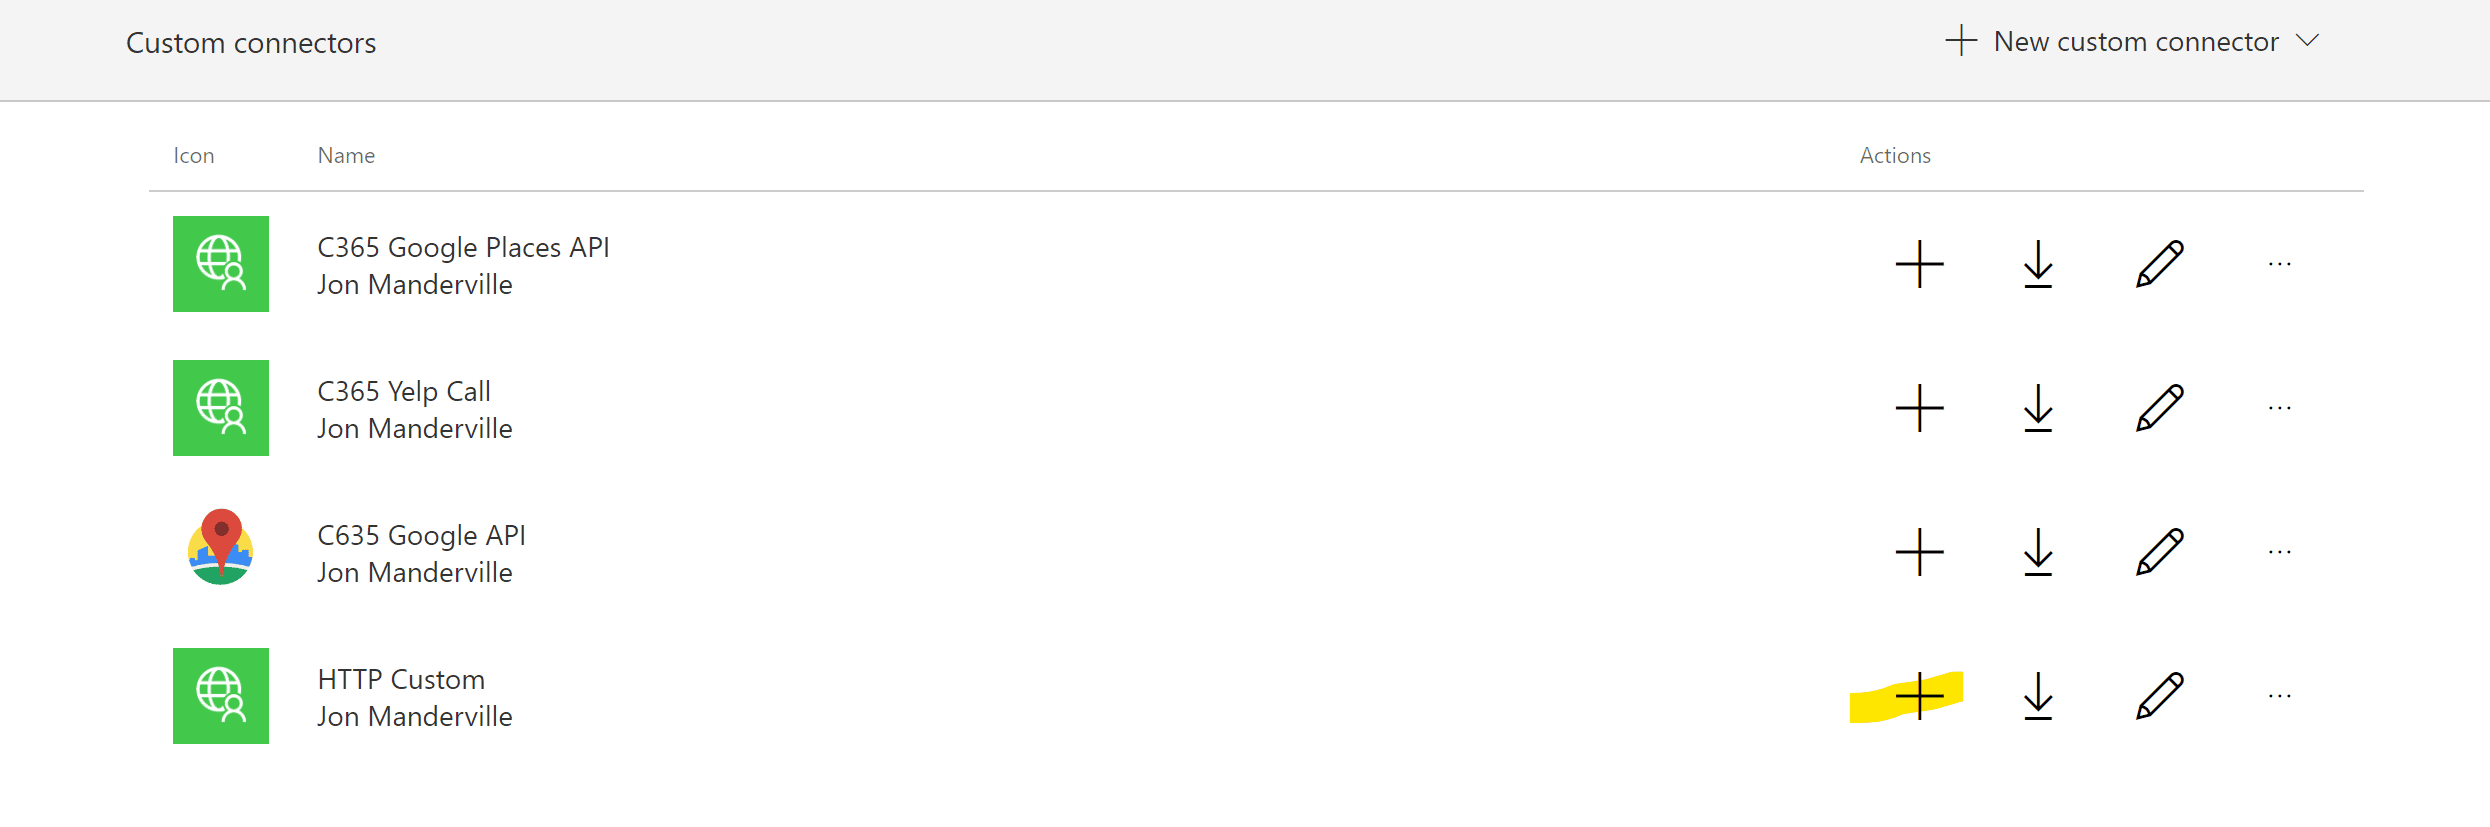
- Click Close (just next to the Update connector link) to Navigate back to the Custom Connections screen in the power Apps studio
- You should now see your new connection type.
- Click the + icon next to it and create a new Connection and validate a connection is possible using your new custom setup.
- Now navigate to Connections within the main make.powerautomate.com dashboard. You should see your new named Custom Connection ready to use.
- You might need to leave it a few more moments to complete the creation step before returning to Power Automate and configuring your flow to use the connection.
Use The Custom Connector in Power Automate
Head back to your Power Automate Flow (GetBankHolidays)
- Add an action and choose Custom
- You should see your connector in the list to choose from

- Select the HTTP Custom connector (assuming this is the name you chose)
- Choose the Action you set up earlier
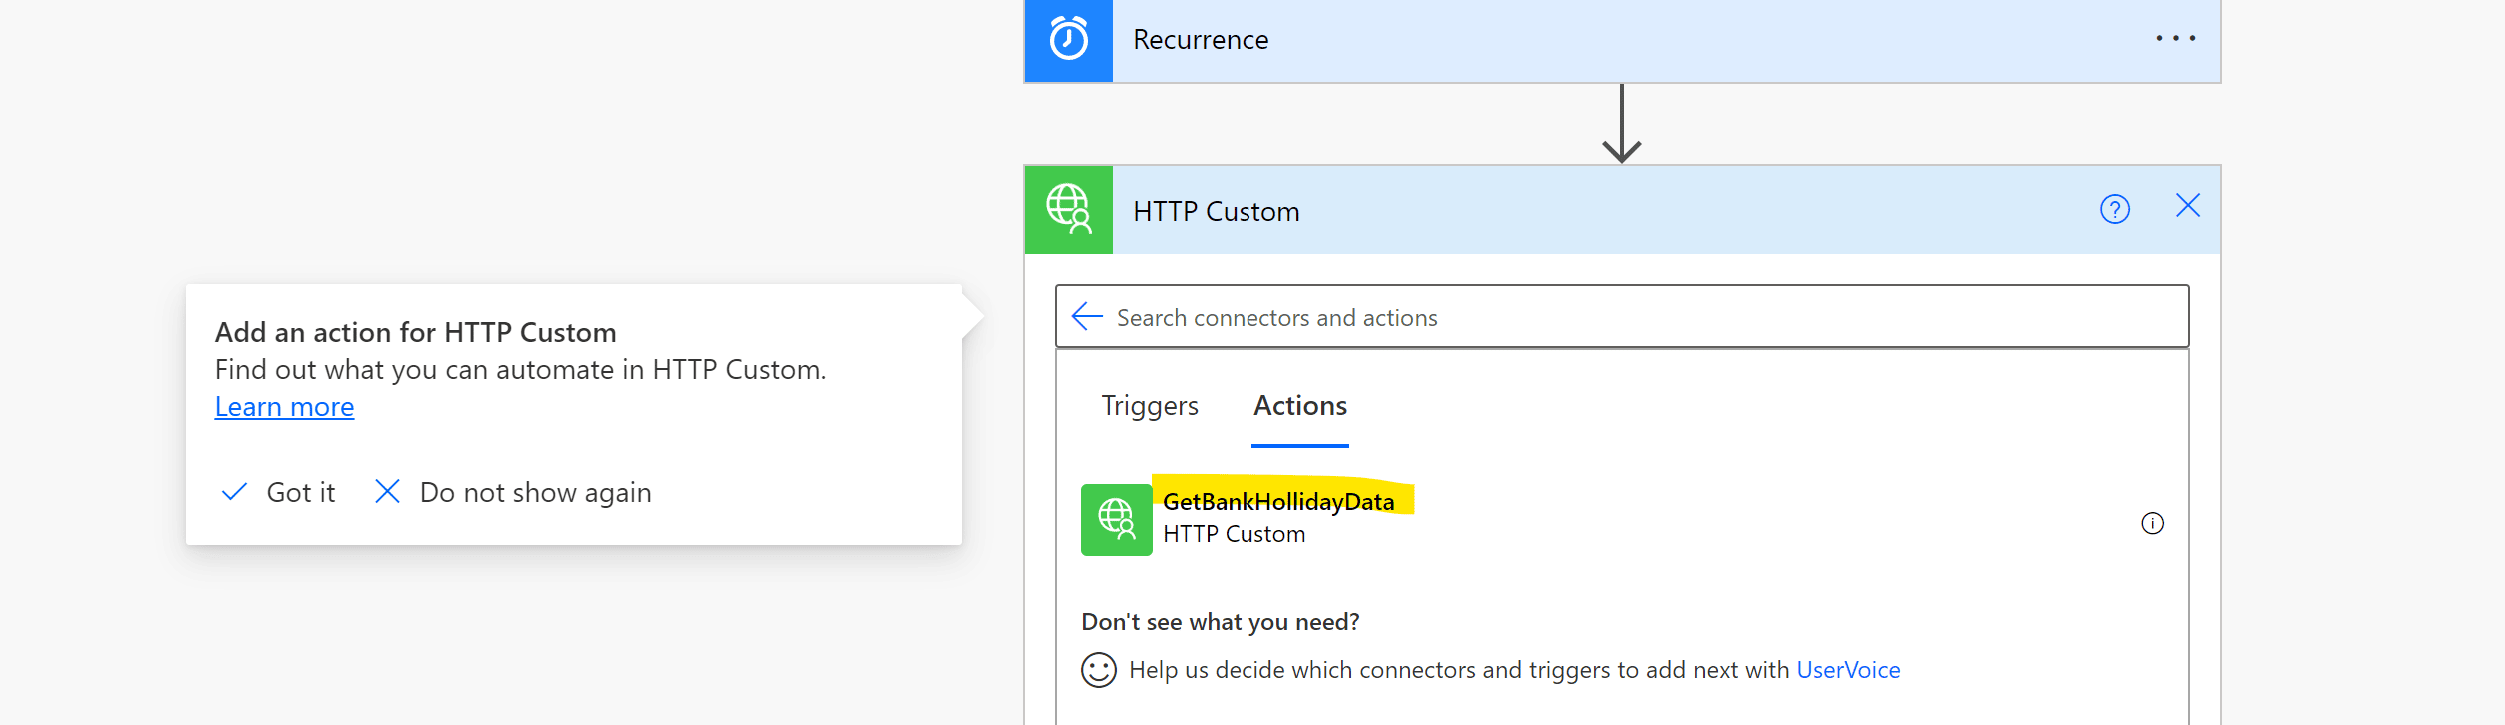
- That’s it! You will now pull in data from a website to your Flow.
Just one more step
The data you have just pulled in is in JSON format. If you were to look at it, it will appear like a long string of text and numbers. Pretty hard to read!
Power Automate would have just as much trouble doing anything with this information if we left it as it is. So we need to convert it into something usable before we proceed.
Using the ParseJSON action in a moment, you can pass in the output from your HTTP step and Power Automate will effectively slice up the data into its component parts.
You will then be able to use these parts to add data to your SharePoint list in a repeatable and reliable manner.
** Health warning and a tip ! ** You will be using Dynamic Content in the next steps. It is not always easy to see what data relates to each option in the Dynamic content selector.
This is especially true if there are multiple elements of the same name being offered from the data (as will be the case in our example).
The best method is to look at the data to understand the structure a little (just paste the URL we provided into a web browser to see the text). Then correlate the elements that are picked out for you by the ParseJSON and dynamic content.
It’s useful to use a JSON checking tool here as well. Simply paste the text you see when you follow the web URL www.gov.tk/bank-holidays.json into a tool like this
You will see the structure of the data and then can read your file a little more easily.
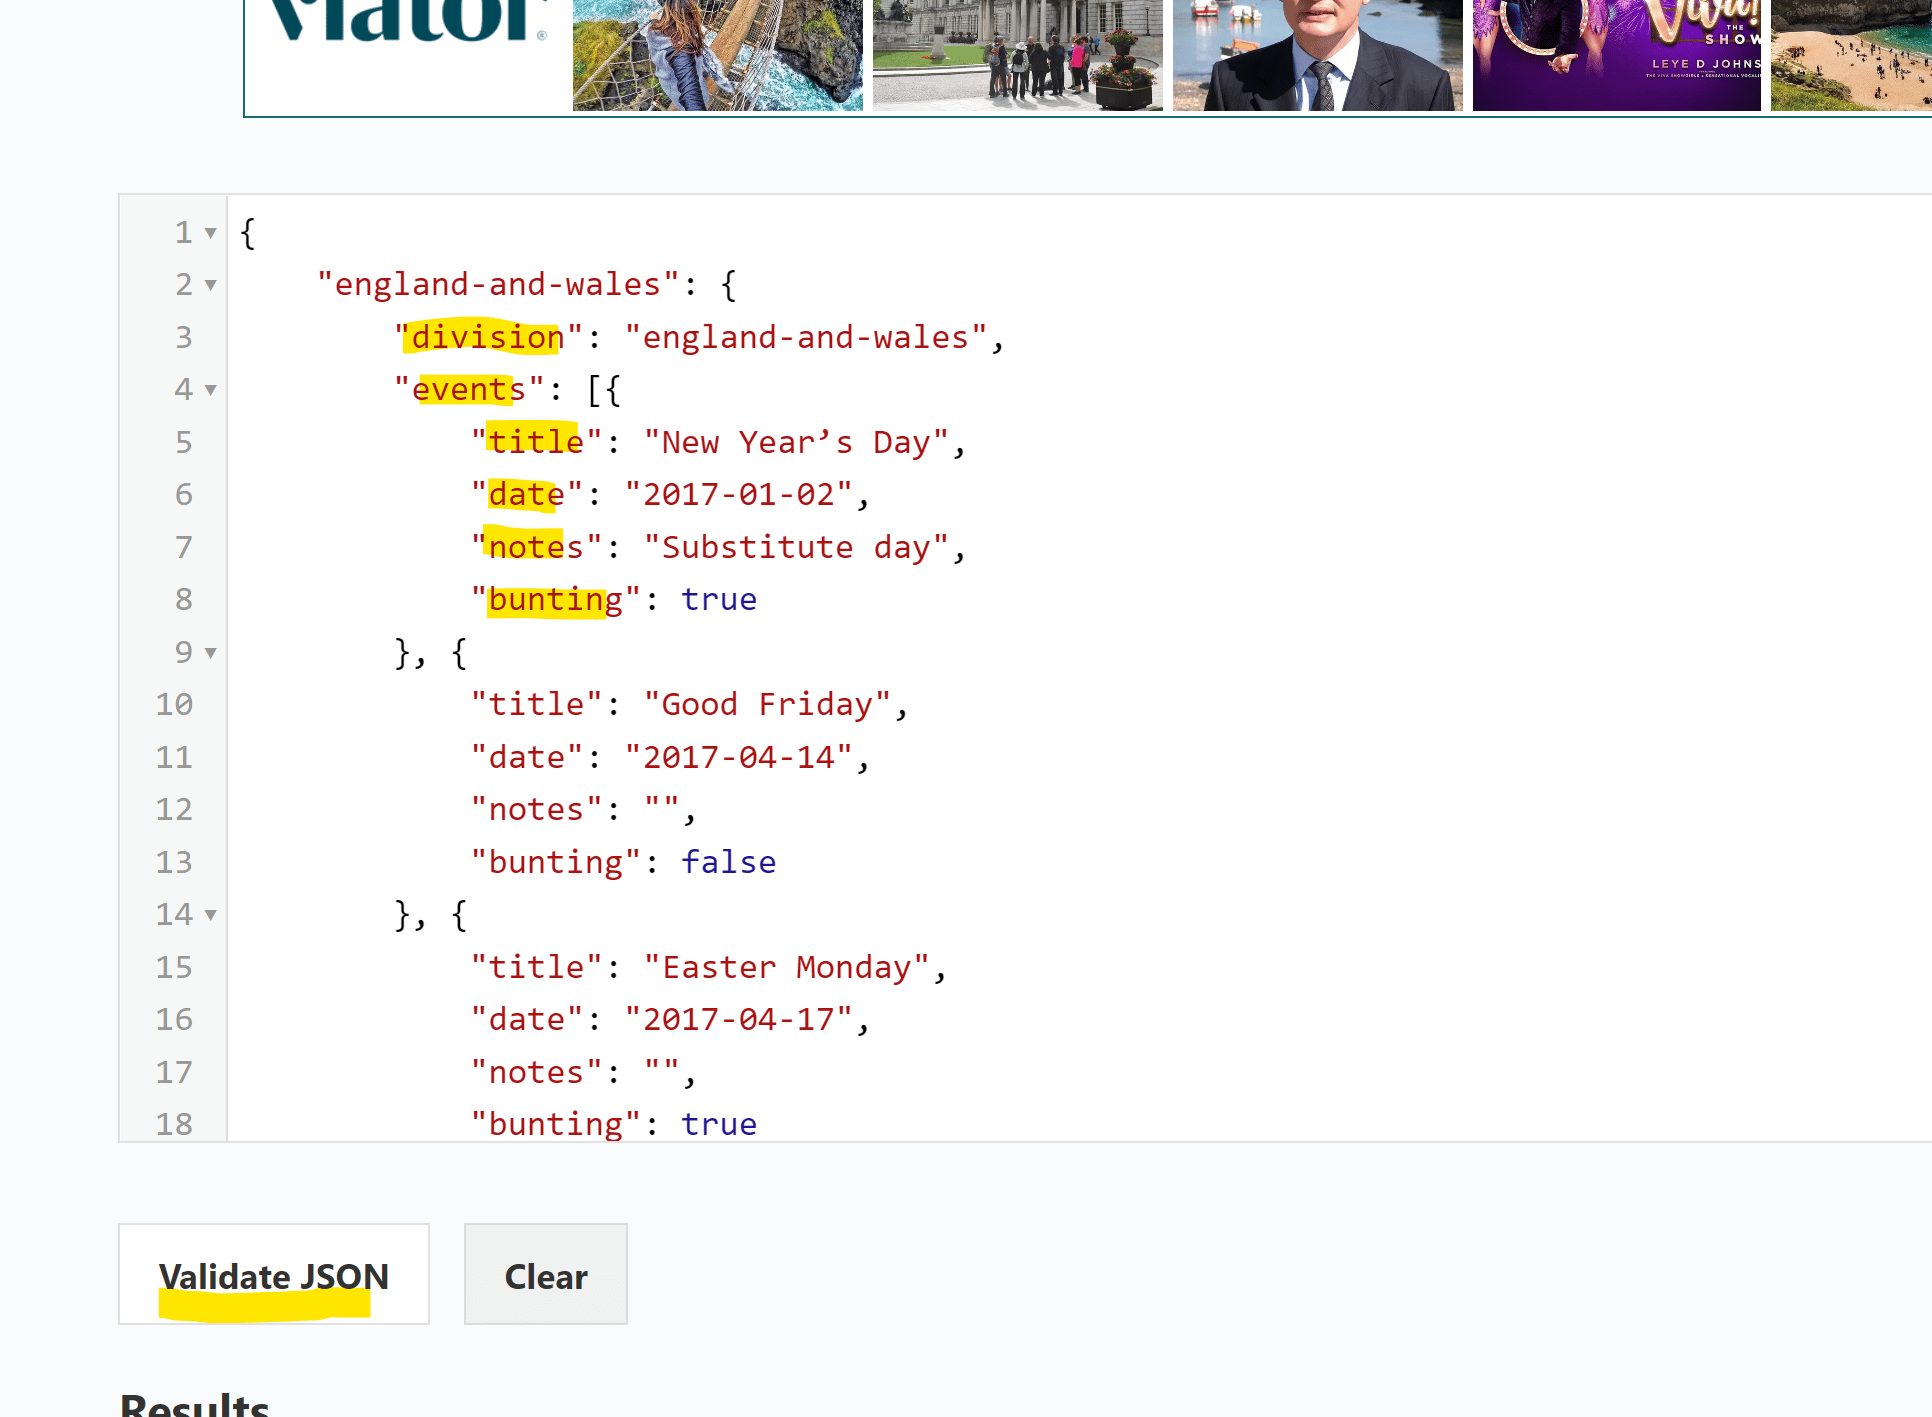
In the example we use, when the ParseJSON step completes, there are 3 ‘Divisions’ to choose from within the dynamic content for the next step.
These are England and Wales, Scotland and Northern Ireland. You can see the structure of the data using the JSON checking tool we recommended above.
Each will have it’s own title, data and notes dynamic content as well.
Trial and error may be your friend here to select the right dynamic content for the step ahead but with a little careful thought and patience, it’s not as hard as it may look at first.
In the UK example, even though we know we are bringing back 3 countries within our JSON data.
There are many ways to filter and select JSON data either within Power Automate or on demand within the Power App but as each adds more complexity to follow in this tutorial, we will assume the connector has retrieved a list of data relating to 1 country or region.
Read the File that has been created
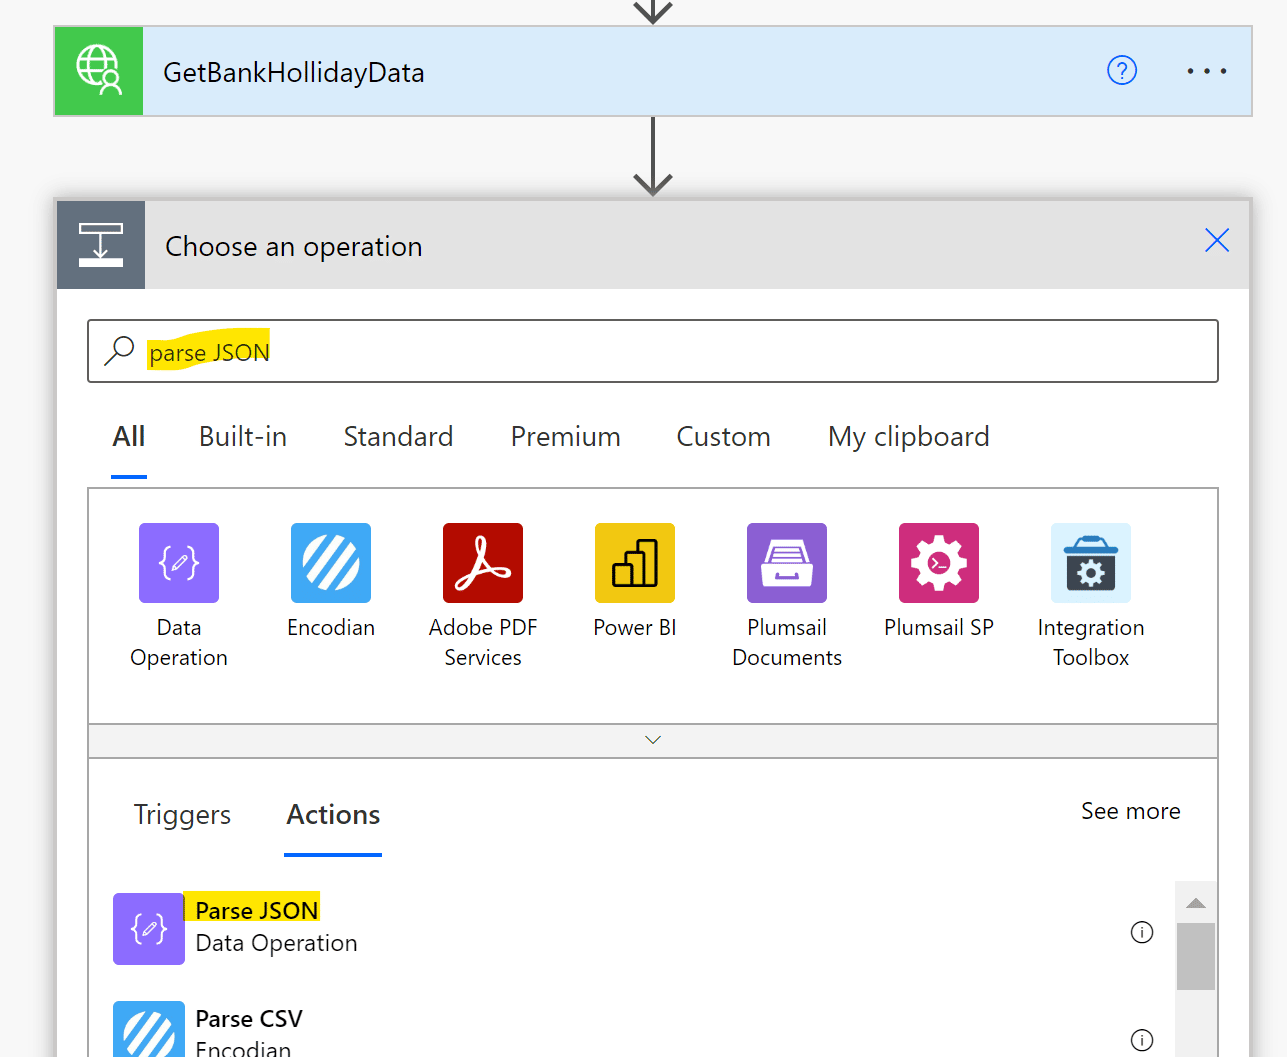
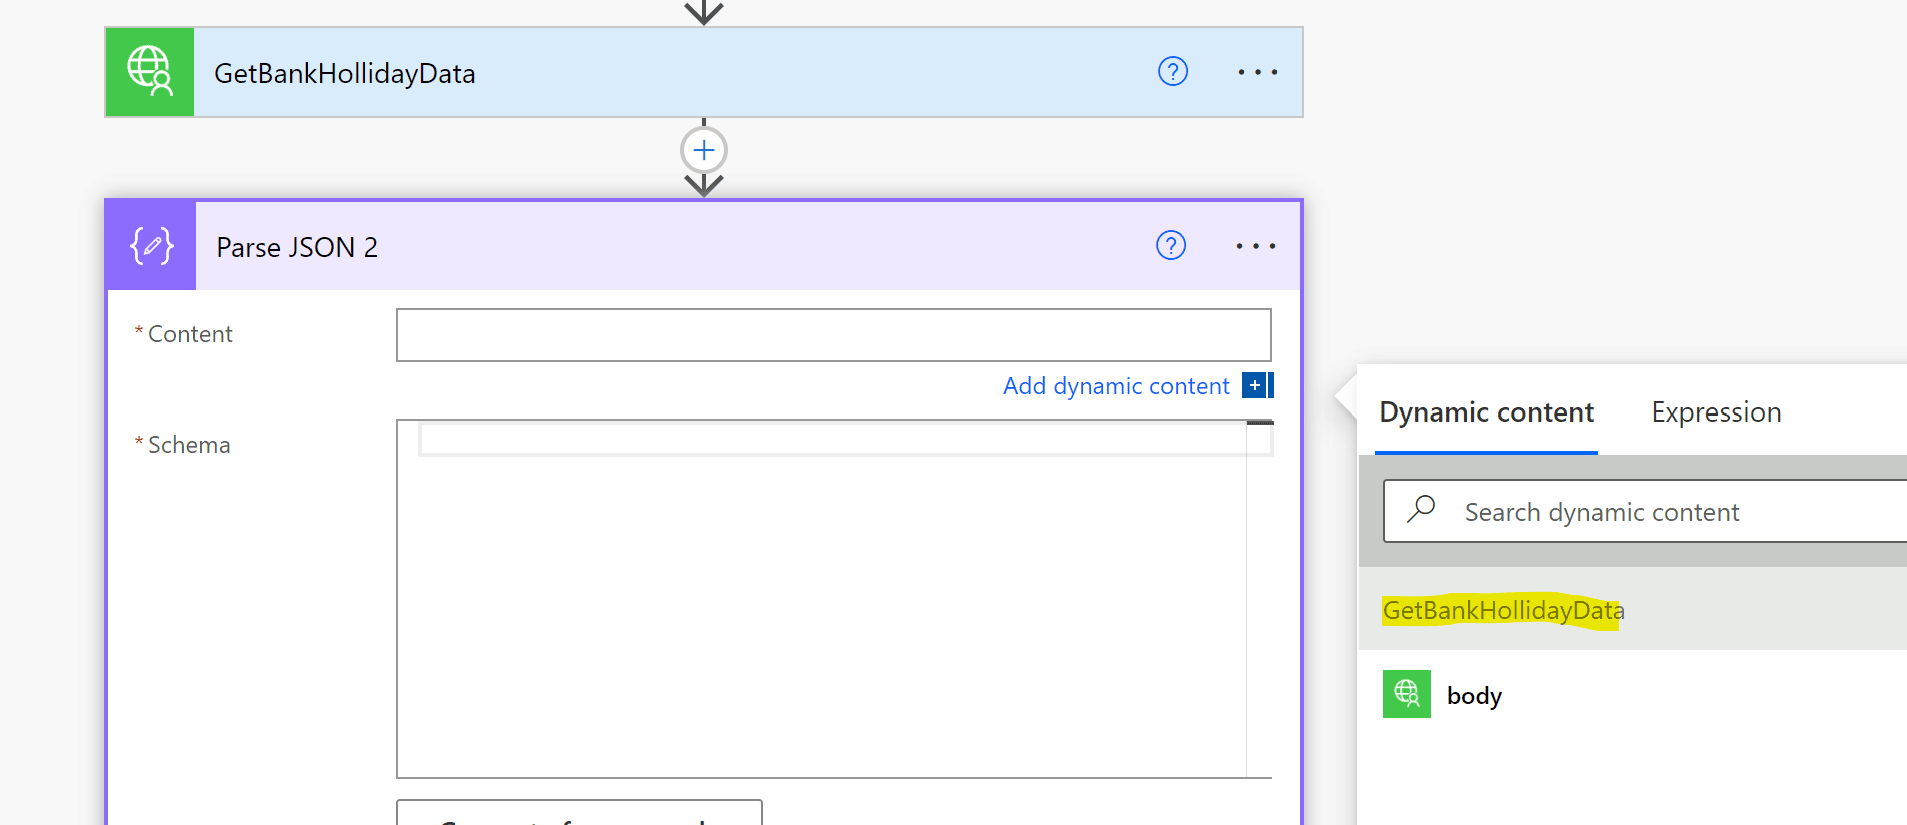
- Add a new action ‘ParseJSON’
- In the Content box, using the Dynamic content, select the Body from the previous step
- To complete the step, you need to let the action know how the data is organised. To do this, you provide a schema for it to use.
- If you have sample data (i.e. by going to the web page, you can let it generate the schema for you by using Generate from sample – paste the data into the window to generate a schema)
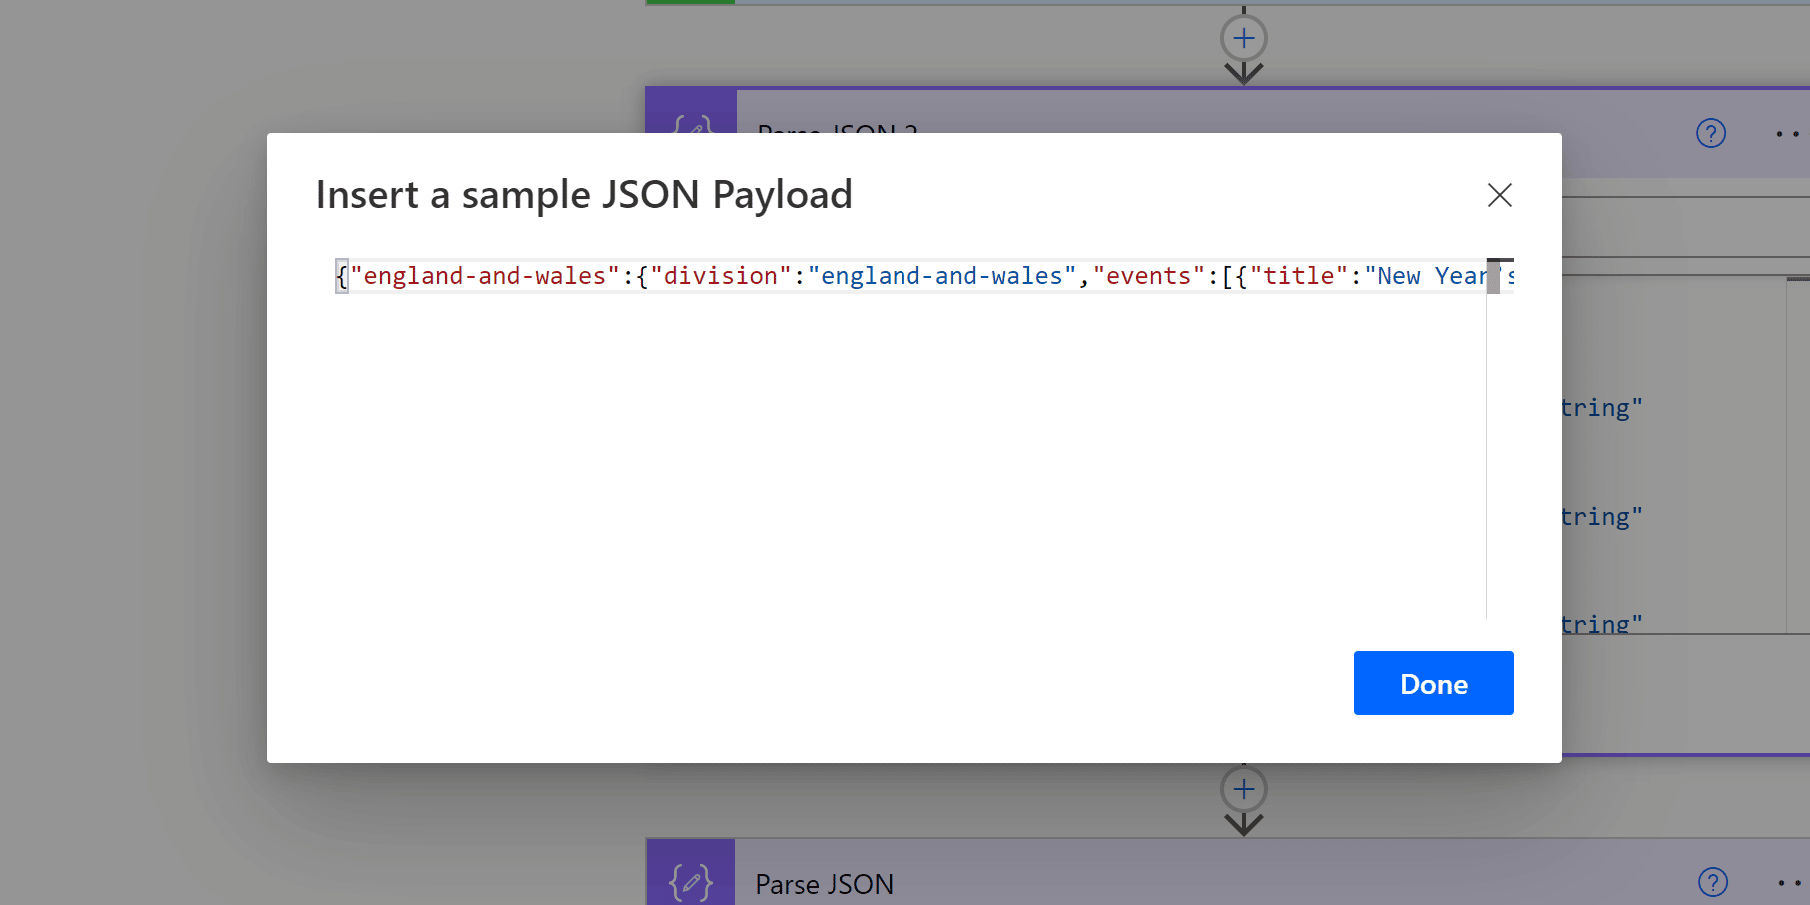
- Click Done and you will now have new Dynamic Content to use from this step.
Write Data to SharePoint
- Add a new action to Create Item in SharePoint
- Select the SharePoint list you created earlier
- Now you will see the fields you can populate.
- To populate the SharePoint field from your bank holiday data, choose a field in the dynamic content that maps to the column in your list.
- NOTE: As soon as you choose an element in the dynamic content, your action will automatically be wrapped within an Apply to each.
- This is because Power Automate knows there is more than one item of this type in the list you gave it. Leave this as it is but continue to choose the right content to fulfil the list
- To keep the tutorial simple, we will only pass the England Bank holiday data to a SharePoint list.
- If you wish to pass additional regions or countries, you can do so using Parallel branches in Power Automate.
- You would also need to filter your data within the power app when checking your leave dates but as mentioned we wont take these steps in this tutorial.
Your Dynamic content may not look exactly like the image below, however there should be a ‘set’ of data you will be able to work with.
In the example below, the ‘sets’ repeat as there is one for each UK region of England, Scotland and Northern Ireland but let’s assume you only see 1 set.
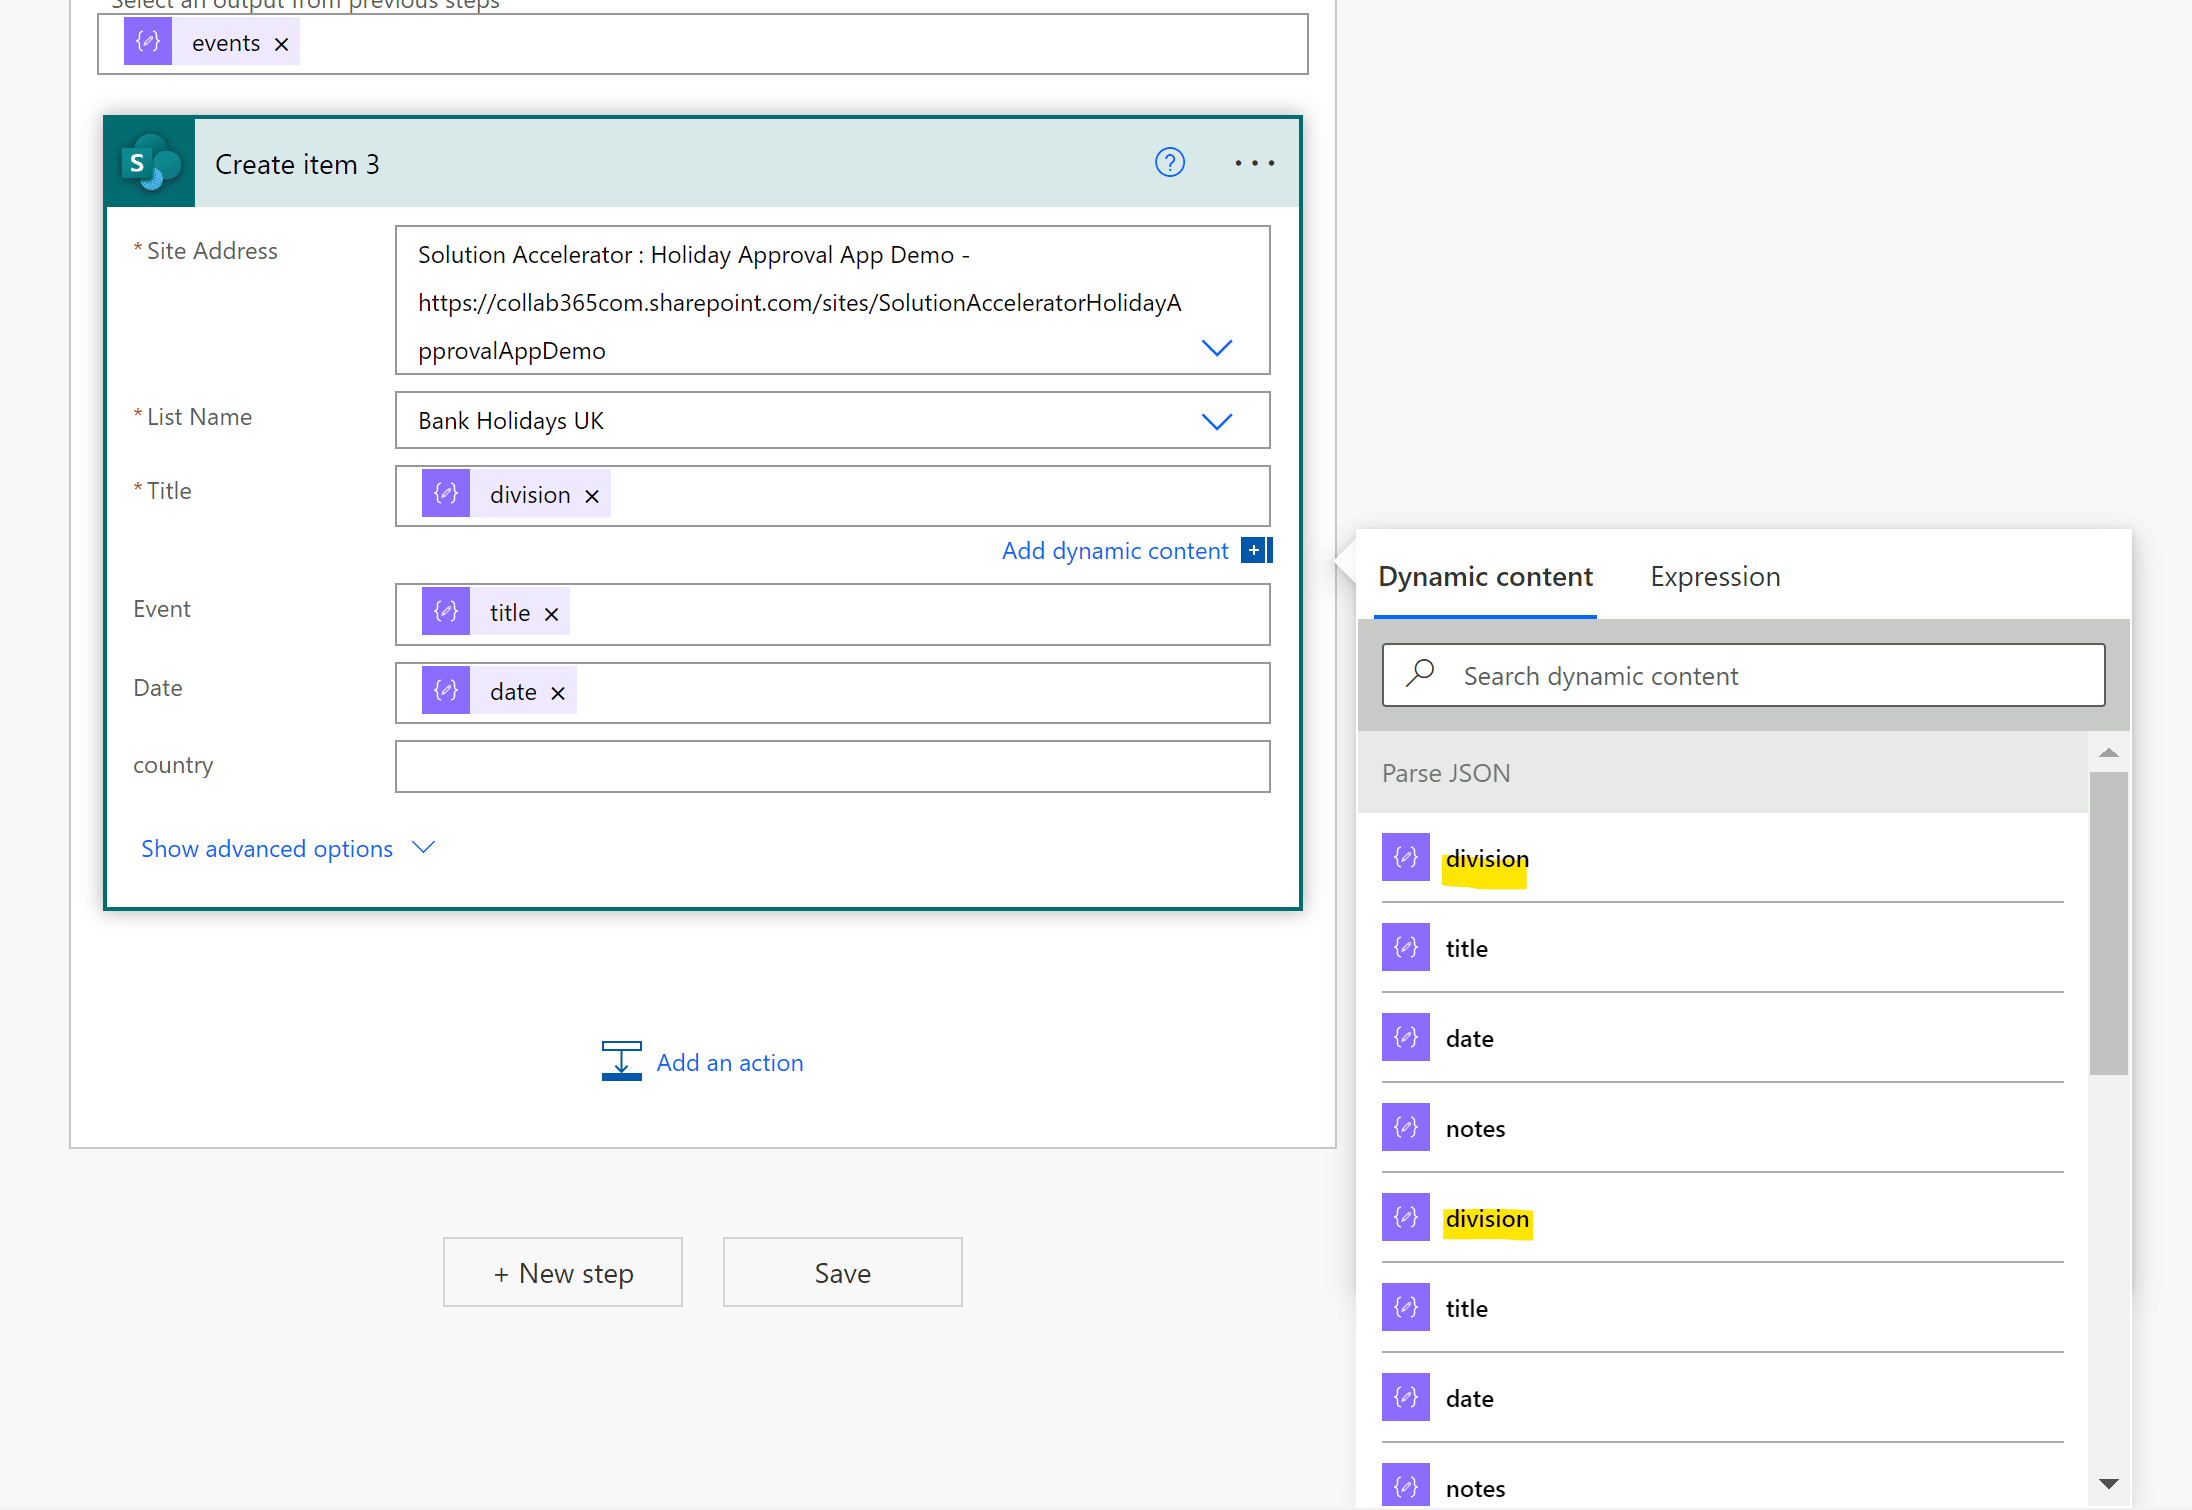
- Add the Dynamic content to the SharePoint list by adding the Dynamic content elements to each Column for your list.
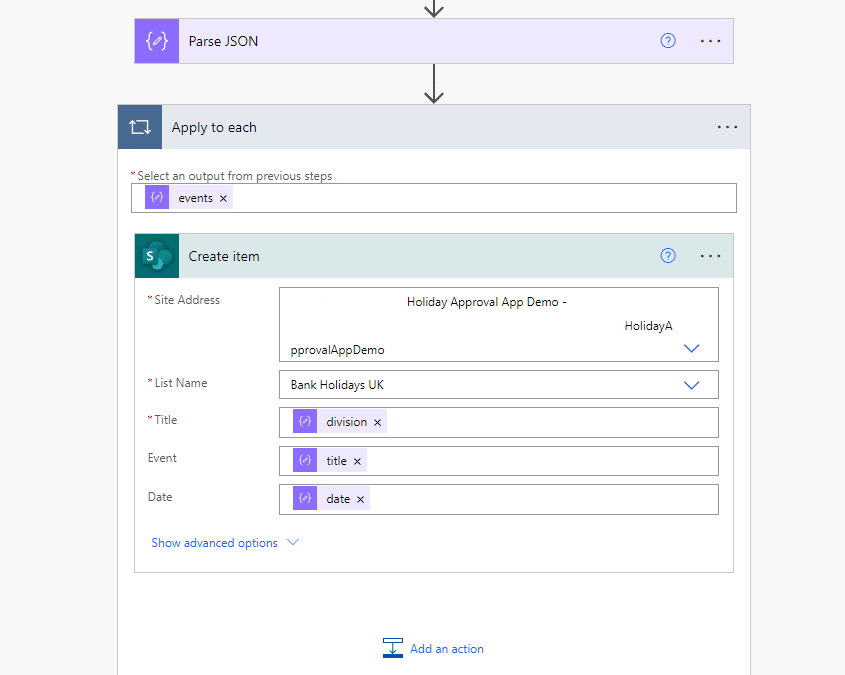
- Save and test this flow
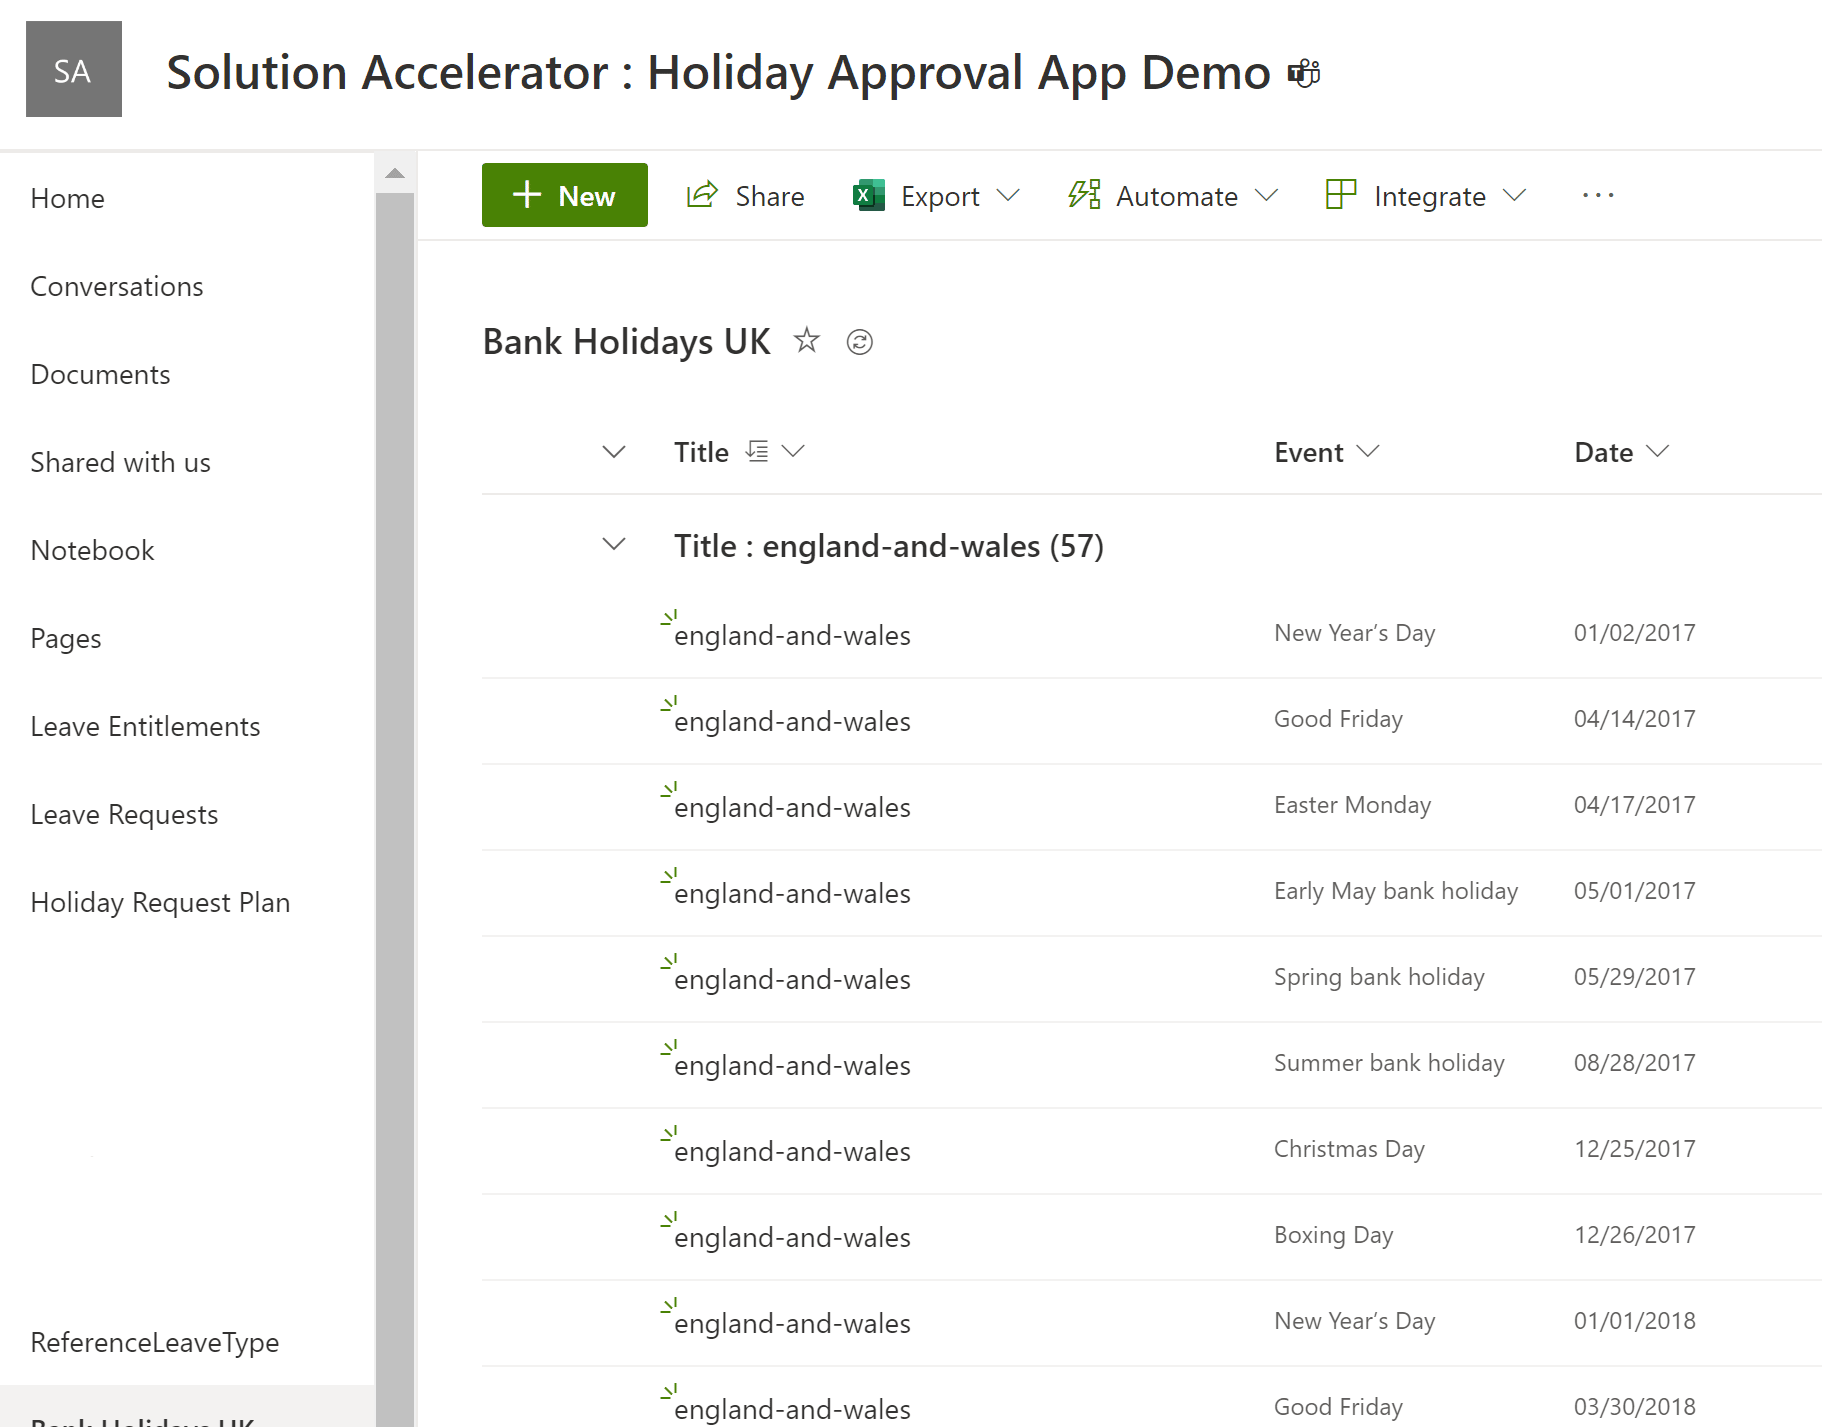
You should now have bank holiday data stored in your SharePoint list. Congratulations!
Removing the Weekends and using the SharePoint data
Your SharePoint list may look something like this now for your Statutory leave/bank holidays.
Using Bank Holiday Data in the App
To use multiple items of data from a SharePoint list within a Power App, the easiest way is to pull the data in using a Collection.
In this example, we take all the data from the list into the App at the beginning.
The assumption is that each person in our organisation is based in the same region. If this is not the case, this is where you can Filter your SharePoint list within the ClearCollect formula.
- Navigate to Make.PowerApps.com and Edit your app
- In the Onstart property of the App add the following formula.
- This ensures that whoever launches the app has the correct bank holiday data to hand. (replace the list name with the list containing your statutory holiday data).
ClearCollect(colBankHolidays, Filter('YourSharePointListName', DateDiff(Today(), Date) > 0))
Skipping Weekends and Bank Holidays
There are many options for this part.
The way we suggest is to follow the inspiration provided by Mathew Devaney and provide some visual cues as to whether the selection of dates crosses a weekend or a bank holiday.
The elements you will need to add to your Power App are:
- Retrieve the SharePoint list of Bank Holidays into your app (DONE)
- Determine the date range for the Leave request
- Remove any weekend days
- Remove any bank holidays that fall within the range requested
- Provide visual cues to the person using the app so they can understand why their selections may need adjusting.
- An additional step you may like to experiment with (which is not covered here) is to disable the Submit button if there are errors in the data selection.
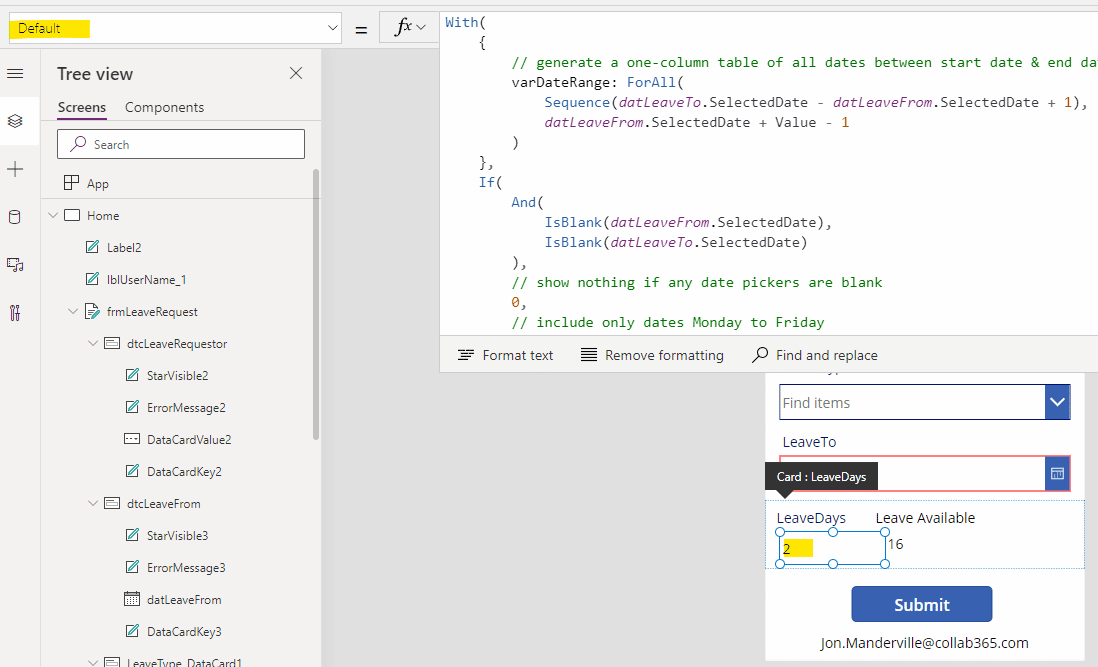
Here’s what you need to add (Note: we named our date pickers datLeaveFrom and datLeaveTo. Adjust according to your name in the app).
- Place this formula into the Default Property of your Leave Days control
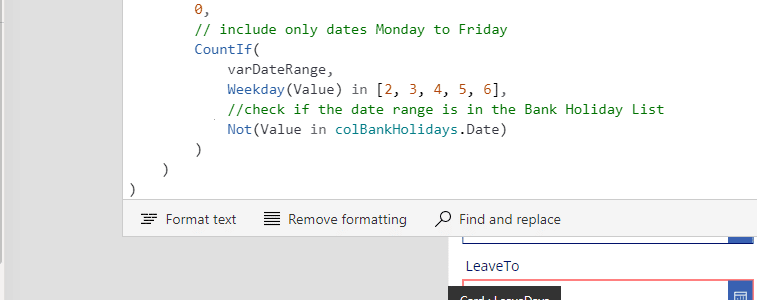
With({varDateRange: ForAll(Sequence(datLeaveTo.SelectedDate - datLeaveFrom.SelectedDate + 1), datLeaveFrom.SelectedDate + Value - 1)}, If(And(IsBlank(datLeaveFrom.SelectedDate), IsBlank(datLeaveTo.SelectedDate)), 0, CountIf(varDateRange, Weekday(Value) in [2, 3, 4, 5, 6])))
- The formula first makes a 1 column table from the dates you have selected.
- It checks for no entry and then so long as there are dates selected, it counts ONLY the days of a normal business week (this is the Weekday element and it uses the fact that Sunday in Power Apps is day 1, whilst Saturday is referred to as Day 7)
- Now add a calculation to remove any dates in the date range you have selected which ALSO exist in the list of Bank Holidays you gathered into a collection earlier.
- Add this formula (using the name of your Statutory leave collection)
Not(Value in colBankHolidays.Date)
The only remaining step now is to provide some visual cues to the end user if something is amiss on their date selection.
- Add the following formula to the BorderColor property of the Start Date picker in your app.
If(And(Or(Weekday(Self.SelectedDate) in [1,7], Self.SelectedDate in 'Bank Holidays UK'.Date, Self.SelectedDate > datLeaveTo.SelectedDate), !IsBlank(datLeaveFrom.SelectedDate), !IsBlank(datLeaveTo.SelectedDate)), Red, Parent.BorderColor)
- Add the following formula to the BorderColor property of the End Date picker in your app.
If(And(Or(Weekday(Self.SelectedDate) in [1,7], Self.SelectedDate in 'Bank Holidays UK'.Date, Self.SelectedDate < datLeaveTo.SelectedDate), !IsBlank(datLeaveFrom.SelectedDate), !IsBlank(datLeaveTo.SelectedDate)), Red, Parent.BorderColor)
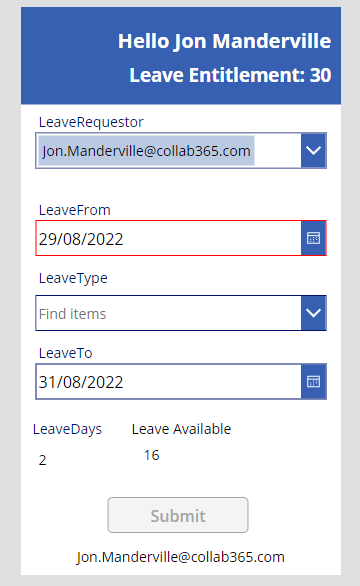
Now give it a test with dates that span a weekend and also a bank holiday. Your Leave Days should be adjusted accordingly for the weekends.
You can add validation to the Submit button to ensure that all conditions are ok before you Submit but that’s one to experiment with outside this tutorial. Our recommendation is to use the DisplayMode property of the button along with an IF condition.
In this example, in the UK there is 1 bank holiday and a weekend between the selected dates which are removed automatically.
That’s it for this bonus module, we hope it’s helpful. Collab365 Team
If you have any comments of suggestions on improving the solution, let us know via hello@collab365.com
Thank You To : Eduardo Russo(5-Day Challenge Graduate) for doing the significant legwork on this solution and also reference to Matthew Devaney for the Power Apps guidance, we tuned it to meet our need but your post really helped.
