
Overview
Office 365 brings a new development paradigm for us to learn for continuing delivering rich SharePoint 2013 solutions, including a new ‘Visual Studio in the cloud’ with the Napa toolset. To learn how this can be utilized for better development, I took on the challenge of learning the toolset by pulling in data from my favorite Blog Site, http://Blog.Slalom.com.
While I’ve done many projects using client-side JavaScript in Content Editor Web Parts (CEWP) to asynchronously pull data from SharePoint Lists and other locations, I wanted to learn what the new experience would be. This is especially important as many organizations start looking to the cloud for hosting their SharePoint.
The Details
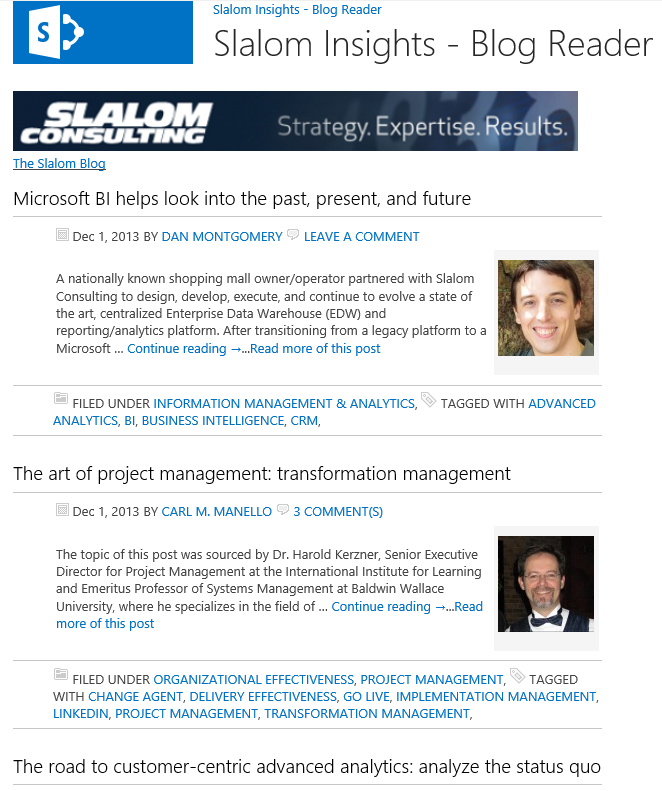
While Slalom Consulting is your partner of choice for solving complex business problems with some of the best talent in the world, we also share our insights and experiences through many forms on the Slalom.com site. There are many articles, videos, and blog posts covering varied topics from technical to organizational. But sometimes you just don’t have the time to head on over while supporting your teams. To solve this for myself, I wanted to consume our Slalom Insights blog posts, showing them in a “Top 10” compact format right inside SharePoint 2013 Sites.
1) App overview
So how to begin? I broke the process down into manageable tasks around filling-in the missing data in my ‘internal hard drive’.
Figuring out Napa & Office 365
This part was the biggest learning curve as the Software-as-A-Service (SaAS) toolset is similar-looking enough to Visual Studio for familiarity but different enough to wonder what all these icons are for and how to hook all this new client-side development up, let alone wondering “where is my code??”. Once you start developing you have the option to export to Visual Studio 2012 and continue working from there but for the needs of my solution I didn’t need to jump to that next level of development. The big thing to remember is that no matter whether you continue developing ‘in the browser’, or export to Visual Studio, you are always creating provider-hosted apps that only run client-side.
To get started, you’ll need to sign up for an Office 365 Developer site and then install the Napa developer tools (link below). This may take a bit for your new SharePoint instance to spin up so pace yourself. Once it’s online and Napa is installed, you’ll see the ‘Build an App’ icon on your new landing page. This will be your gateway to Microsoft’s new NapaCloudApp.com where your projects will live, connected to your Live ID.

2) Office 365 getting started
Our new window starts with the Napa overview allowing us to create new apps or modify existing ones. Clicking the ‘Add New Project’ icon brought me into the design surface of our new app. From previous development projects we’ll quickly understand our 4 main coding sections: Content, Images, Pages, and Scripts. Each one has beginning files for quick ramp-up and is designed for a separation of concerns so our project doesn’t seem cluttered. There are several buttons down the left quick launch but we’re only concerned with ‘Settings’ for setting up properties, ‘Run Project’ for seeing if what we are building is working, and ‘Publish’ once we’re ready to push a major version to our development site.


3) Napa toolset overview
So what do we have to work with here?
- Content— This is for CSS files but this could also include text and XML documents if those were needed as well
- Images— This section is pretty self-explanatory about any images we want to show in our application
- Pages— This area holds all our .ASPX items for displaying content, with a “Default.aspx” that will contain our HTML controls. Note that the first page is called “ClientWebPart.aspx” which will be our wrapper for all other pages and should seem very similar to previous SharePoint development methods
- Scripts— The last section is where all our client-side JavaScript/jQuery will live to handle all the data/DOM manipulations we put in the “Default.aspx” page. We can add in our own JavaScript files for importing, all we need is to put a <script/> reference in the “Default.aspx” page so they are loaded
- Note that line #1 was added for us containing “use strict”, which is a convention in ECMAScript5 that helps ensure better code. See the link below for more information
What’s the data?
So now that we have our infrastructure ready, I needed to figure out how to get all those awesome posts into a consumable data feed. Blog.Slalom.com uses WordPress, which has a great REST API implementation thus making my life really easy since it is very close to SharePoint’s own REST feeds. The only item we have to keep in mind is that after some trial-and-error I stumbled across references that the Office 365-SharePoint 20113 Web Proxy requires a requests response size must not be larger than 200 KB. This means that we’ll need to restrict how much data is brought down to not ‘blow up’ our application.
Consuming the data?
Using the WordPress API documented in the References section, I put together a URL that creates a GET request for the blog site, which based on my simple design, I just need the top 10 items of all posts on page load. WordPress automatically returns the posts in JSON format and in descending order so all I need to do is limit the feed to the last 10 items. This is possible using the OData structure implemented.
https://public-api.wordpress.com/rest/v1/sites/blog.slalom.com/posts/?number=10

4) WordPress REST Feed
Outputting something useful
Ok, so we now have our infrastructure and data, let’s put together something useful. The first thing I need to do is setup the properties of the App so it will run and have a nicer look to it. Clicking on the Properties button on the left Quick Launch pops a modal dialog with the following sections we need to update.
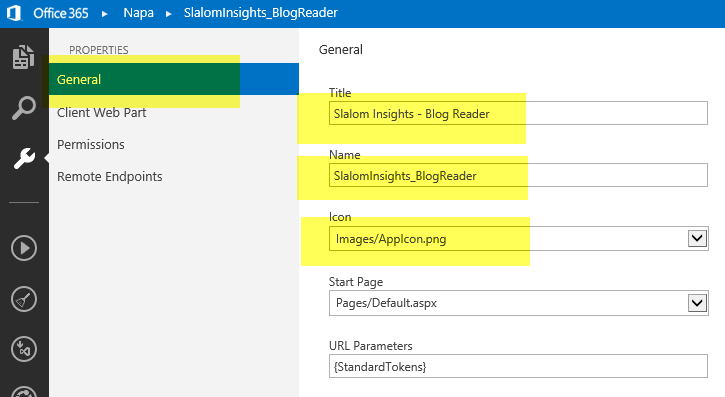
- In the “General” section we need to update our Title field for our users to see and optionally create a showcase image that is 96 pixels wide by 96 pixels high. Initially this is for when your users add it on one of your Site pages, but if you publish to the Office Store you will need this image for submitting.
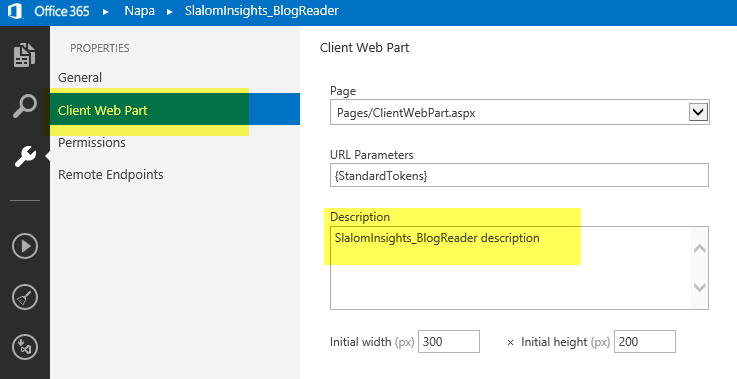
- The next section, “Client Web Part”, is what is dropped onto one of your Site pages and only needs the Description field updated to describe what the App does.
- The last section we need to update is “Remote Endpoints” which is a required safeguard protocol for allowing your App to pull in the external data source (WordPress REST URL) we will add into the App.js file later as well.
- “Permissions” is the 4th section, but in cases where you are not coding against SharePoint Lists/Library’s, this section doesn’t apply.

6) Properties Overview
The second task needed is to build out my HTML to use for filtering and pushing the asynchronous data into. Taking the existing “Default.aspx” page, I add in HTML for a title, navigation link, and a placeholder div to push the rendered output HTML into.

7) Napa – Default.aspx
Now we’ll switch over to the Scripts > App.js file and add in our necessary JavaScript functions. First thing we need to do is build our global variables on lines #2-5 to hold URL’s and such for calling them easily later. Then in our $(document).ready() section starting at line #8, we put in our function that kicks off everything, formMessage(), when the DOM is ready. In this function starting on line #11 I create the header HTML showing a title with a link, replace the empty header Div with this text, and finish the dataserviceUrl. Finally, I pass the dataserviceUrl to the buildFeed(feedTarget) function, beginning on line #20.
The buildFeed(feedTarget) function starts out by putting a ‘working’ image on the page in the empty output Div to let users know the code is running. We’ll replace this with our results output as soon as it becomes available but it’s good User Experience (UX) with asynchronous code. The next step is we make a jQuery .ajax() call starting on line #24 to asynchronously get our results, but note that we have to call SharePoint 2013’s new SP.WebProxy which lives in the new “_api” namespace (line #25), the same namespace where all the REST and Web Services calls have been moved to. This is now how we ‘get out’ to retrieve data from external sites in Office 365. Since it’s jQuery we’re calling we still have our standard success & error methods when the call returns. In the data section starting on line #27 I pass in our real feed URL as a parameter along with the dataType to output on line #31.
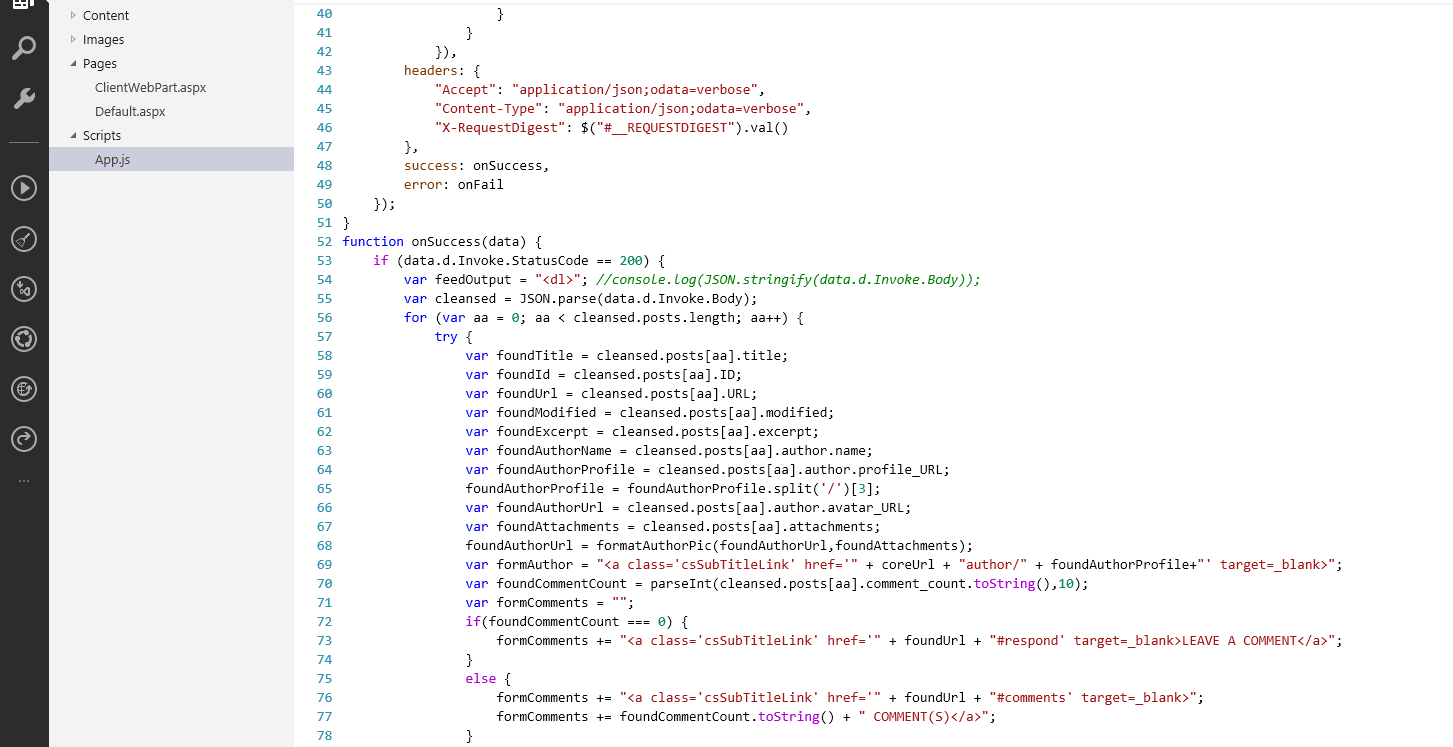
In the Success output of the call on line #48, I send it to a new function onSuccess(data) on line #52 that is passed the JSON/text output of my SP.WebProxy call to manipulate. Now since this is just text right now my output from the call needs to be turned into JSON so I can work with the data as objects using the JSON.Parse() function, passing in a specific parent-to-child path. I also added a success check on line #53 to verify I received a success (code 200) from the service call and output the error on the screen for troubleshooting.
After parsing the body of the response on line #55 I verify the data comes back akin to image 4) above. Starting with line #56, I begin a For loop on the JSON objects, which an enumerator was automatically created for me.
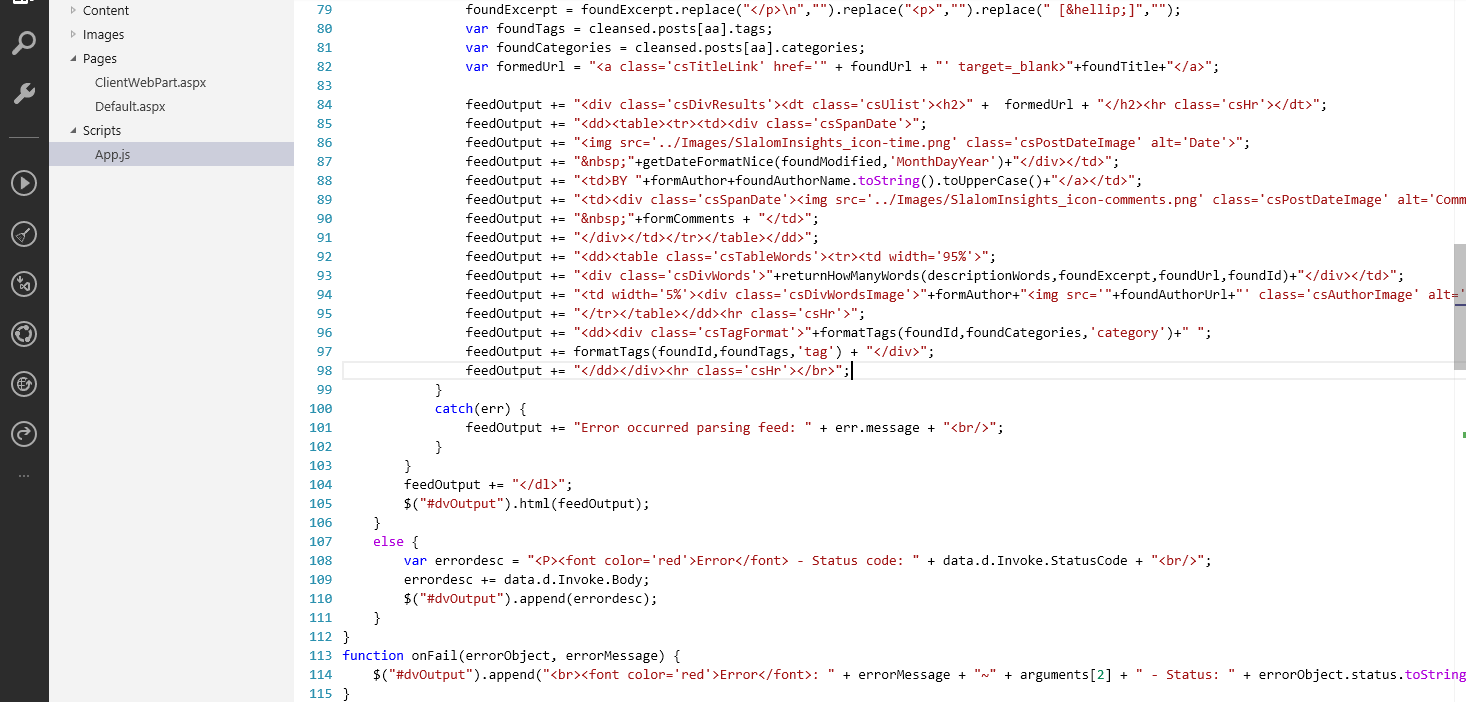
In each pass through the results, lines #58-82, I use jQuery object notation to extract the metadata I want into variables and append them to my primary HTML variable that I then have jQuery replace my empty Div with on line #105 after all the results have been looped through. I then concatenate all my results into the variable to update the Div’s HTML once as it is less expensive to add to the string than continually manipulating the DOM with multiple appends to the Div’s HTML.
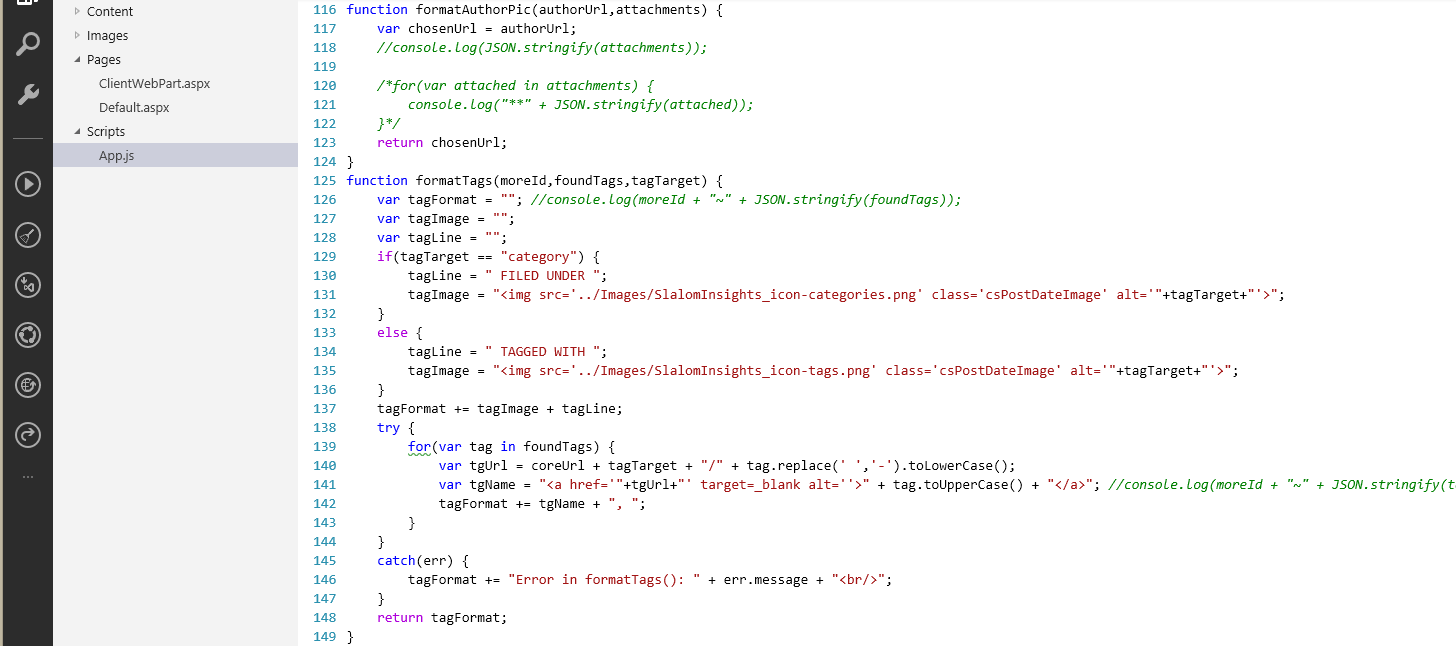
The last lines of code, lines #113-198, are helper functions that I reuse to output a custom image based on the item link and to reformat JavaScript dates (my arch-nemesis!). The result is a client-side application similar to how we’ve built JavaScript/jQuery ones before, but more tightly integrated into the new SharePoint 2013 format.


8) App.js code
With our code built out, we now need to see if we did it right. Using image 3) above I click on the Preview/Run Project button on the left side which does a quick packaging and launches a page for our application review. If it all looks good, and actually works right, then we can move to doing a full publish below. Otherwise it’s wash, rinse, & repeat in our code above to fix the bugs.
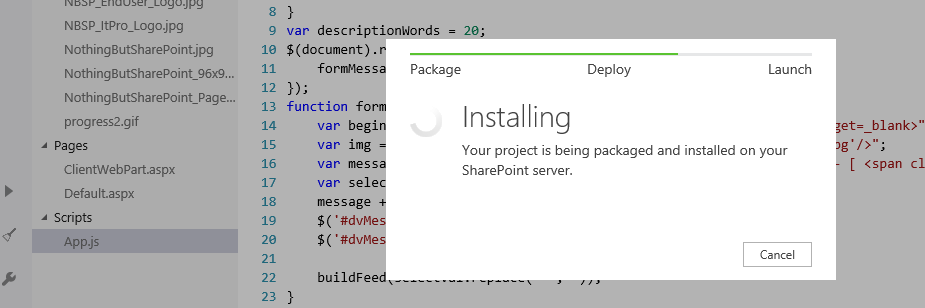
9) Run Project
As you can imagine it took me some trial and error (quite a bit actually) to get to the point of actually publishing a fully-working App to my Office 365 development site, but needless to say I finally was able to get everything aligned. When ready, click on the Publish Project button from image 3) above. A modal dialog will appear asking the name of the package file to store in our development site, whether to create a public link to share, and the version of the App. Copy down this version if you are thinking of publishing your App to the Office Store / Seller Dashboard as they won’t read it from the file, instead making you input it in one giant text box (but that’s a different painful story).

10) Publishing the App
Once the App is successfully published the modal dialog will show us the success message with several links, the important one leading to the publish location. This is actually a List behind the scenes at the root of your Site Collection called “App Packages” where you manage the properties of the App, very similar to Sandbox solutions in SharePoint 2010 minus the resource throttling. Following the link we are sent back into our development site in this hidden List where we can see all the Apps we have built or uploaded. If we look on the left Quick Launch under Recent, you’ll notice that our new App is at the top. Clicking on it loads the application page our solution runs in just like in image 1) above.

11) App Packages
Summary
So that’s all it takes, and once you’ve done it a few times it becomes easier to reuse components. While I’ve shown the new “Napa way” to build Web Parts, don’t worry, we can still build our tried-and-true client-side JavaScript solutions in Office 365 using the Content Editor Web Part or the new Script Editor Web Part, as well as continuing with Sandbox solutions. But building fresh or migrating your apps to the new ‘best practices’ development using the new toolset will allow your users to take full advantage of solutions in the new cloud.
