
In this tutorial, I want to demonstrate the following:
- How to create a form with Microsoft Forms.
- How to synchronize a Forms response between a Form and Microsoft Excel.
If you prefer, you can also watch the video here:
If you’ve not used Microsoft Forms, I recommend looking at it. It’s a straightforward tool that allows you to gather user feedback from within and outside your organisation.
Create a new form with Microsoft Forms.
Let’s get Microsoft Forms running by navigating to “https://forms.microsoft.com.” Once it’s loaded, login in with your Office 365 credentials.
From within Microsoft Forms, select the option to create a new form and call it “The Excel Summit Sports Quiz.” At this point, you can optionally customise your form with colours and images.
In this tutorial, let’s select a theme to make it look more exciting on the right-hand side of the top toolbar and select “Theme.” You can choose whatever you prefer, but I prefer a brown theme.
Once you’ve given the Form a title and made it look more exciting, you will need to add some questions. As you create the questions, you will notice that you can have many different types of questions.

As we’re not going too deep with Forms, I will use several “choice” questions. Our form intends to survey the respondents to see who their favourite sportsperson is across several sports.
Add three choice questions as follows:

One of the benefits of Microsoft is that it’s a WYSIWYG (What You See Is What You Get) editor, meaning that as you design your form, it’s very close to what a respondent will see.
Once your form is complete, we now need to get some responses! To this, click the “Share” button on the top menu.
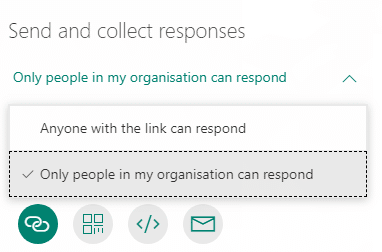
At this point, you can see we have two options:
- Anyone with the link can respond – meaning that anyone in the world can answer.
- Only people in my organization can respond – meaning that only those in your organization’s Azure Active Directory can fill in the form.
Join 11,000+ in the Collab365 Academy
Master Microsoft 365, Power Apps, Power Automate, Power BI, SharePoint with Exclusive Access to 450+ Hours of Expert Training and a Wealth of Resources!
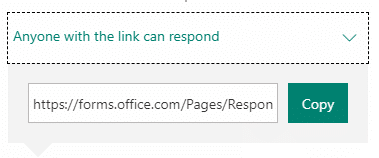
I love the first option, as this means you have a very excellent way for people externally to interact with your business. When the data comes into Microsoft Forms, you can quickly forward it to other services such as SharePoint or Excel (see the rest of this tutorial).
Click “Anyone with the link can respond” and “Copy.”
To prove it works for anyone, load up an incognito browser (Chrome) or InPrivate (Edge) and paste the link. You will be presented with the form, as illustrated below.

Now fill in Form, choose your favourite sportspeople and click “Submit.”
That’s it! You have now created a survey, and the response will have been saved inside of Microsoft Forms.
Analyzing the form response data.
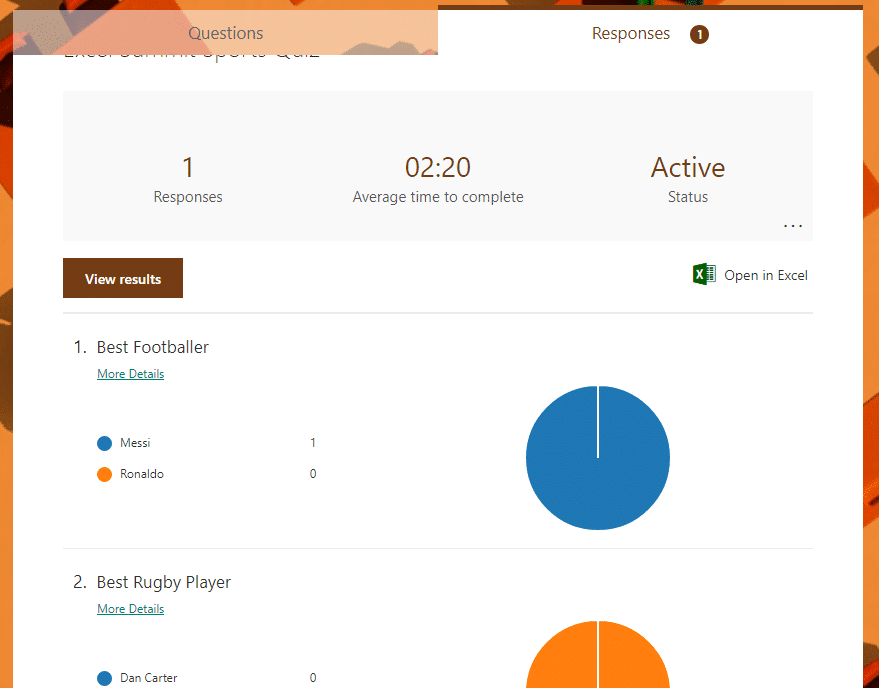
Navigate back to the browser tab where you edited the form, and you should see a new response.
Here is an example of the Response (accessible by clicking on “Responses”):
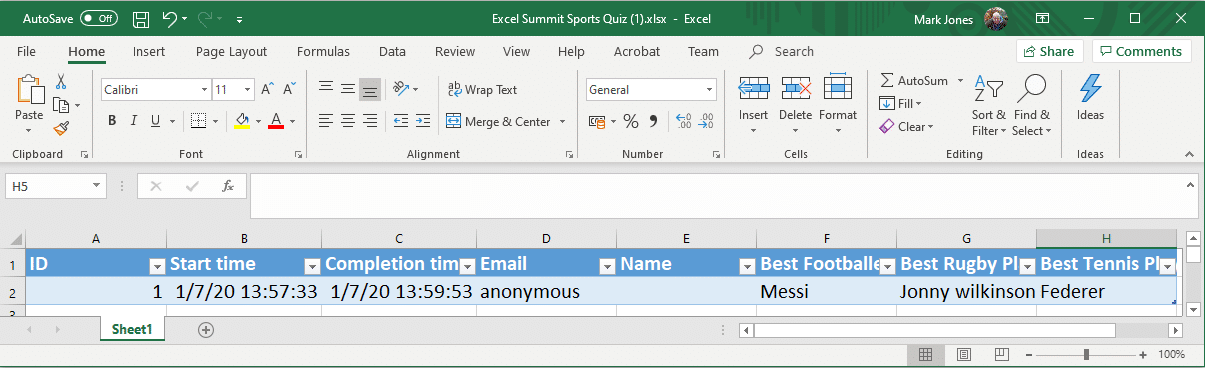
You can also click the “Open in Excel” link. If you do, it will look something like this:
I am pretty sure you will agree that it was not only speedy but straightforward to go from nothing to a running form. As easy as it is, there are a few reasons why you would want the survey responses sent to another data store such as SharePoint or Excel. Here are some that come to mind:
- You may have an existing Excel Spreadsheet and would like to supplement it with the responses.
- You may want your Team to be alerted to the response in Microsoft Teams.
- You may want to filter, sort, and share the responses with your team in SharePoint.
- You may want to share the live responses with your team as they come in. If you wanted to do this with Forms, you’d need to give everyone permission to see the responses and ask them to keep downloading the spreadsheet.
There will be many more use cases where you need the survey responses outside of Microsoft Forms. The next part of this tutorial explains how we will automatically send the answers from Forms to an existing Excel Spreadsheet.
How to synchronize a Forms response between a Form and Microsoft Excel.
To get around the drawbacks of keeping the data in an isolated spreadsheet created by Forms, we will now look at another Office 365 service called Power Automate.
Power Automate (previously Microsoft Flow) is an automation tool that allows you to pass data between one or more services. It can be configured to run on various triggers, such as:
- When a new SharePoint list item is created, or
- When a new Form response is received
When the trigger (event) occurs, Forms will listen to it and carry out the steps that you specify.
I like to think of Power Automate as the “glue” between Microsoft’s services.
That’s a very rapid intro to Power Automate, and you can find many more comprehensive articles on the Collab365 Community. Now it’s time to create a Flow within Power Automate that passes the response data as it comes into our Excel Spreadsheet.
Create an Excel Spreadsheet from within Microsoft Teams
Before creating the Flow within Power Automate, we need to store a spreadsheet in a destination we can “see” from our Flow. You can store your spreadsheet within OneDrive for Business or a “normal” SharePoint site. However, in this example, we’re going to use Microsoft Teams.
Please note: If you don’t use Teams, then go ahead and store it in a SharePoint document library or save it to OneDrive for Business.
Steps:
Open Microsoft Teams and navigate to a Team you would like to create the Excel spreadsheet within.
Click on a Channel and navigate to the “Files” Tab.
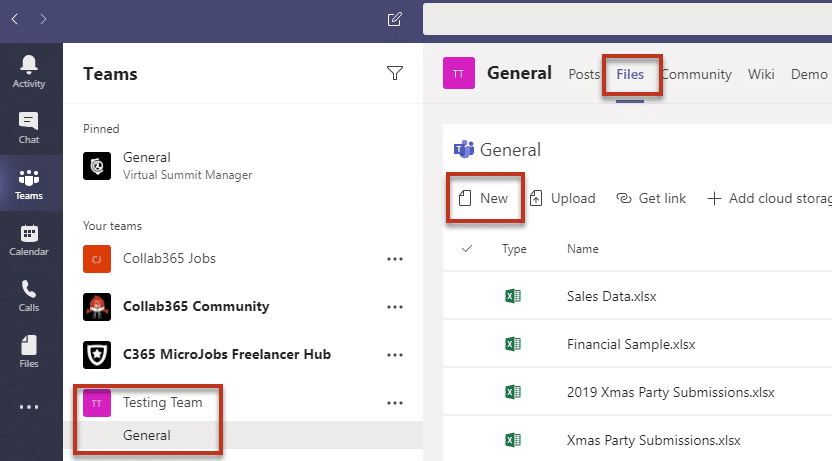
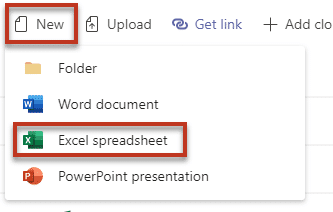
On the “Files” tab, select “Add new Excel Spreadsheet.”
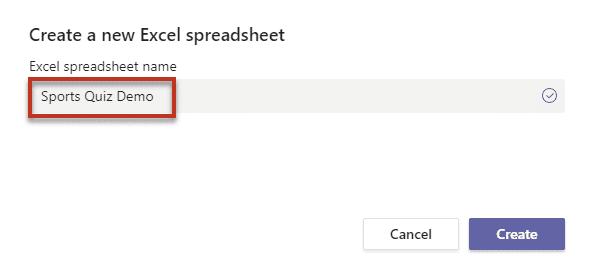
Once you’ve done this, give your Spreadsheet a memorable name, as you will need to use that in Power Automate later.
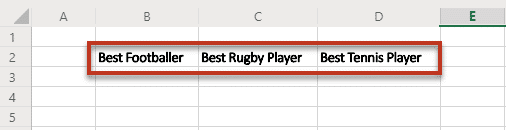
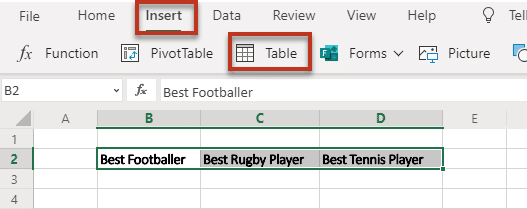
When your Spreadsheet has been created, open it, and add the following values into three adjacent cells:
- Best Footballer
- Best Rugby Player
- Best Tennis Player
Now highlight the three cells and choose “Insert” > “Table”
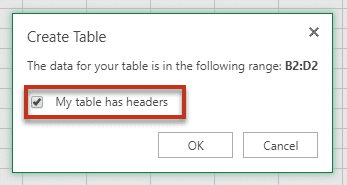
On the dialogue window that is then displayed, select “My table has headers” and click “OK.”
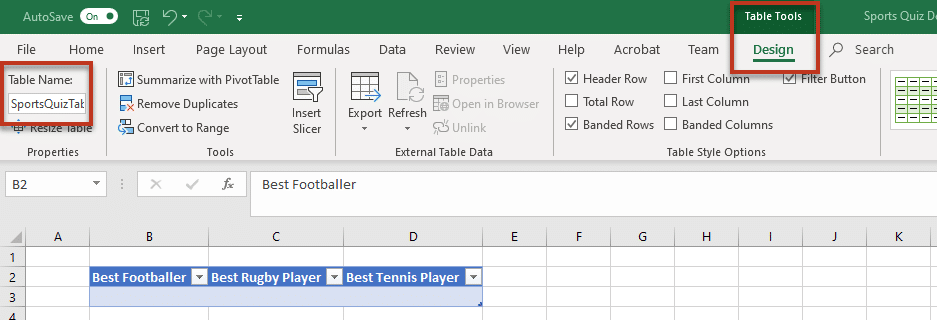
You should now see your spreadsheet looking something like this :

Excel has created a data table that Power Automate can automatically send data to. As you will need to refer to the name of the Excel Table in your Flow, I strongly recommend you rename it to something more meaningful. When writing this, it’s impossible to rename a table using Excel Online, so you need to do using the desktop version of Excel. So open the spreadsheet in desktop Excel and rename it.
Join 11,000+ in the Collab365 Academy
Master Microsoft 365, Power Apps, Power Automate, Power BI, SharePoint with Exclusive Access to 450+ Hours of Expert Training and a Wealth of Resources!
Here’s a quick snippet of how you would achieve that:
That’s all the setup work we need to do in Excel, so let’s work on getting the data from Forms into Excel via Power Automate.
Create the Flow in Power Automate
For the next part of the tutorial, navigate to a browser and open up https://flow.microsoft.com. Once it’s loaded, click “Sign in” and use your Office 365 credentials.
Steps:
- From the menu on the left, select “My Flows.”
- Select “Create.”
- Select “Automated Flow.”

Now we’ve initiated the creation of an automated flow, we need to give it a name and select the trigger. The trigger defines when the flow starts, so in our case, we need it “wake up” and run when a new Microsoft Forms response is created.
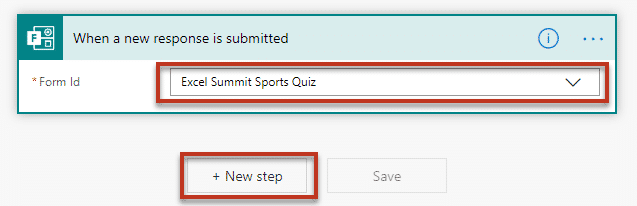
Select the options as outlined in the following image.
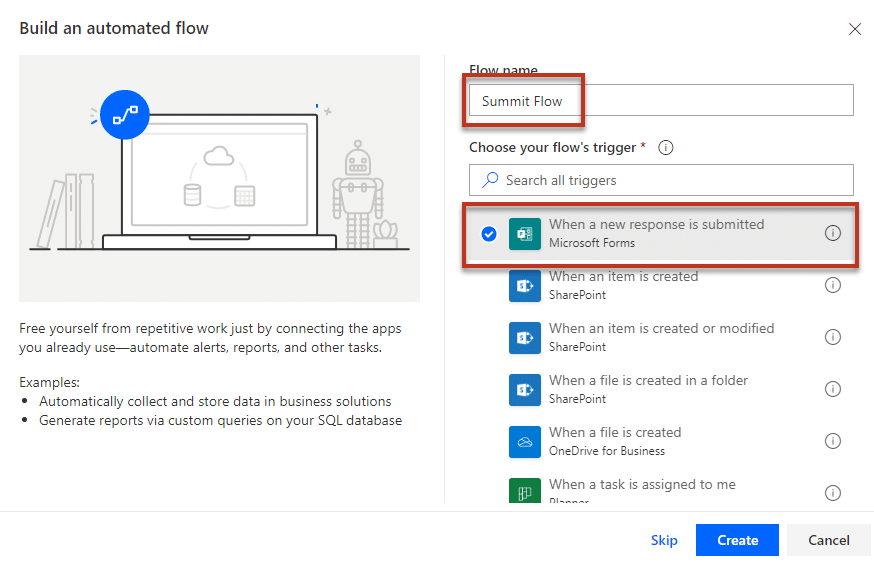
Once you’ve filled in the dialogue, hit “Create.” You will then be taken to a designer canvas with just one trigger defined like this. Select the form you created in the dropdown and click “New step.”
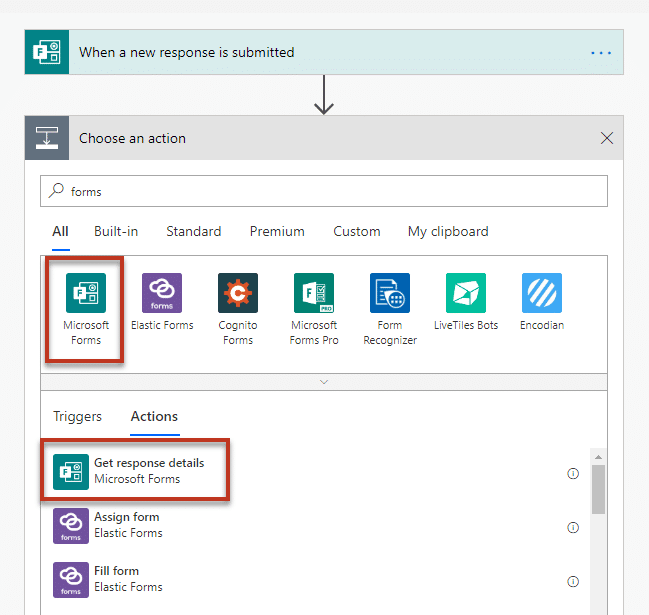
In the New step, we need to search for “Forms,” select “Microsoft Forms” and then choose “Get response details” (as illustrated below). This step allows us to get and reference the incoming Forms response so that we can use it in a later step.
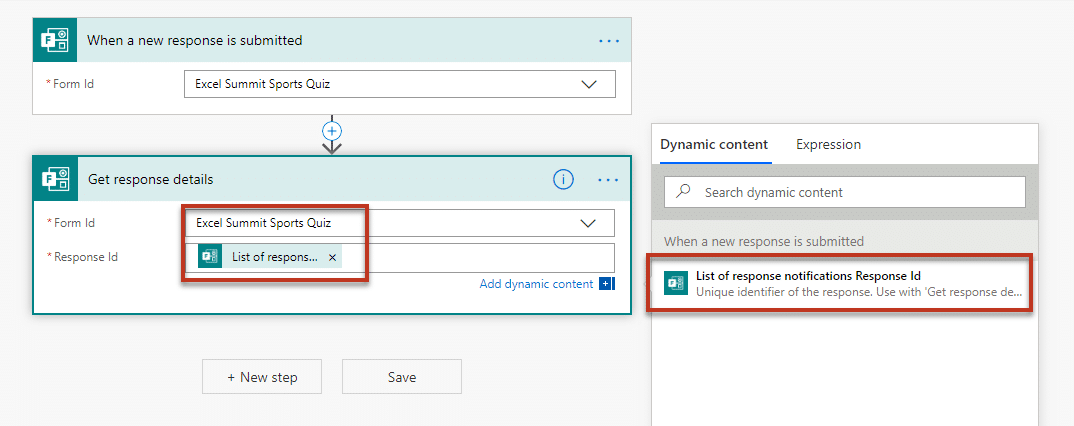
Once you’ve added the “Get response details” action to the canvas, you need to select the same form as in the first step and also set the “Response Id” to the “List of response notifications Response Id.”
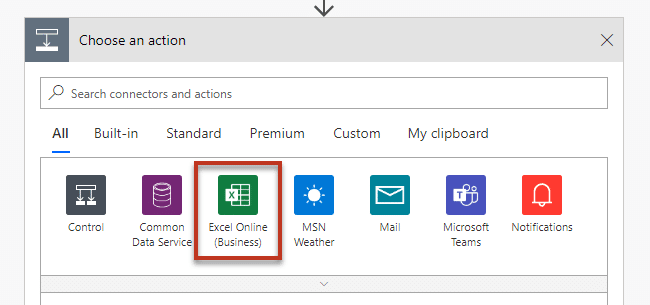
If we save and run the flow now, it will do nothing more than run when a new response is submitted. It won’t do anything useful with the data. To continue adding functionality, we need to add another step, which will allow us to take the reference to the forms response (just created by the end-user) and send it over to Excel Online.
Once you’ve hit “New step,” please select the “Excel Online (Business)” option:
Then select the spreadsheet created in the previous section (using Microsoft Teams) and set the values in the data table.
From the list below the Excel Online (Business), choose the option to “Add a row into a table.”

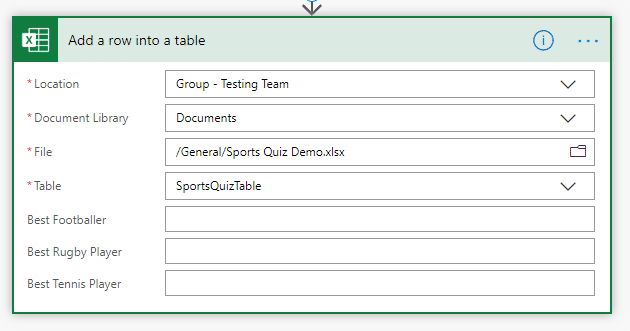
The values to enter in this next step are pretty self-explanatory. You need to find the location, document library and file name of where you stored the Excel Spreadsheet. You then need to choose the table name that you created.
If everything worked, you should see your column headers, as shown below.
Next, we need to tell the step where to get the “Best Footballer Player,” “Best Rugby Player,” and “Best Tennis Player”. To do this, click on “Best Footballer” in the Power Automate step, and you should see a selection box automatically appear to the right as follows:
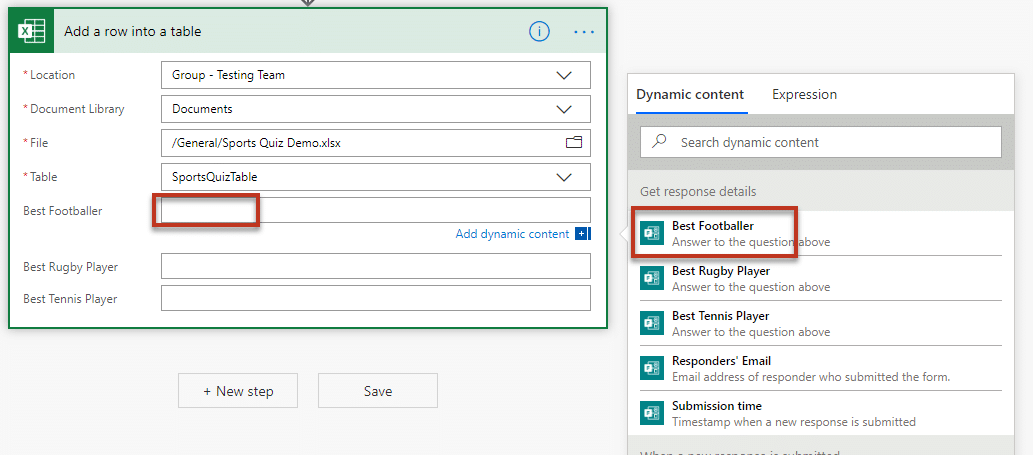
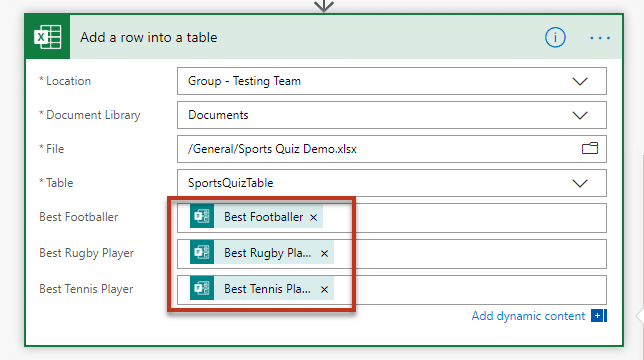
Click on each of the Footballer, Rugby and Tennis players and select the Forms field on the right. Once you’ve finished, it will look like this.
That’s it! Save the form, add a response to your Microsoft Form, and then check it got piped into the Excel Spreadsheet. If it did, you should see something like this.
