
Before we begin, let me answer this question. Can there be a roadmap to mastery in MS Flow? Well, the short answer is No. But the roadmap can significantly help you in starting your journey towards gaining Mastery in Flow and learning some advanced tricks. In this session, I will take you through the journey which consists of 10 milestones and in each milestone, you will learn an advanced feature of MS Flow.
Note: If you haven’t worked with Flow before then I suggest to spend some time playing around and learning the basics of Flow.
This is a write-up from a session given by Jon Liu at the Collab365 Flow Virtual Summit. You can still grab this as an EBook (along with our other Flow EBooks), in our Flow EBook Bundle. Alternatively, you’d can also grab a pass to watch all of the Flow video recordings.
10 milestones to learning and mastery of Microsoft Flow
- Getting started with the templates
- Understanding triggers and actions
- Understanding outputs
- Debugging with Compose and Test
- Logic constructs
- Expressions
- Looking for trouble
- Patterns
- Custom Connections
- Surprise???
Milestone 1. Getting started with the templates
A great starting point on your journey to Mastery of MS Flow is the OOTB templates available in MS Flow. There are plenty of templates based on common scenarios available to play with so take some time to explore them in order to understand the basics of Flow if you are fairly new to it.
Milestone 2. Understanding triggers and actions
Every flow consists of actions which can be any operation e.g. (Getting a document from SharePoint) and at least one trigger which defines how and when your flow gets started.
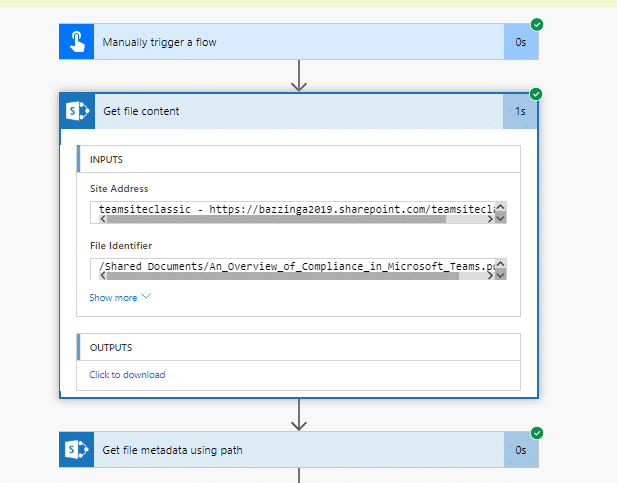
Let’s create a flow and add two actions,
- Get SharePoint file Content
- Get SharePoint File metadata
You will need to connect them to a SharePoint Online tenant and then use one of the libraries to get the file. For this demo we will manually trigger our Flow. The flow should look like this,

I will cover the purpose of Compose in the upcoming milestones, but for now, think of it as a way to see the output of our actions.
Milestone 3. Understanding outputs
In our previous milestone, we created a Flow with two SharePoint actions. Now we will take a look at how we can use outputs from actions and how we can chain an output from one action as an input in the next action.
In this milestone, we will cover
- Every action has an output
- Binary as an output
- Filter by Type
- Date as a string
Now let’s go back to the flow we created in the previous milestone and run it.
Click on “see flow run activity” and expand the Get File content action. The output is the content of the file. If the content is too large then the flow designer will not be able to show the content and instead, you will see a link to download output. Click on “download output”.
Now if you search for the body, you will see the content of your file is in binary format.
The output of the Get SharePoint File metadata action is basically the file properties or metadata. So, the output of each action depends on the type of operation.

Filtering by type
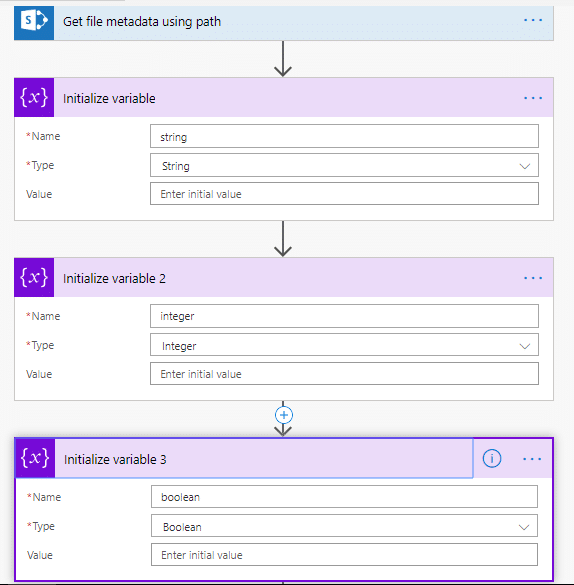
Let’s create three variables a string, an integer and a Boolean using the initialize variable action.
When you will click on value and check out the dynamic content, you will see the properties from all the actions that exist before this action but you will notice that it filters to show only the options of the type of your variable.
So, if you click on the value for integer value you will only see two options, ItemID and Size

Similarly, if we go to Boolean we will only see isFolder property.
Mastery Tip: Sometimes, we want to bind a value of different datatype to the variable e.g. “assign a string value to an integer”. We can do that by using Compose action. So, let’s add a Compose action to our flow and assign a string value “Display Name” to it from previous action.

Now, let’s add a new initialize variable action and make it an integer. You will see that you can assign compose action output to it. The output of compose action is available to all types of variables.
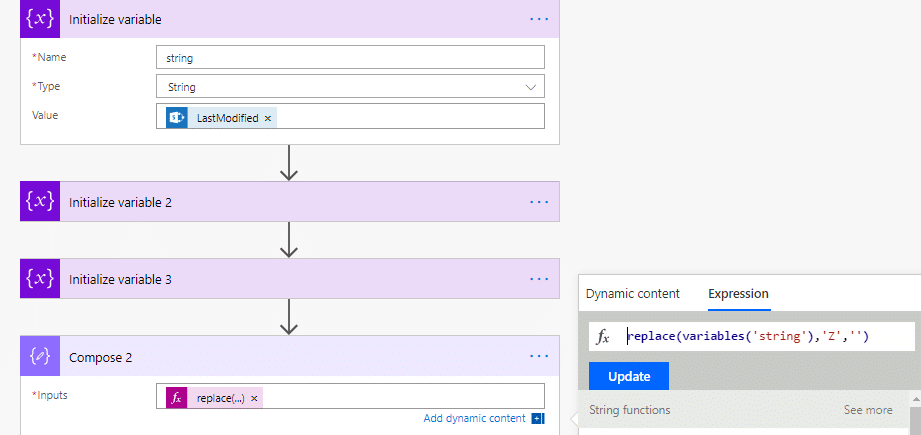
Date is string
Now to see how dates work in MS Flow, Open the string variable and select a LastModefied property from dynamic content. Now add a compose action and use an expression to replace Z with an empty string from the string variable.
Now run the Flow, after the execution completes expand the string variable action and you will see that it has the date value which is in a specific format of “yyyy-MM-ddThh:mm:ssZ” where Z represents the time zone. If you remove Z like we did in compose action you will see the local time as output.

Mastery Tip: If you want to do any datetime calculation in flow, first convert it into local time like we did by removing Z and then attach time zone information. You can do that by using Convert time zone action. Add a convert to time zone action to our flow.
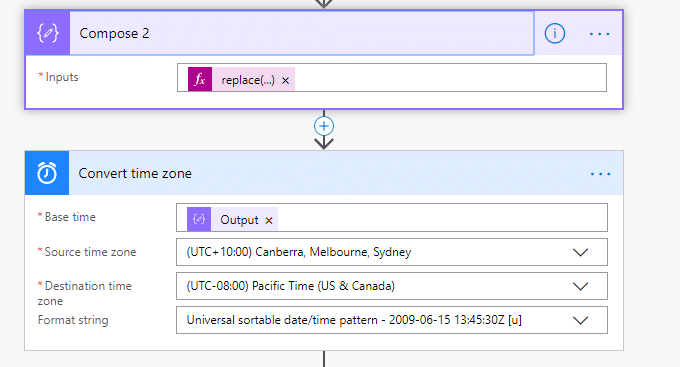
Now, save and run the flow again. Expand the convert time zone action and you will see it converts the datetime from local time to UTC time zone. Similarly, you can convert the time from UTC to local time zone as well.
Milestone 4: Debugging
Debugging is very important for troubleshooting and analyzing the output of our actions. In this milestone, we will cover how we can do debugging in Flow including
- Compose is our friend
- Test is our other friend.
- Cues in Colors
- Data is in Json format
Compose is our friend
So far we have been using Compose action to view our action outputs. Compose is a very powerful action which allows you to view the output and manipulate the output before it can be used as an input in other actions.
Tests is our other friend.
Tests is how you basically run your flows during development in order to test the results. It allows you to test using new data in which real-time data is retrieved from your connections like SharePoint or you can run it using data from previous runs.
Gotcha involving Tests
Let’s add a Send an Email action to our flow and use your email address for sending an email. Assign Display name to both subject and Body and add the file content output as an attachment. Your action should look something like this

Now when we test with using data from the previous run, you will see an error in send email action.
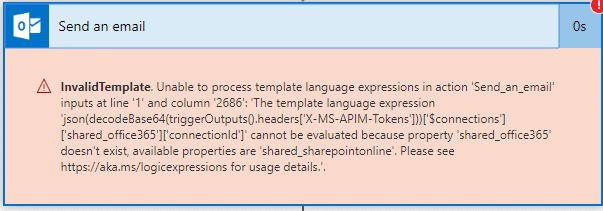
What it means is that outlook connection does not exist. Since in the previous run there was no outlook connection available because Flow uses the data when the flow was triggered previously. However, if you run the flow with a test, the flow will run successfully. This often gets power users when they run flow using previous data after they have added new actions with connections.
Mastery Tip: Whenever you add an action that requires a new connection then make sure you run the Flow using test and not previous data.
Cues in Colors
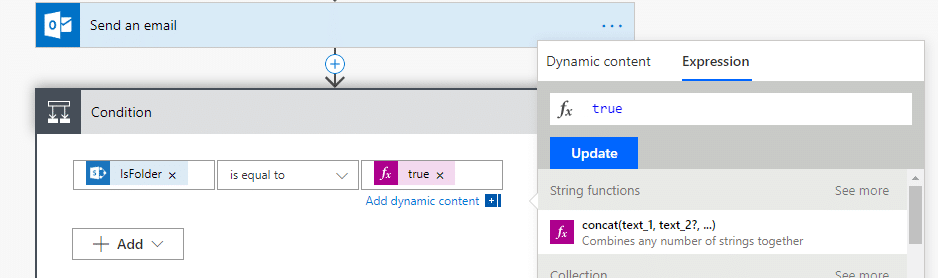
Now, let’s have a look at what cues we can get by looking at the color of output strings. First off, anything which is in black is a string. For example, when we need to use a condition and use a Boolean then it’s best to use an expression to assign the value instead of typing true.
Now, let’s add a compose action in the “if no block of the condition” and then run the flow. Expand the condition and you should see the output below.

Mastery Tip: keep an eye out for color of the fields you are comparing in conditions to make sure you compare the right types.
Data is in JSON
In Flow, data is stored in JSON format and sometimes it is helpful to see the raw values that come back when an action runs. Let’s, look at the raw data that comes from the “Get File Metadata” action.
Note: Right now there is a bug in Flow which doesn’t show “See more” in a compose action so we need to use the trick below to get the reference to the body. Add a compose action and use the Id and then use “peek code” to copy the body.
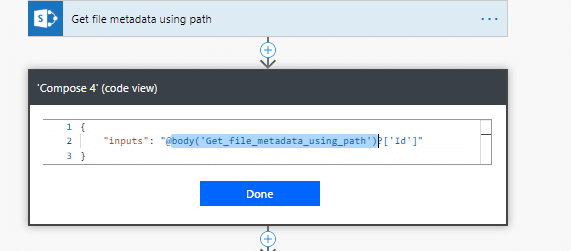
Now remove the id and add it as an expression.
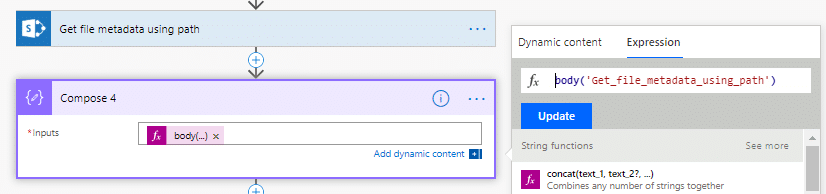
Save and Test the flow and once the run is complete expand the new compose action. You will be able to see all the property values in raw format. This is a great way to check the returned types of each property and the JSON data which comes back when action is executed.
One strange field is ETag field which starts with a “\ delimiter.
Milestone 5. Logic Constructs
We are halfway there in our journey in Flow mastery and in this milestone we will look at logic constructs. We will cover the following in this section.
- Do Until construct
- Condition tricks
- Apply to each
Do Until Construct
This is one of the basic constructs available in Flow for a logical operation.
Let’s add a “Do until” action in our flow, select integer variable and set value to 1.
Add a set variable action and set value of integer to 1 (This means that the loop will run only one time).

Gotcha in Do until
The gotcha here is in the limit. If you expand “Change limits”, you will see by default the value is 60 which means one hour. You need to increase that number if you expect your Flow to run over one hour. Same goes for timeout which is 1 hour by default and needs to be increased as well.
Condition Tricks
We have covered that in our previous milestone, where we used expression to get the raw data and check the types of each property in order to make sure we use the right type in our condition. So, if your condition is failing then look at the raw data to make sure the comparison values are of the same types.
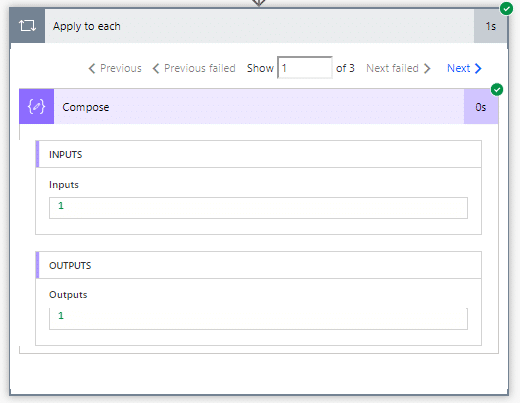
Apply to Each
Sometimes we need to fetch multiple items and see the properties of each item in which case Apply to each action comes in handy. In order to look at apply to each, let’s create a new Flow and add a “Get Items” SharePoint action. Use a list from your SharePoint tenant which has multiple items.
Now add a compose action and select ID from the Get Items action. You will see the compose action will automatically be wrapped around Apply to each action.

To better understand the use of it, let’s use the same trick we did before and add a compose action before applying to each action and select value.

Now, run the flow and then expand the new compose action and look at the output. I recommend using a tool like visual studio code (which I am using here) to view the JSON data. It helps you to understand the data and you can apply JSON format to it as well. There are multiple items returned each contains some SharePoint properties.

Now, if you take a look at apply for each action, you will see it has generated an array of compose actions each with the ID value. That’s the outer wrapping if that’s what we want. In some cases, we might need only one item in which case we can use an expression.
Mastery Tip: When to use Compose vs Variable
With a compose action we don’t need to worry about data type since it can consume anything. However, the main advantage of using variable over compose is that you can change the value of the variable after you initialize it. Whereas compose only used for runtime values and this is the benefit of compose i.e. it allows you to create datatype agnostic objects on runtime without creating variables first. This means that compose is also much faster to use then set variable.
Milestone 6. Expressions
We have used expressions in our previous milestones but I want to go a little deeper and cover some advance level settings in expression.
Let’s do a very common example of Expression. Add a compose action to our flow and let’s say we want to get only 1st item of the Get Items.
There is a trick here, go to expression and type first which will show the first expression. And then place the cursor in the middle of the parenthesis and select value from dynamic content.

We can do something like displaying title by adding “.Title” at the end of an expression. This is the simplest way of accessing JSON data using path however there are other much safer ways of doing that as well. In order to understand how to use JSON and path, let’s have a look at an example
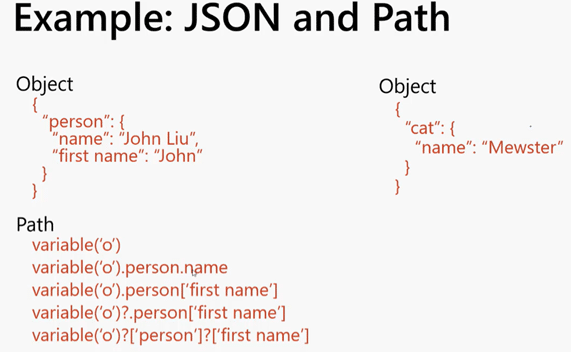
Assume we retrieve an item from a list called “person” which will return person as an object “o”. Now there are several ways to access the properties of the object, the simplest and easy to write form is “person.name” which we used in our demo, but it is also the riskiest one. Because, if the object or property doesn’t exist then flow will throw an error.
The safest and most forgiving form is “variable(‘o’)?[‘person’]?[‘first name’]” which will not result in an error even if the object or property doesn’t exist. That’s why in most of the demos you will see this being used.
Mastery tip: Use compose to debug and look at the JSON output before using the path to access the property. This is the best way of avoiding invalid property mapping errors and then drill deeper and deeper into the properties step by step.
Milestone 7. Looking for trouble
We have reached Milestone 7 and this is where things start to get interesting. So, let’s start looking for some trouble and in this milestone, we will explore the following topics.
- Peek code
- Static output
- Parallelism
- Fan-out/ Fan-in
- Timeout/retry policy
- Pagination
- Run-after configurations
- HTTP Request and Response
- HTTP webhook asynchronous callback
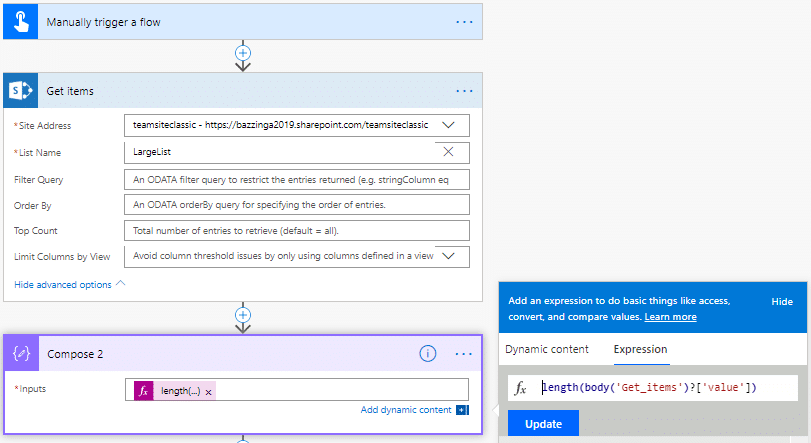
For this milestone, we will need a list with a large number of items (>5000), so we will configure our flow to fetch items from a large list. The flow will look like this.
Pagination, Timeout and Retry Settings
SharePoint has a view limit of 5000 items for the list and in MS Flow, pagination allows us to go beyond 5000 items which you can turn on from settings. We can also set the number of items we want to return using Top Count. If you hover over the Top Count you will see that the tooltip shows “default=all” but in reality, it defaults to the first 100 items.
So, let’s add a compose action and add the length expression to check the count of items returned. Also, clear off the top list value of 5000. Test and run the flow, you will see that items count is 100.
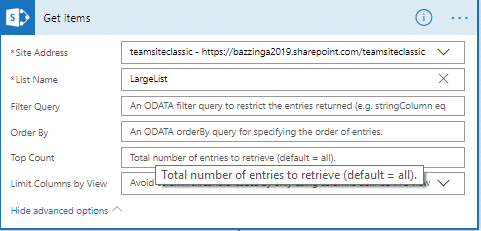
Now, if you set the value of Top count to 5000 and test and run the flow. We can see the total count of 5000 items.
For large list, with more than 5000 items, we need to use turn paging on to get all items. In order to do that, go to settings and toggle Pagination= on.

Now test and run the flow and you will see it takes longer to run the GetItems action because the action will be executed twice or more for each set of 5000 items in your list.
There are a lot of fun settings available, you can set a timeout for your query which is by default set to 1 day which means your query will timeout if it takes over 1 day to run it. Ideally, you should keep it to a lower number like 5 minutes. We can also set Retry which is by default set to 5 which means your query will retry in case of intermittent error occurred and it retries 4 times exponentially.

Milestone 8. Patterns
Patterns are basically the combination of smaller building blocks like actions, conditions, parallel branches and combining them in an elegant way in order to achieve a complex behaviour. Let’s look at one of the most common and advanced patterns called Approval Escalation.
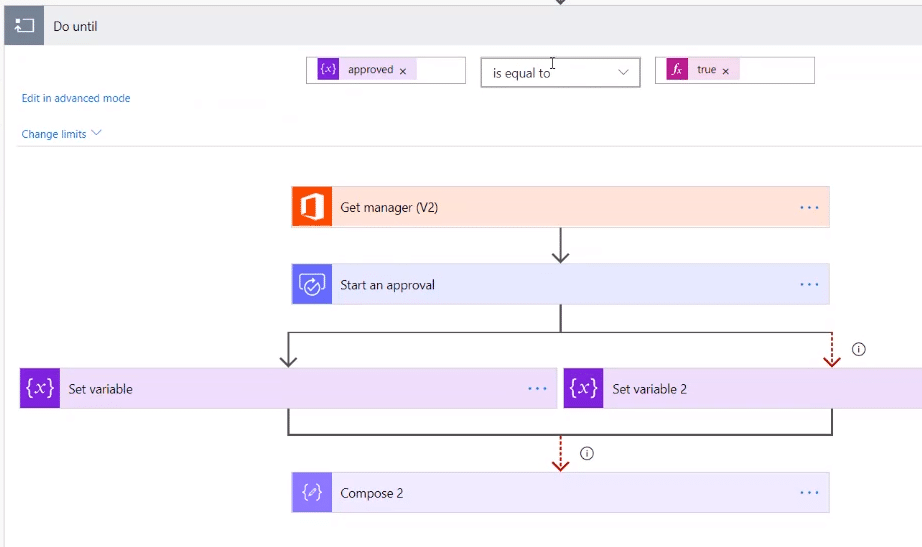
In this flow, I have a do-until action which gets the user manager using Get Manager action and then assign the Approval to a manager. There is a parallel branch for setting approval outcome and timeout. So the condition is to wait until either the Approval is complete or a timeout occurs. So if the approval is successful it goes to the left, and if a timeout occurs then it goes to the right.

This pattern was first created by Serge Luca, and it is called the Approval timeout Escalation, and what it allows us to do is to wait for the Approver to complete for 5 days and if the Approval hasn’t been completed then the Approval will timeout reset the Approval to the current manager and then assign it to escalated manager.
Escalation in MS Flow
In Flow, we don’t have an option to set escalation using some settings, so in order to achieve it we create patterns like the one above using a loop, variables and setting timeout policy and then having a parallel branch to handle normal condition i.e. approval is true and an abnormal condition in which timeout occurs and approval needs to be escalated.
Pattern is combining multiple building blocks like loops and parallel branches together like what we have done in Approval Escalation pattern and there are several other patterns available which we can create in Flow.
Some Common patterns used in Flow are:
- Approval timeout escalation
- State machines
- Sending pictures from PowerApps to SharePoint
- Bulk Copying data across Excel to CDS
- Anything Governance with Flow
- Building governance portal using Flow by building workflows over lists
Milestone 9. Custom connections
Custom connections are used for connecting to systems which are not available in MS Flow OOTB and we use HTTP action for that which is a Premium action. HTTP actions come in three options,
- HTTP
- HTTP + Swagger
- HTTP + Webhook
Generally, with HTTP you can call any external web service of App but you will need a secret or key for authentication. Now, in order to access any external resource, you will need some delegated permissions and a personal account will be used for this. In order to achieve that in Flow, you will need a custom connection. You need to learn the following elements to create a custom connection
- Open API Schema
- Authentication
- Custom connections
Milestone 10. Brave the Unknown
This milestone is yours to continue the journey in the Mastery of Flow. Anyone claiming to have the perfect roadmap can only show you the path to the point they have travelled and the rest is up to you move forward and dig deeper and learn more about concepts like how you create your own patterns.
