
SharePoint has a number of different field types that you can set, some of which, like Hyperlink fields, have two parts: a hyperlink; and a description. When editing through the SharePoint user interface, both parts of the field are displayed on the screen to make it clear what you are entering. Unfortunately the same cannot be said if you’re trying to update a hyperlink field from Flow or Logic Apps. In this blog post, we will look at the drawbacks of using Flow and Logic Apps to update a hyperlink field, and what we can do instead to achieve the desired outcome. For the purpose of this article, I will be using Flow, there are no differences to the implementation within Logic Apps.
Hyperlink Field in SharePoint
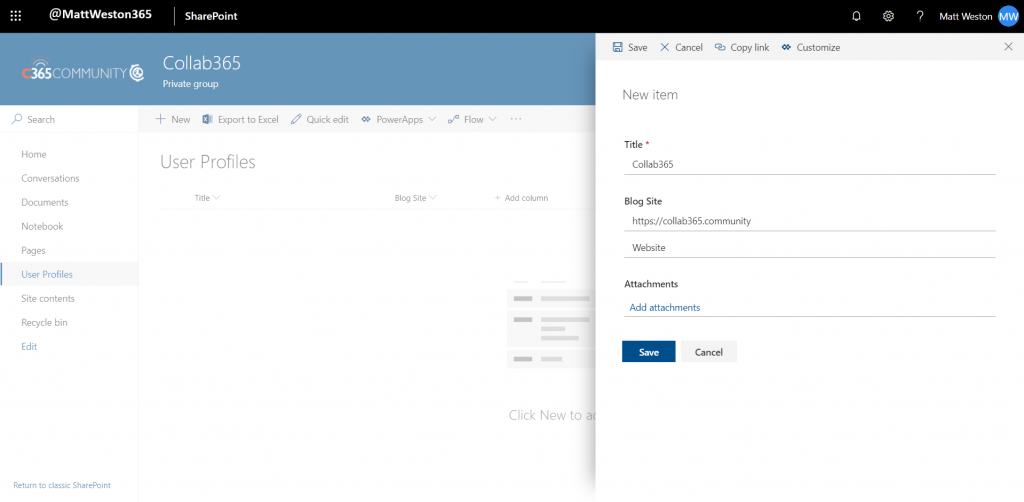
To start with, let’s look at exactly how a hyperlink field is rendered within SharePoint and how it behaves when it’s entered into a list. In my example, I have a list called user profiles which will have a title, and a hyperlink field called Blog site. When you open the edit form, you can clearly see that there are two elements to the hyperlink:
- URL
- Display text
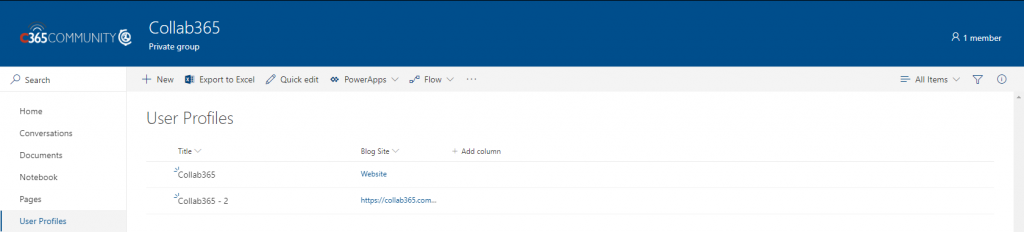
When I manually add an item into the list, SharePoint will automatically combine both parts of the hyperlink to display something which is nice and friendly to the end user.

Creating from Flow
We know that creating the list item manually will give us the desired effect, but what happens if I want to automate the creation of those list items using Flow. For the purpose of this demo, I’m going to manually trigger the Flow with a Flow button, and as a result of the Flow I’m going to put an entry into my User Profiles list. When I select my Site and List using the “Create Item” SharePoint action, it will show me the title, and my blog site fields, but only gives me a single text box for the hyperlink. So, what do I put? Just the URL?

If I do only include the URL, I’m going to just see that in the hyperlink field:
When I first came across this, I thought I know how this works! I have to separate the URL and the Description using a comma! (https://collab365.com,Website). Error: Invalid URI
I know, I need to separate the URL and Description with a comma and a space! (https://collab365.com, Website). Error: Invalid URI
Ok, I can get this, I need to surround each part of the string with quotes, and then separate them with a comma and a space (“https://collab365.com”,”Website”). Error: Invalid URI
Flow is slightly better at telling you that this is going to work than Logic Apps. Logic Apps will take the string, however your format it, and pass it into SharePoint, so you’ll end up with https://collab365.com,Website as the hyperlink.
I even tried to create a JSON string in the format which I know SharePoint will take the URL, but that just failed completely and triggered my Catch scope.
So no matter how I format this string or no matter what cunning plan I can come up with, I’m not going to achieve a friendly hyperlink in this way.
Updating with the Desired Outcome
Luckily, or not depending on your point of view, the REST API is available for us to call and use for some of the more intricate field types. Whilst this isn’t the most straight forward way, and most citizen developers will probably run a mile when they see this solution, it does work quite well.
I’m going to keep my original “Create item” action, and I’m going to create a new step using the “Send an HTTP request to SharePoint” action. It is effectively going to perform an update on the list item in order to set the hyperlink field in the desired way.

The HTTP request is basically going to use the PATCH verb in order to tell the API that I want to perform an update against the list item which I’ve identified by taking the ID from the creation action and passed into this one. It is then a case of creating the body of the REST call to update the field that you want. The key mistakes that people usually make here are getting the first “type” wrong as this identifies the SharePoint entity type. If you’re ever in doubt, use your browser to initiate a REST call by creating this URL and pasting it into the address bar (just replace everything in bold with the relevant detail):
[URL OF YOUR TENANCY]/sites/[URL OF YOUR SITE COLLECTION]/_api/web/lists/getbytitle(‘[DISPLAY NAME OF YOUR LIST]‘)
This will show the JSON body which is returned from your list, so then just perform a find for “ListItemEntityTypeFullName”, then copy the value between the tags into your REST call body.
The URL field is effectively a JSON array which allows you to specify the Url and Description, so again, just update the relevant parts with whatever you want in there. In my example I’ve used static data, however, you could use dynamic data, or expressions to create the content.
{
'__metadata': { 'type': 'SP.Data.UserProfilesListItem' },
'BlogSite': {
'__metadata': { 'type': 'SP.FieldUrlValue' },
'Description': 'Website (From REST)',
'Url': 'https://collab365.com'
}
}
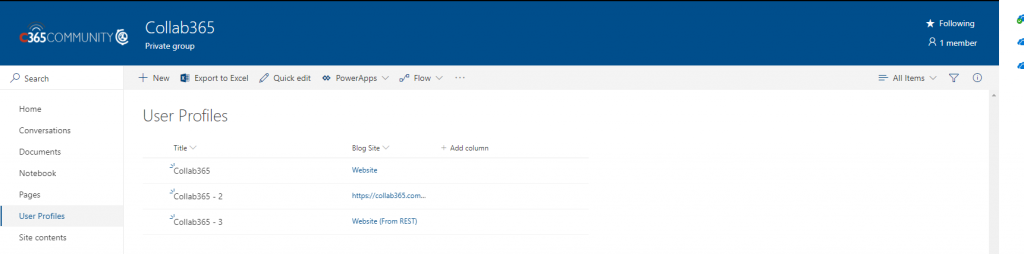
So if I run my Flow again now, I now get the desired result:
So what does all of this mean?
I’m hoping that sooner, rather than later, the Flow user interface will be updated to be able to handle hyperlink fields, and other types like it. This will allow us to edit such fields without having to resort to the REST API. The good thing is that the HTTP call action allows us to easily use the SharePoint REST APIs without having to worry about getting tokens to authenticate. The upshot of this is that if you want to create a URL in a list, using Flow or Logic Apps, and have it displayed in a friendly way, then there’s a little more work which you need to do to make it possible.
