
One of the great benefits of SharePoint is the way it has centralized repositories of information that we can reuse over and over to support our users. The Managed Metadata Service is one of the most powerful in that it allows for one central location to store and manage keywords or sets of terms, but can be delegated down to any users to keep it current for the business. This, along with its support of nested terms and Alternate Labels, makes it perfect to help users categorize and find their content.
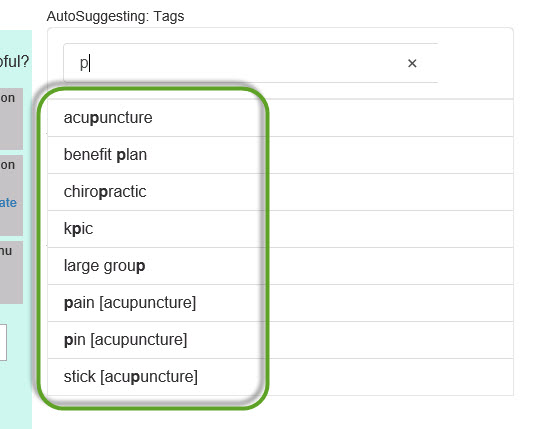
Using this easy service of Keywords, we’ll query the service for different Term Sets and make them available as a typeahead feature in any of our textboxes.
Firstly, what is the Managed Metadata service and why do we want to use it for this purpose? Managed Metadata, known also as “the Term Store”, is a hierarchical collection of centrally managed terms that an organization can define, and then use as attributes for items or ‘information about information’. Once defined, these terms can be added as columns to SharePoint Lists and Library’s for tagging with values that can be reused over and over, but updated from one place so the changes propagate seamlessly.
So now that we understand the Term Store’s capabilities, we can realize why an organization would want to use that service as they’re already tagging their documents with these values. This is especially powerful when using the typeahead boxes to drive better Search Results for your users.
Ok, how do we hook all this up now that we know why to use it? There’s several major sections we’ll walk through in the code below that will detail out the necessary steps. One thing to not is that we’ll be using JSOM to work with the Managed Metadata service as Microsoft has still not released a REST API for working with it like they have for all the other core services.
Setup HTML & include JavaScript Library
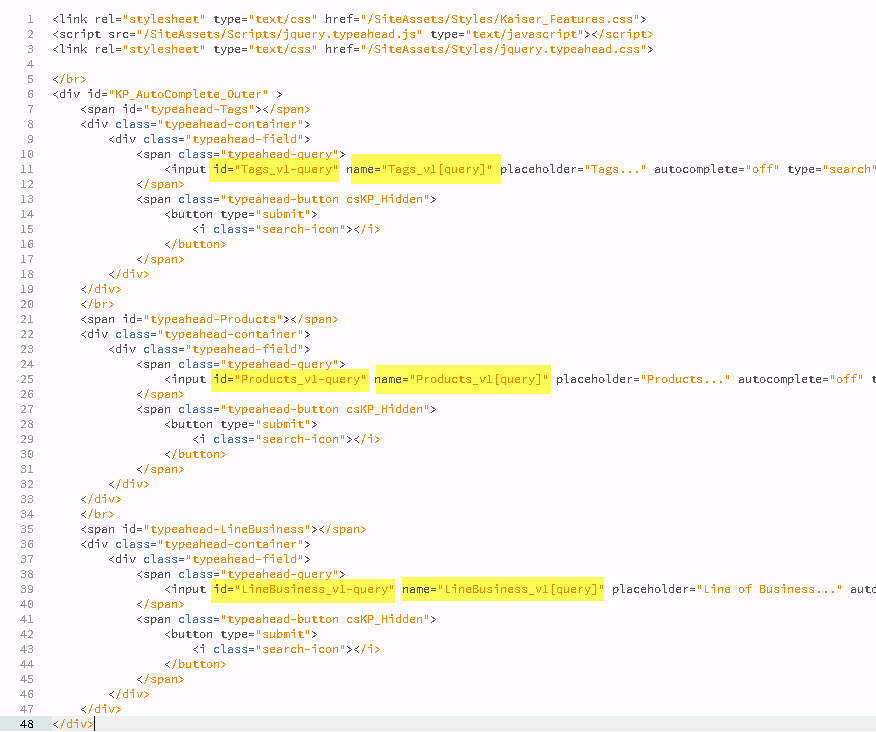
The first thing the code starts with in lines 1-3 is to load any necessary CSS and the jquery.typeahead.js file we’ll need to do the work. There are several other libraries of this type, but I found this Twitter version from GitHub the easiest to work with.
Also, you’ll need to force the loading of sp.taxonomy.js for accessing the Term Store. I made this reference in the Master Page as these typeahead’s were going to be available on almost every page, but normally you’d want to load the library only when you’ll need it (see References article below).
On Lines 6-48 is the build-out of the HTML to show using a Content Editor Web Part (CEWP) that are a set of duplicate element sections, here to target different Term Sets for typeahead. The layout of the elements and their class names are specific to how the jquery.typeahead.js library needs them to be formatted, with the exception of the <input /> tags highlighted. I updated the id=”” and the name=”” values to be specific to the Term Set I wanted to make available as their typeahead.
Begin script processing
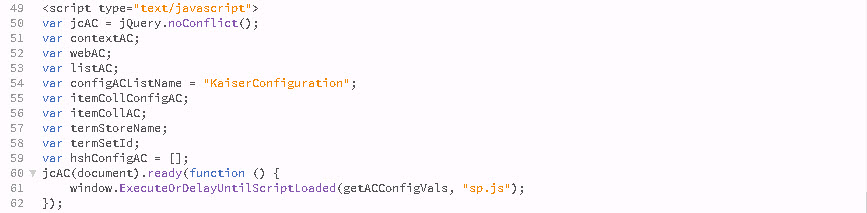
In the next section, lines 49-62, we start actual processing by instantiating variables to be accessible to all functions including a namespace-like the one activating .noConflict(), which releases jQuery’s hold on the “$” shortcut. This means that anyplace that we would normally use the dollar sign to reference jQuery, we put the variable’s name in its place. There are some JavaScript Library’s, like the Twitter typeahead, that use the “$” and will throw errors.
The final few lines of code, the “(document).ready(function() {” section, tells the JavaScript to wait until the DOM is fully loaded before allowing any processing. Once ready, we call the SharePoint 2013 specific command ‘window.ExecuteOrDelayUntilScriptLoaded(getACConfigVals, “sp.js”);’ which is necessary when using CSOM/JSOM to ensure the functions we’ll need have been loaded. The first parameter we put in is which of our functions to call for starting the real work once sp.js has been loaded.
–Load the Term Store name & Term Set ID keys
Now that SharePoint’s JavaScript libraries have been loaded, we need to complete our variables for talking to the Managed Metadata service. Starting with Line 63 through the Line 83, the 2 functions there query a List I setup behind the scenes called “Configuration Admin” where I needed to store several key-value pairs for many of these SPA’s (Singe-Page Applications). If you don’t need this much overhead, just set the 2 variables ‘termStoreName’ (Line 57 – nice name of the Service in CA) & ‘termSetId’ (Line 58 – internal GUID). to get this to work after commenting out these functions.
Contact the Managed Metadata service
With everything setup we can finally start our querying of the Term Store beginning on Line 85 where I call the function loadAutoCompleteVariables(), passing in the input element ID I want to attach to and the name of the child Term Set we want to target (your use may only have one).

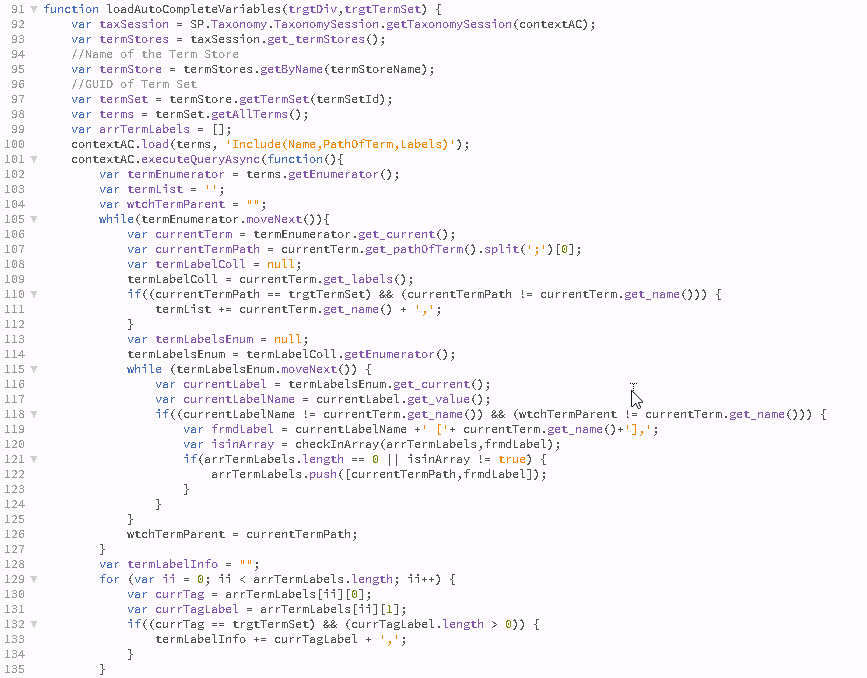
From Line 91 – 146 the loadAutoCompleteVariables() function sets up several variables based of SP.Taxonomy.TaxonomySession type from the sp.taxonomy.js library we force-loaded earlier, also using the Term Store name & Term Set ID keys queries/set above. Then on Line 98 the last variable fires the .getAllTerms() method which builds an object containing an enumerator. Using that terms object we then tell our Context object to load those Terms asynchronously into memory, also including extra parameters to force Labels to come through (or else SharePoint hides them from us).
Enumerate all the Terms, then enumerate their children Labels
Starting on Line 105, the code begins walking through each Term returned and gathers it’s property’s, including the Labels collection, and appends each one to a comma-separated variable of the Titles. Then on Lines 114 – 125 the code enumerates the Labels collection of the Term gathering distincts, shoving them into an array, and finally on Lines 129 – 135 we loop through the cleaned array to add the Labels to the core Titles variable.
Cast as an array and have typeahead.js bind array data to HTML
On Lines 138 & 139 we take our core Titles variable and split it into an array, then append that new object into a JSON array for assigning the typeahead data.
Lastly, on Line 142 we pass in our target Element and JSON array to the loadAutoComplete() function that runs on Lines 147 – 155. This final function takes our target Element and data, then uses the typeahead library to bind them to each other.

Creating typeahead’s for your users gives them the ability to tie into your organization’s infrastructure without having to memorize exact words. Using the Managed Metadata service for this, especially if you’re using it for document tagging, increases findability in your organization and gives a better user experience.
References:
- OneDrive code repository
- Support.Office.com — Introduction to managed metadata
- TechNet — Overview of managed metadata in SharePoint Server 2013
- Typeahead.js
- JavaScript API reference (JSOM) for SharePoint 2013
- Accessing Taxonomy Term Store with JSOM
- W3Schools — jQuery – The noConflict() Method
