
It has become a recent talking point to get your Microsoft Teams meetings and Live events broadcasted to your social media platforms.
In this post, I will demonstrate a great solution using OBS Studio which offers numerous ways to integrate with Microsoft Teams.
There are two key areas of integration I will be diving into. “Using OBS in your Teams Meetings” and “Using OBS to stream your Teams Meetings to Social Media”.
What is OBS?
Open Broadcast Software, commonly referred to as ‘OBS’ is a free recording and streaming platform predominantly used for streaming live video games to social media, which makes it a great tool for live encoding video on Teams. Being open source, its community is vast and has a bold library of interesting and useful plugins to assist your productivity and creativity.
I will be showing you how you can make use of plugins and the in-built tools to prepare, broadcast and share in Microsoft Teams.
Why use OBS?
It’s free! It packs a lot of punch for no cost at all. I will be demonstrating how you can use OBS to prepare your presentations in a way that will keep your students & clients focused on just the important aspects. Your private stuff will remain private in a way that will look very organised and professional.
How to Download & Install OBS
OBS and OBS Virtual Camera are both required. Having the Virtual Camera plugin is more focused to those who wish to enhance their meetings.
We must first download and install OBS onto our system. Go to www.OBSProject.com and choose your operating system.
Proceed through the installation process and install to your preferred directory.
As mentioned previously, OBS is an open source program, therefore there is a vast library of third-party plugins. The main plugin we need is OBS Virtual Camera which can be found in the OBS Forums.
OBS Virtual Camera is a tool that allows us to use our broadcast screen in OBS as a webcam in Microsoft Teams.
Visit https://obsproject.com/forum/resources/obs-virtualcam.539/ and download by clicking “Go to download” in the top right. Install the plugin and register 4 virtual cameras.
OBS Settings
OBS Studio is packed with numerous settings that can be daunting to look at. For the most part a lot of them are irrelevant for our use case. Here is a quick rundown of the things I would change.
VIDEO
- Base (Canvas) Resolution – 1920×1080 (or your screen resolution)
- Output (Scaled) Resolution – 1920×1080 (or 1280×720 for slower internet speeds)
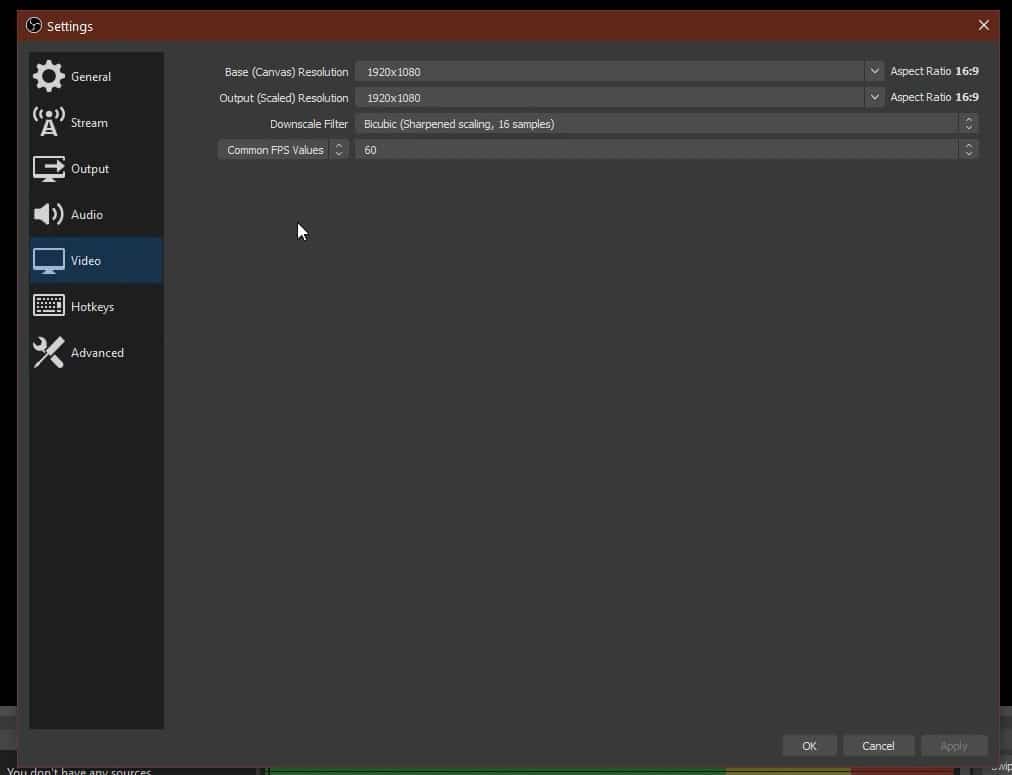
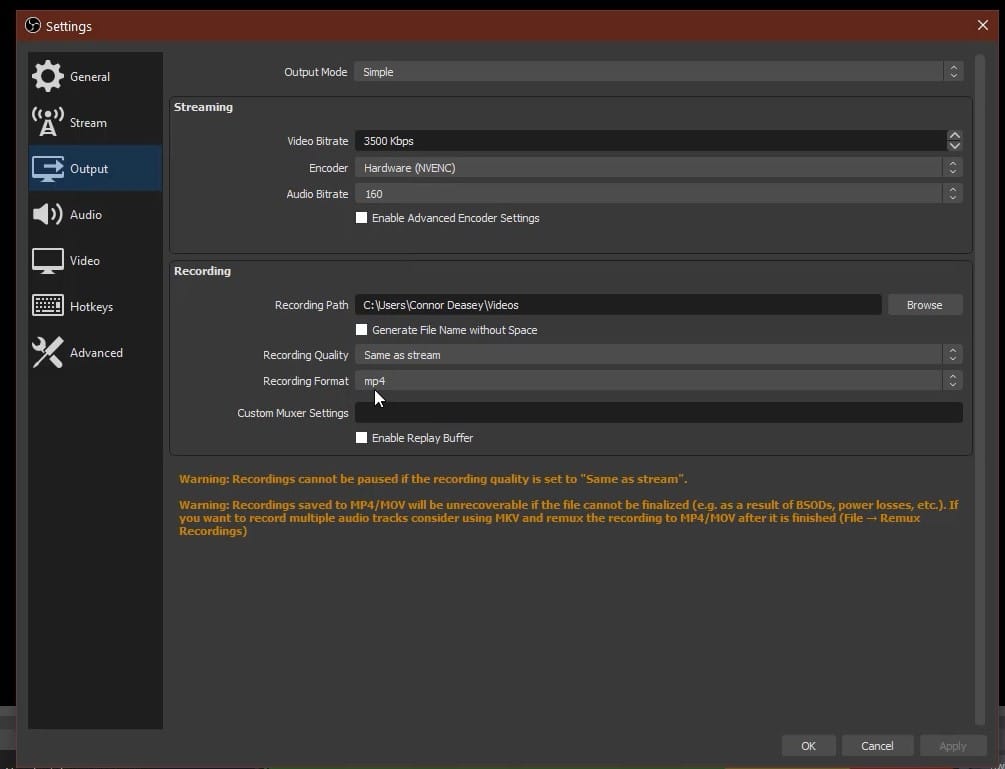
OUTPUT
- Video Bitrate – 3500 Kbps (or 2000 Kbps for slower internet speeds)
- Recording Format – MP4 (for more compatibility with other apps)
STREAM
If you are using OBS to stream a Teams meeting, you will need to acquire your stream server and stream key. These can be found in your live video setup pages on your streaming platforms.
You can then input these into the Stream tab on OBS.
Scenes & Sources
The two primary sections of the OBS user interface are the scenes & sources tabs at the bottom left. This is where we can add all of our sources to the main display screen. Anything that is added here and selected will be visible to the viewer.
Scenes are individual broadcast screens which hold a collection of sources. Sources are individual items which can be placed inside a scene.
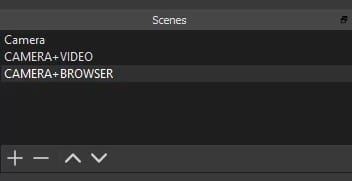
The first thing we need to do is create an empty scene. This is essentially a blank workspace in which we can start building our presentation.
Underneath the scenes window in the bottom left press the “+” button three times.
This places three new scenes into our scene collection. It is common practice to name your scenes, so you can quickly refer to them in your broadcast. I have named mine “CAMERA+BROWSER”, “CAMERA+VIDEO” and “CAMERA”.
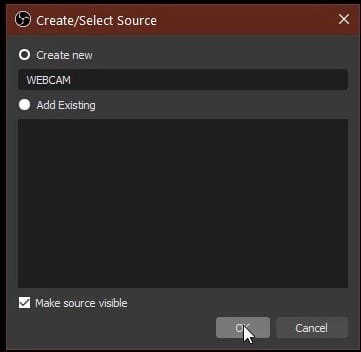
With the “CAMERA” scene selected, we can begin adding sources. Let’s add our webcam to the scene. Just like the scenes panel, click the “+” button on the sources panel and click “Video Capture Device”.
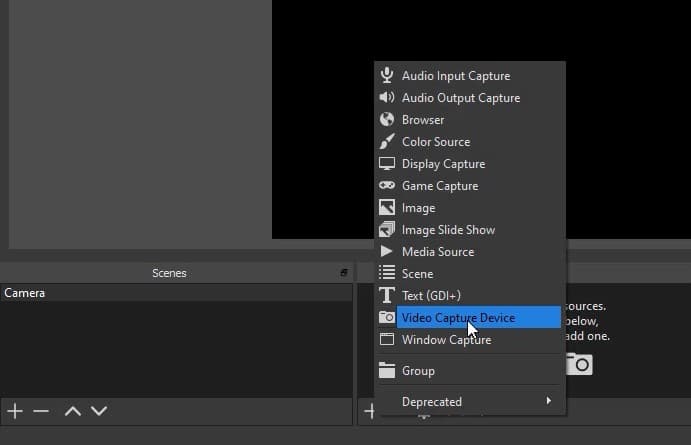
You will be prompted with a window. Let’s rename our Webcam to “WEBCAM” and click “OK”.
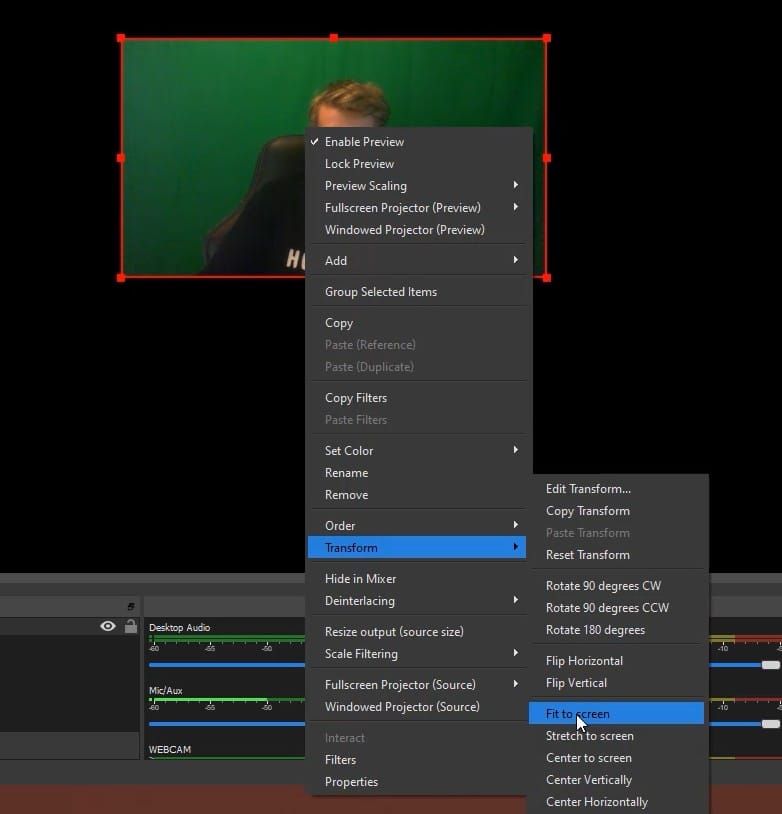
OBS will choose the default webcam on your computer. You can manually choose your webcam using the Device drop down list. A new window will appear showing your camera settings. We will leave everything at default for now.
All sources are moveable and scalable within your scene. I’m going to position my webcam, so it fits the scene by right clicking on “WEBCAM” in the sources panel, go to transform and selecting “Fit to screen”.
Now that we have our camera setup in our scene, let’s select our other scenes and begin adding some more sources.
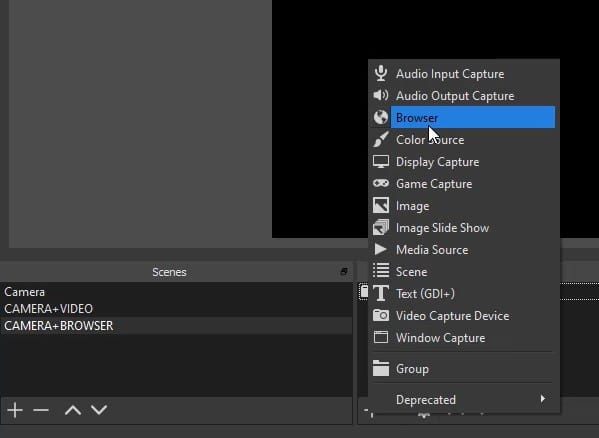
In the next scene we are going to add a browser. We can bring in a clean fully functional browser in OBS without our operating systems user interface, minimizing the unnecessary content on the screen.
Select the “CAMERA+BROWSER” scene that we created earlier and click the “+” on the Sources panel to create a new source. Select “Browser” from the list.
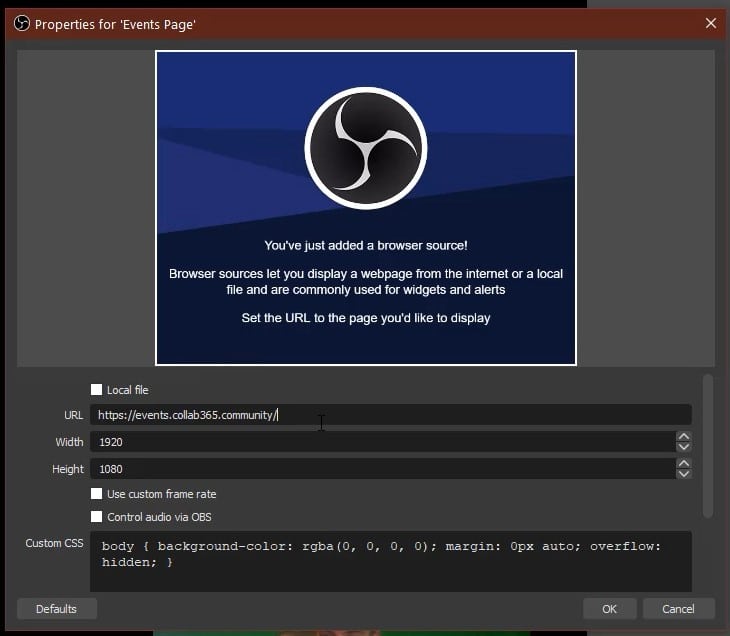
We have another properties window where we can choose the destination web address we want to show. I’m going to enter the Collab365 events page, set my screen resolution in the “Width” and “Height” boxes and click “OK”.
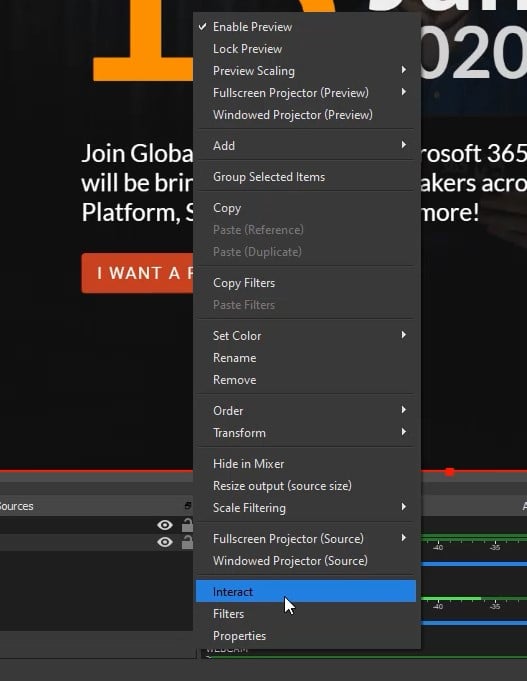
Our webpage is now displayed in the scene. We can interact with our webpage by right clicking on our source and selecting “Interact”.
We can also reuse the webcam we created earlier.
Click the “+” in the sources tab, select “Video Capture Device” and select “WEBCAM” from the “Add Existing” box. This will bring in the Webcam with any effects and properties adjusted before.
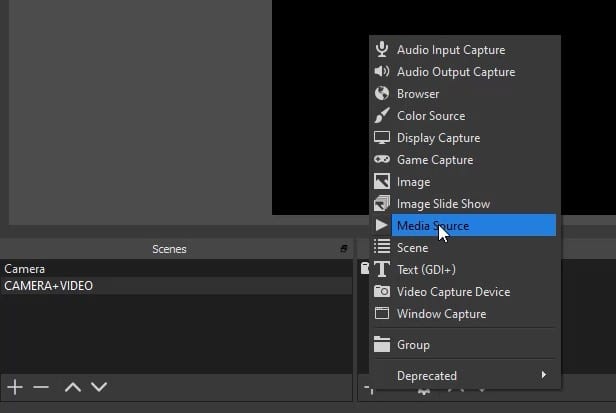
Finally let’s add a video. Select the “CAMERA+VIDEO” from the scene selection and add another source. This time we are going to add a “Media Source”. This will allow us to add a video file from our computer.
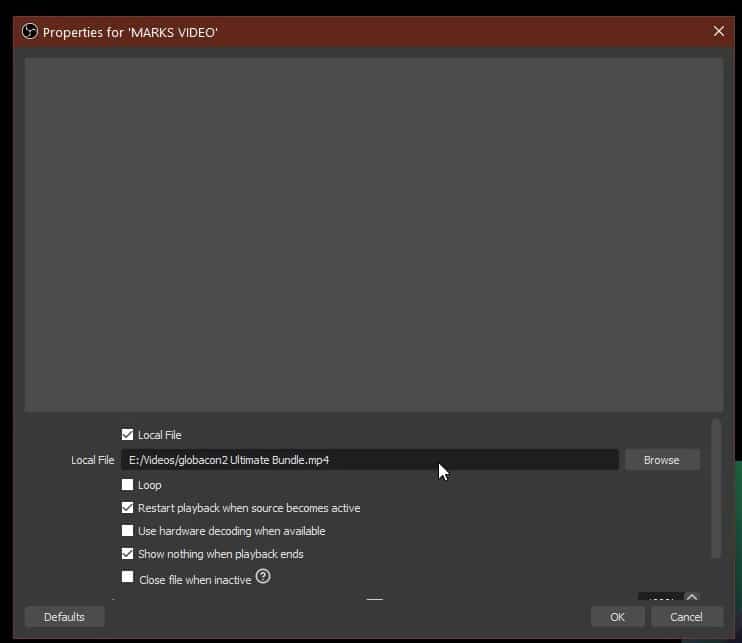
Next to Local File, we can click browse and choose the video we want to play. When we have selected our video, I like to make sure “Restart playback when source becomes active” is enabled. This allows the video to play from the beginning every time we select our scene as the active scene.
We can adjust the position and scale as normal and add our webcam as we did before.
There are plenty of other sources available in the sources panel. You can add images and text and really unleash your creativity.
Setting up OBS Virtual Camera for Microsoft Teams Meetings
Now that we have OBS and the Virtual Camera plugin installed, we need to activate the camera within OBS and set it as the primary device in Microsoft Teams. This will allow us to share our computer screen and webcam in a new light in our Teams Meetings.
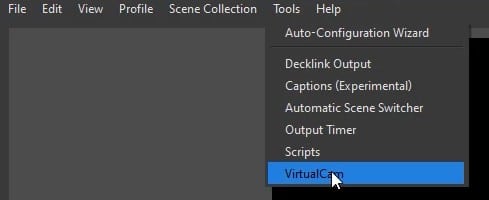
Open OBS Studio and go to “Tools” – “VirtualCam”. This displays a window for your virtual camera.
I recommend enabling AutoStart which allows the virtual camera to start with OBS Studio.
Select OBS-Camera from the Target Camera drop down box.
Set Buffered Frames to “0”.
Click Start.
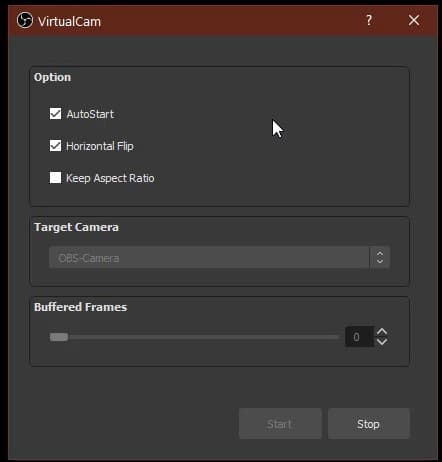
Your virtual camera is now enabled.
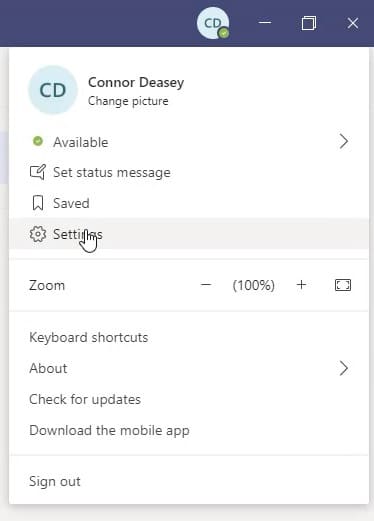
We now need to set your default camera in Microsoft Teams.
Open Microsoft Teams and click on your profile icon at the top right of the window.
Choose Settings.
Go to the Devices tab on the left. Under Camera, you need to select the virtual camera we previously activated, in this case OBS-Camera.
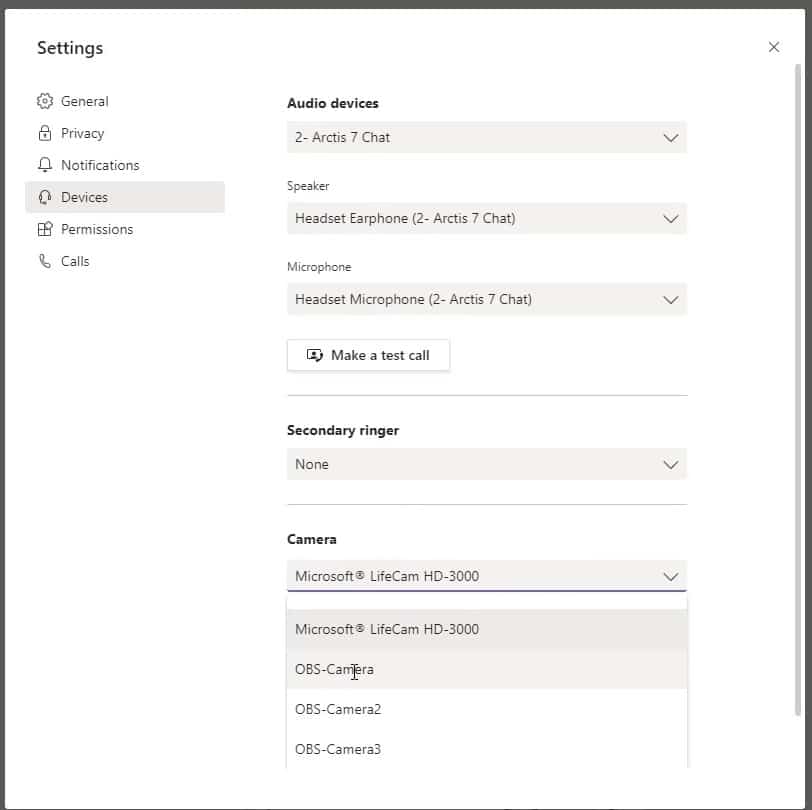
We have now made the connection and Microsoft Teams will pull the broadcast window in OBS as its primary camera source when joining a Teams Meeting.
Creating Presentations and Classes in OBS
So, you want to share a presentation with your team? Our Virtual Camera is set up and now we can begin preparing our scenes. We will begin by quickly thinking about the content we would like to share. For this example, I want to share a screen briefly showing what our meeting will be discussing. I would like to show a few slides from a presentation and end with a video. I also would like to be visible throughout my meeting but disappear when the video is playing.
Now I have an idea of what my meeting will include, we can begin structuring our meeting inside of OBS Studio.
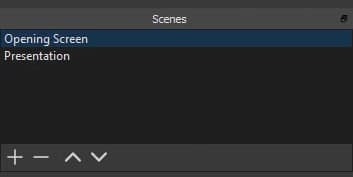
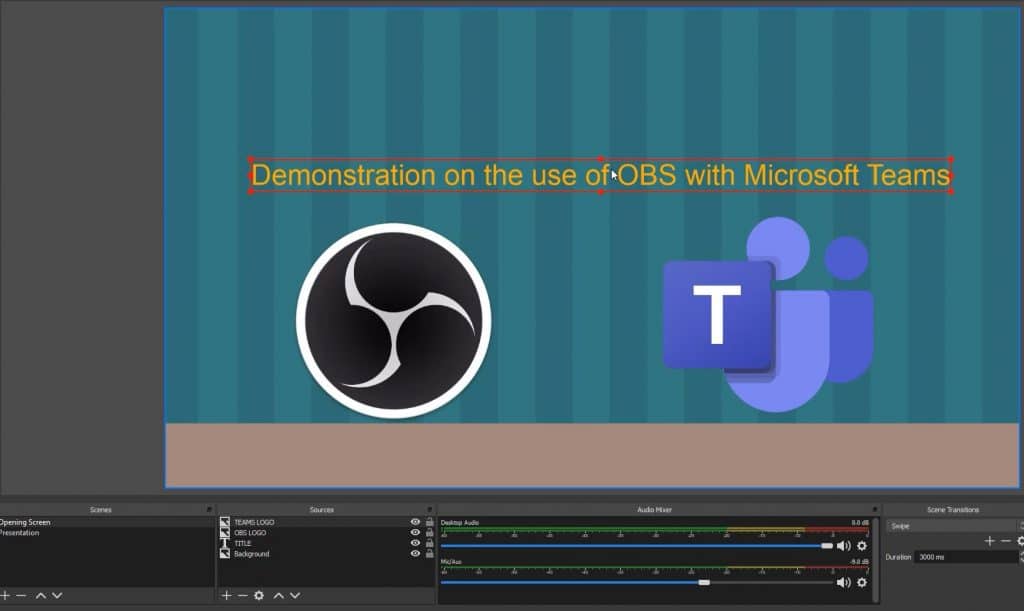
I’m going to create a couple of scenes, named “Opening Screen” and “Presentation”
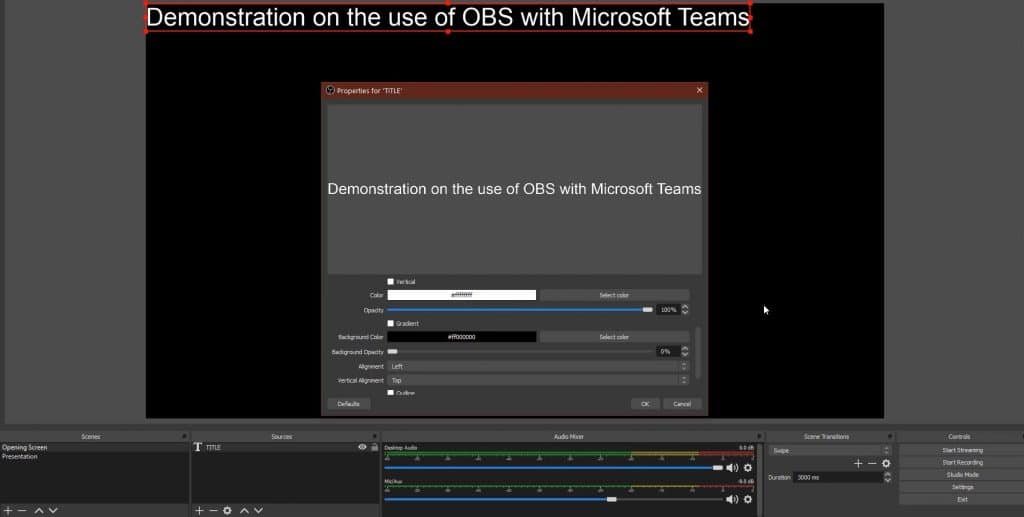
On my Opening Screen, I want to add some text using the “Text (GDI+)” source input my meeting title “Demonstration on the use of OBS with Microsoft Teams“. I’ll add a few images and leave it at that.
Heading over to the “Presentation” scene, I’m going to add my presentation. I have discovered the smartest way to show your presentation is by using the browser source thus allowing you to directly interact with your presentation within OBS.
I’ll add my “Browser” source and direct the URL to my presentation. You can interact with the browser window by right clicking and selecting interact.
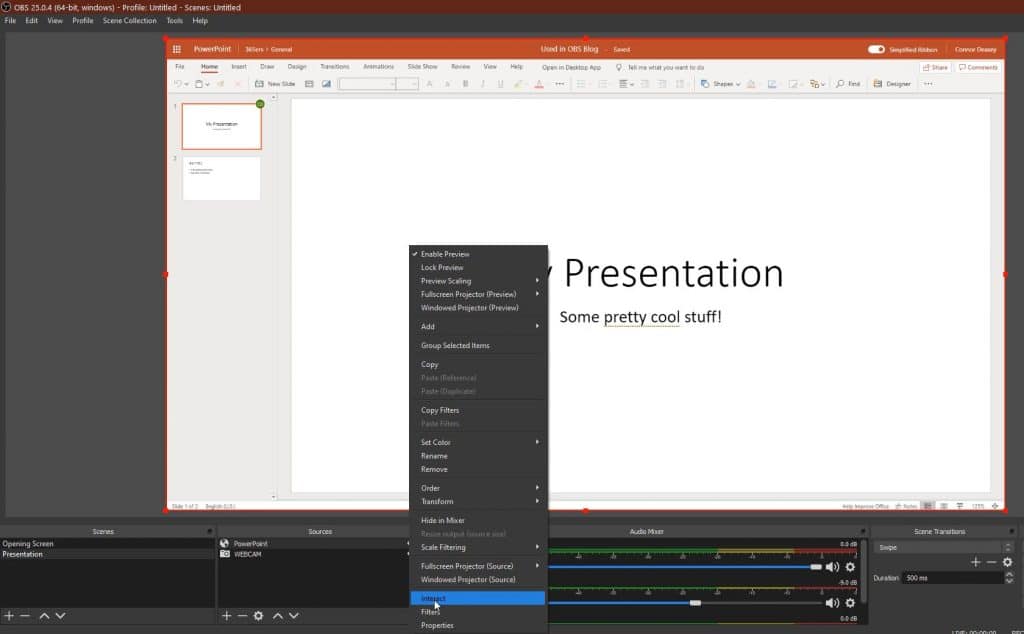
Note: Presentations stored in cloud services will require you to login as the browser source plugin is not bound to your computers default browser.
Using “Interact” I will set my slide show to play in full screen.
I will add my camera using the “Video Capture Device” source.
Producing Your Meeting
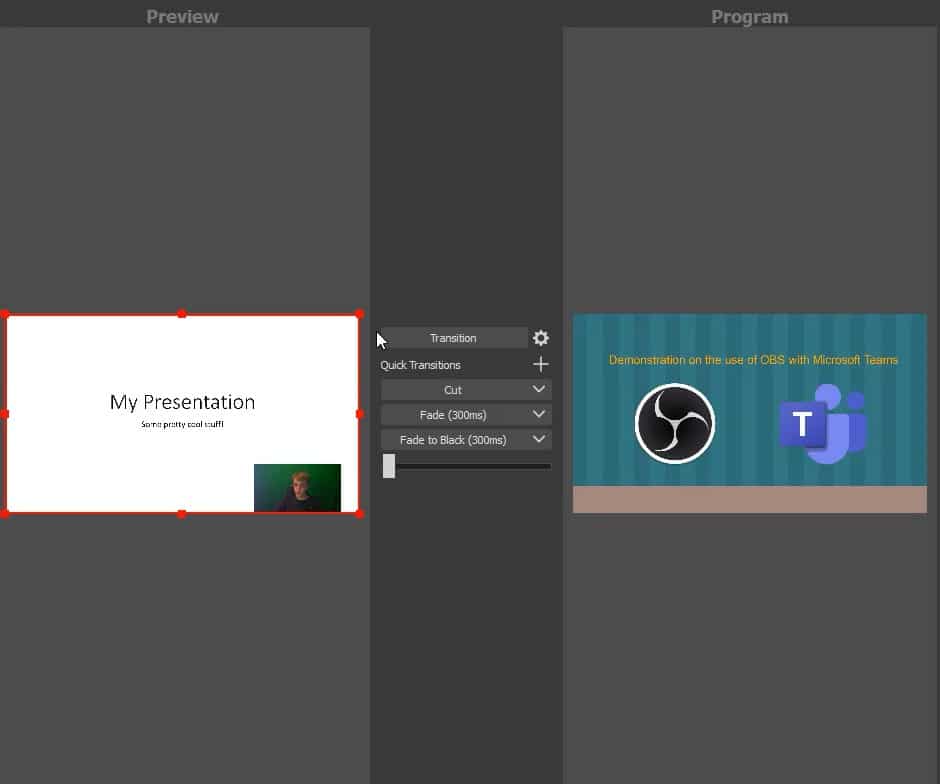
I will enter “Studio Mode” inside OBS. The layout will have changed, and you will see two screens. The screen on the right is the active scene that will be seen in your teams meeting and the screen on the left is a preview of your editable scenes. I strongly recommend using Studio Mode as you can find and edit a scene before you show it to your audience by hitting the “Transition” button in the centre of your screen.
Broadcasting a Microsoft Teams Meeting or Live Event to a Social Media Platform
We can use OBS Studio to stream a live event or meeting in Microsoft Teams. For this example, I will show two methods, streaming to Facebook Live and YouTube Live. There are so many different social media platforms that it would be impossible to demonstrate them all here, however they all work in a very similar way.
To broadcast to one of these platforms, there are two key pieces of information we need to find. The RTMP Server address and Stream Key. The RTMP server is an address that we use to point OBS Studio to the right place, and the Stream key grants access to stream there. It is important that we do not share our stream key with anyone that you don’t want streaming on your social media pages.
Streaming to Facebook Live
To find your Facebook Live Server and Key we need to head to the Facebook page that you want to stream to.
Under the “Write Post” section, you can find “Live Video”. If you can’t see this, click on the triple dot button and select “Live Video”.
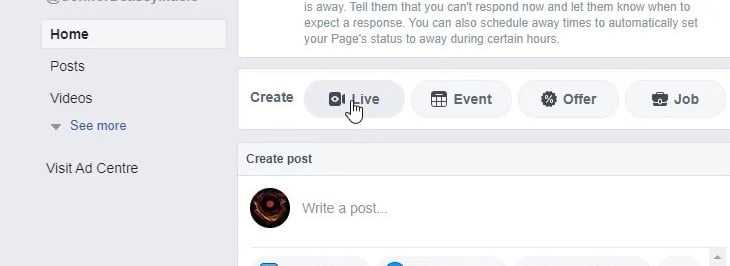
You will be directed to a new page where you can set up your live stream with a Title & Description with a bunch of other settings. Once this is set, click on “Use Stream Key”.
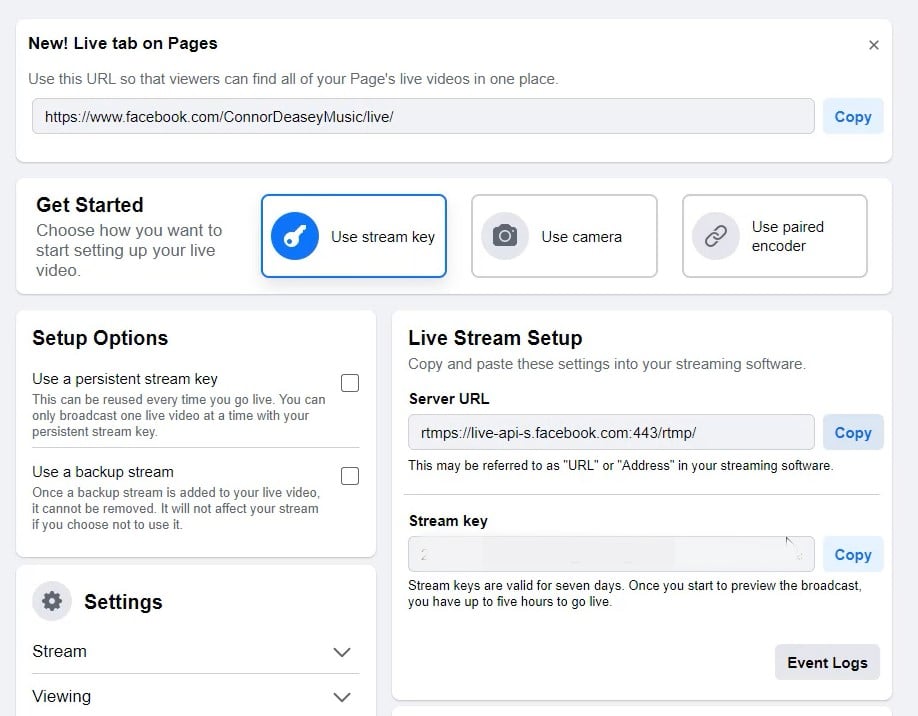
Inside the Live API box, you can see your Server URL and Stream Key. You will need to copy these values to enter inside OBS Studio.
Streaming to YouTube Live
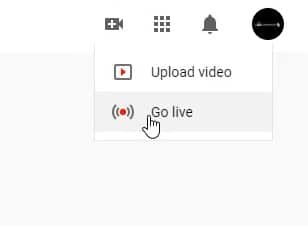
Let’s head over to our YouTube Studio page. In the upper right of the page click “Create”. Then click “Go Live”.
A new window will pop up to add Titles & Descriptions alongside other useful tools. Once this is set, click “Create Stream”
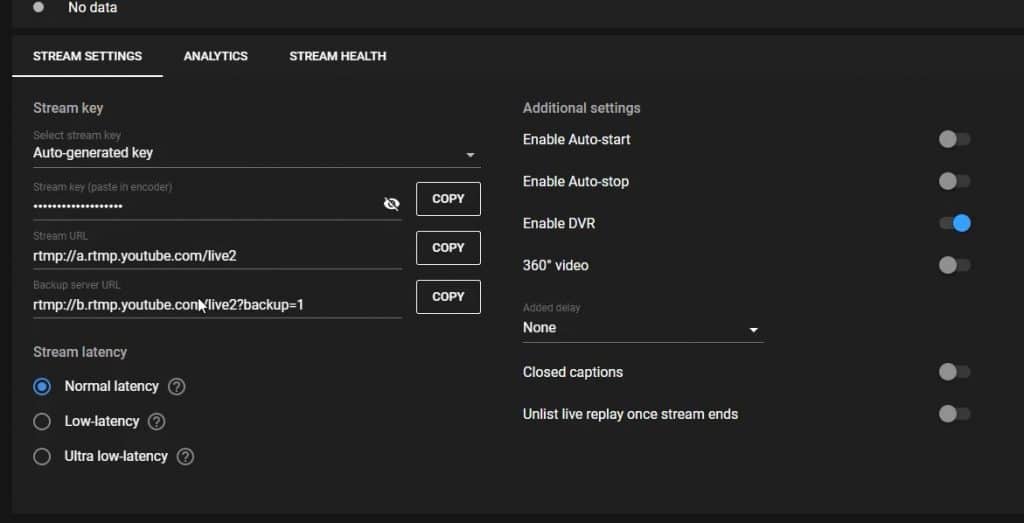
You will be directed to Live Stream Dashboard. Under the “Stream Settings” tab, you can find you Stream URL (RTMP Server) and your Stream Key. Copy these values as we will use them in OBS Studio.
Building your Broadcast
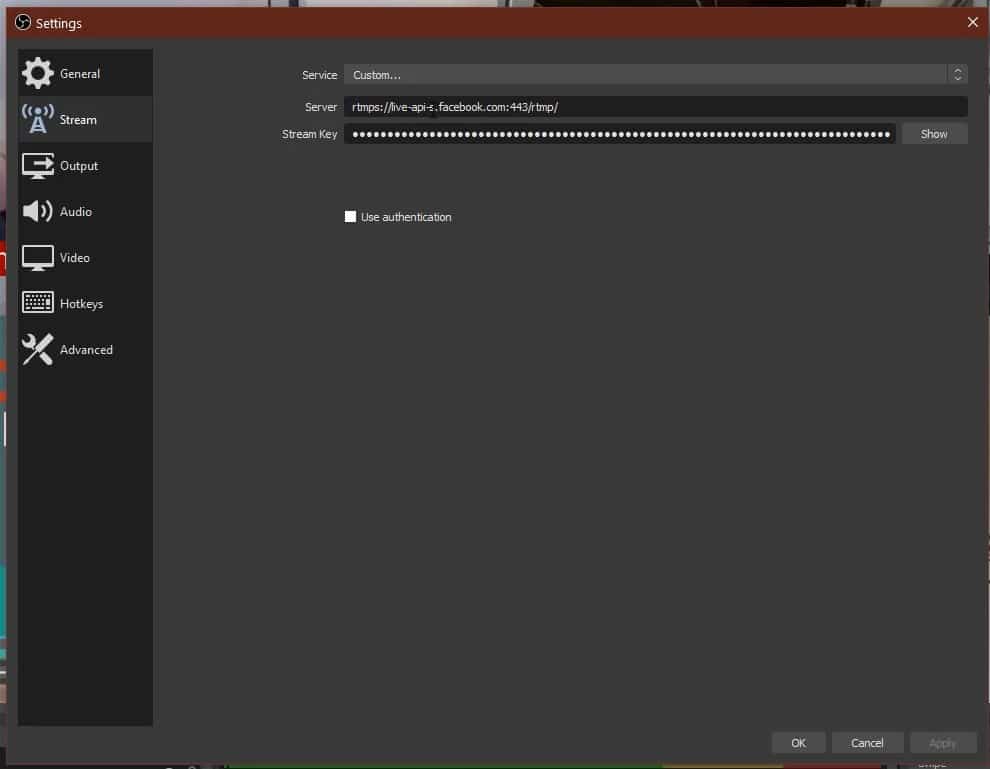
Now we have our Server and Key, we need to input them into OBS Studio. Head back to OBS Studio and open the settings window. Head to the “Stream” tab and paste the Server address and Stream key into the boxes here. Click “Apply” and you’re ready to start streaming.
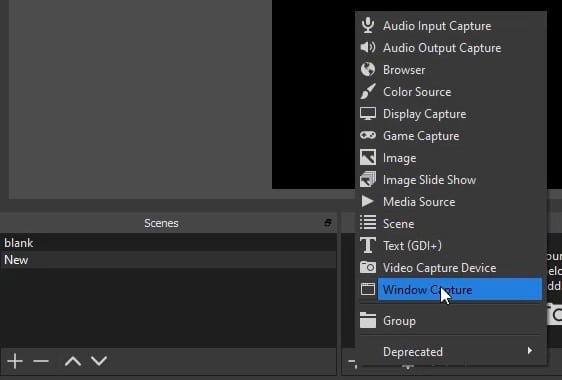
We can now build our broadcast. As demonstrated in the Scenes & Sources section, we are going to add our Microsoft Teams window as a source.
Add a new scene called “Teams Stream” and a “Window Capture” source. Name it and click “OK”.
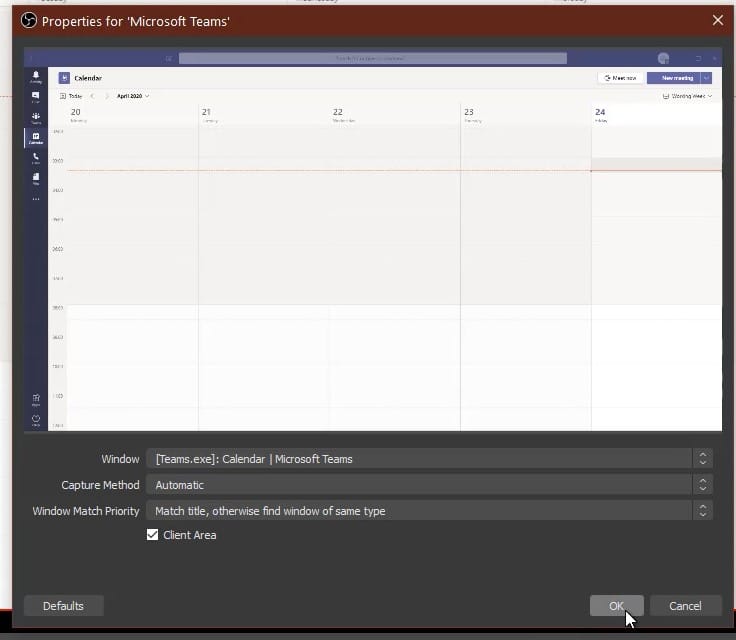
Select your Microsoft Teams (Teams.exe) application from the “Window” drop down box. Using Window Capture allows OBS to use a specific window on your computer, even if it is minimized or not visible on your display.
When we enter a meeting or live event, we can broadcast the Microsoft Teams application. To keep things tidy, when you are in the meeting you can click the triple dot icon in your Teams Meeting screen and select “Enter full-screen”. I also recommend setting your status to “Do not disturb” in Microsoft Teams to avoid any unwanted notifications being broadcasted to your stream.
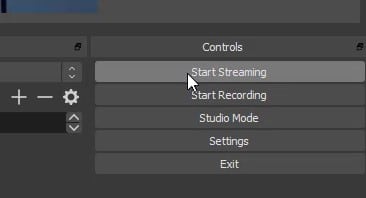
You can now hit “Start Streaming” inside OBS Studio, and your “Go Live” button on your social media site and you’re off!
