
Introduction
I was asked to create an Expense solution, where users can select their payment currency when completing an expense form to populate an Expense list. The currency field of the form is a dropdown list lookup field of the Currency list.
I will be focusing on the latter list for the sake of this post. This list consists of a Month, Source (index currency), Target (currency we are trying to retrieve) and Rate (exchange rate) columns. When entering data in the Currency form, all fields except the Month and Target fields will be populated via a workflow and therefore auto populate the dropdown Currency field in the Expense form. I’ve done it this way as the list administrator wants to manually change the Month field at the end of each month.
So how do I find a solution for this business requirement? Well I could have the administrator just visit an external website to get the exchange rate values, copy and paste them in the Currency list. This means the user may have to do more work and is likely to make a mistake in typing the exchange rate figures, not to mention that it would not be a good user experience. Lightbulb, it is possible to connect to an external service and pull in live data into SharePoint for later use.
In cases where there is an existing web service that you need to access – either a public one, or perhaps a private web service that is hosted by your company – SharePoint Designer 2013 provides an action that you can use to call the web service. There is no longer any need to rely on a developer when you need to call an existing web service.
Web Services in SharePoint Designer 2013 Workflows
Creating a custom web service is much easier than creating a custom action. Not only that, but whereas a custom action could only be used by the workflow in which it’s installed a custom web service is portable and can be used by any number of consumers. While SharePoint 2013 can consume any type of web service, it is easiest (recommended) that you use web services that accept and return data using the standard OData formats of Atom or JSON (JavaScript Object Notation).
In SharePoint 2013 workflows, you call a web service using a new action introduced in SharePoint 2013 named “Call HTTP Web Service”. This action is flexible and allow you to make simple calls to a web service easily, or, if needed, you can create more complex calls using HTTP verbs as well as allowing you to add HTTP headers. In my workflow, I created a variable that stores the URL, I wish to call. Figure 1 shows the Call HTTP Web Service action.
 Figure 1. SharePoint Designer 2013 stage showing the Call HTTP Web Service action
The Call HTTP Web Service action lets you specify any of several request methods, including GET, PUT, POST, and DELETE. This lets you tell the web services, specifically RESTful services, what to do on the service that you’ve specified with the URI property on the activity.
The second stage of working with web services involves submitting data to, and receiving data from, a web service, which you do by using either the request or response properties on the Call HTTP Web Service action. Note, however, that rather than as a stream, data is passed as a complex structure using the Dynamic Value object.
Dynamic value data structures are formatted as JavaScript Object Notation (JSON) strings. There is a series of activities associated with the DynamicValue type that can be used to count the number of items in the response, extract values from the response, or build up a new structure for updating or creating items. Below are the steps for doing this.
Create a customer list
- In SharePoint Designer 2013, I created a custom list and name it “ExchangeRates”.
- Renamed the default Title field to Month (we’ll get the current rates at the end of each month).
- Added the fields Source, Target and Rate, all of the type String shown in Figure 2.
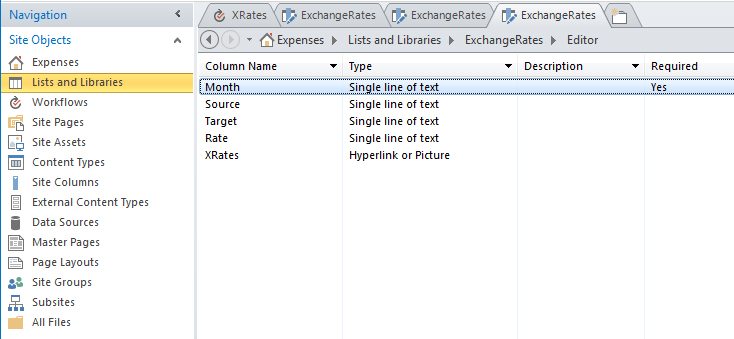 Figure 2. Creating the Customers list in SharePoint Designer 2013
Create the workflow
- In the SharePoint Designer 2013 navigation pane, select the Workflows option.
- On the ribbon, click the List Workflows button and select your list. In this example I selected the “ExchangeRates” list that I created earlier from the drop-down list.
- I have named my workflow “XRates” and left the description blank as shown below in Figure 3.
- Set the Platform Type to SharePoint 2013 Workflow and click the OK button.
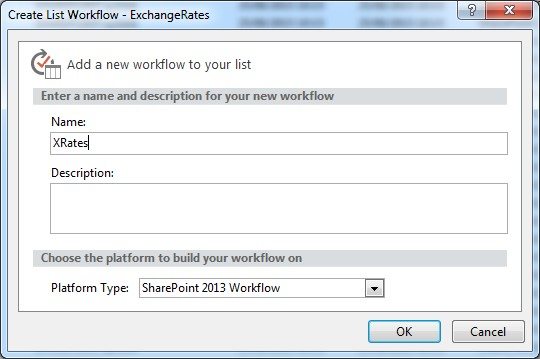 Figure 3. Creating a new List Workflow using SharePoint Designer 2013
Before starting the workflow, I had to get the correct URL in JSON format. I found an XML site feed that I could parse onto this URL – “http://www.firstamong.com/json/index.php?q=” to get the data back in JSON format. Normally one would have to “Build this Dictionary (Output to Variable: dictionary)” in the workflow to handle HTTP request. You would then add two headers like below and in Figure 4;
- Accept: application/json;odata=verbose
- Content-Type: application/json;odata=verbose
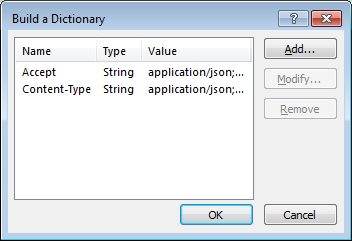 Figure 4. Build a Dictionary window in SharePoint Designer 2013
However, by adding “?$format=json” after the feed URL you need not build a dictionary with headers to handle JSON data because adding this will format feed into JSON data.
Query the web service for the customer details
Now that the workflow has been created, we’ll want to enable it to call a web service, which we do by adding a Call HTTP Web Service action (explained earlier) to the workflow’s default stage.
- Click on the link labelled “this”.
- To the right of the Enter the HTTP web service URL text box, click the builder button (…) to open the String Builder dialog box.
- In the String Builder, I entered this URL: http://www.firstamong.com/json/index.php?q=http://currency-api.appspot.com/api/GBP/USD.xml?$format=json initially.
- This is a free currency api site that shows the exchange rate from GBP to USD only.
- To get another currency, change the “USD” part of the URL to another currency code.
- The first part of this URL changes the latter XML part to JSON format.
- You’ll now select the currency code part of the URL and replace it with a Dynamic value.
- To dynamically create the URL, use the “Add or Change Lookup” button in String Builder. In the resulting Lookup for String dialog box, set the “Data Source” to “Current Item” and set the “Field from Source“ to “Target” as shown in Figure 4. The resulting URL string should be; http://www.firstamong.com/json/index.php?q=http://currency-api.appspot.com/api/GBP/[%CurrentItem:Target%].xml?$format=json.
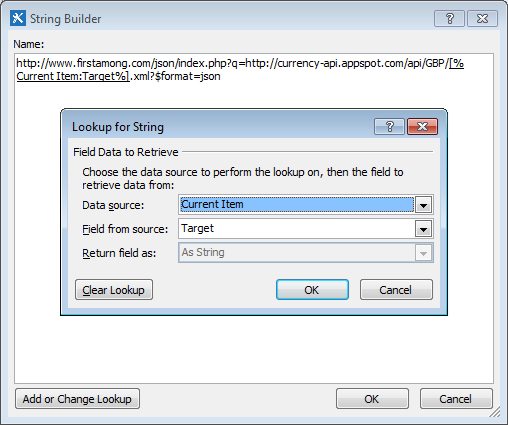 Figure 5. Dynamically creating the URL for the web service request
- Click OK on the Lookup for String, OK again on the String Builder windows to set the new URL. Set this to receive results from the web service, next we store the results in another variable.
- In the Call HTTP Web Service action, click the response link in the action and create a new variable of type Dictionary, I named it “varAllResults”.
- The entire Call HTTP Web Service action is not likely visible, since it is a long sentence in the designer. Scroll to the right and notice that the response status code is stored in a variable called “responseCode”. I tried this a few times and so I have “responseCode3”. This is convenient, and something that can be written to the workflow instance’s statistics page in the workflow history list.
- Add a Log to History List action after the Call HTTP Web Service action and set its message to write the status code for the response to the log, as shown in Figure 5.
 Figure 6. Writing the Web Service Response Code to the History List
Extract values from response
Now that we have the web service response stored in the “varAllResults” variable, the next step is to extract these values and place them in local variables.
To do this, we’re going to add Get item from dictionary actions to the workflow. The path to the item from which we’re going to extract a value has to match the structure of the response and be in a specific format. A good way to figure this out is to enter the URL into the browser to see the response that comes back. Pasting the URL earlier in the browser I get JSON data as show below in Figure 7.
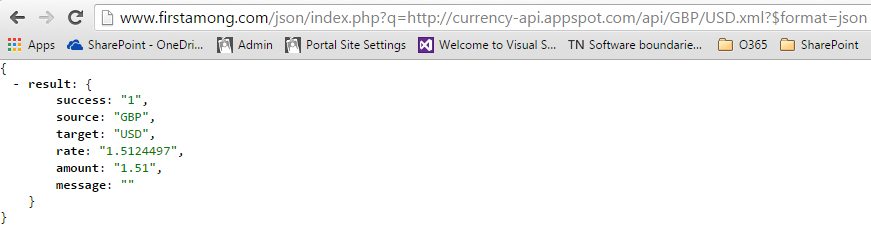 Figure 7. Viewing the URL in a browser
Notice that the results are nested within the object called “result”. Therefore the path to the field “source” in the web service response is “result/source”. I elected however to pass the initial path to another variable using a “Get item by name or path from dictionary (Output to item)”.
You can view the data structure in a free “JSON Viewer” here – http://jsonviewer.stack.hu/, http://json.parser.online.fr/ or download a standalone application named “JSON Viewer” from https://jsonviewer.codeplex.com/. Using the URL from earlier, you would copy the contents in the page and paste it in the “Text” tab, the “Viewer” tab is shown below in Figure 8.
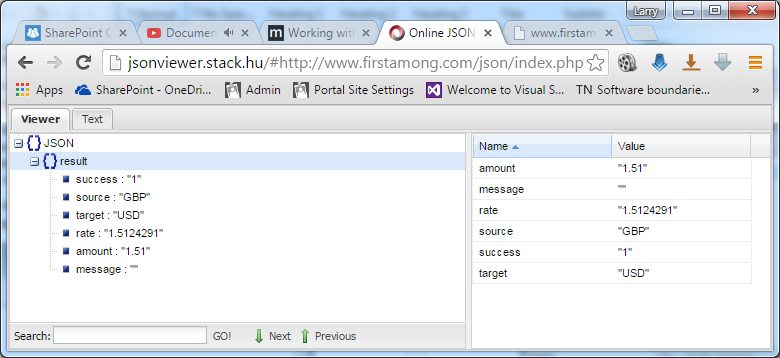 Figure 8. Free online JSON Viewer showing data structure
In actuality, I added four “Get item by name or path …” actions, one to get all results and three to get all fields. I got all fields in “result” from “varAllResults” and passed them onto a variable named “varCurrentVals”. From this variable, I want to get a “source”, “target”, “rate” individually. I placed this in a loop so that “The contents of this loop will run 1 times since the URL is dynamic and will be changed by the user input in the “Target” field.
I put this in a loop because I had set URL dynamically earlier in the workflow before the loop (this may not be necessary). A loop is more useful when you count the number of items in a Dictionary and loop through it getting values by count. My loop will run 1 times as shown below in Figure 9.
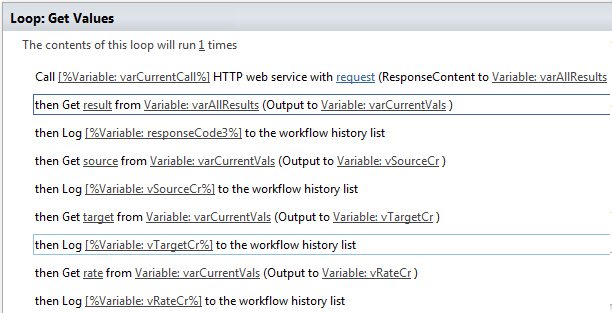 Figure 9. Extracting Values from the Web Service Dictionary Response
Update or Set the list item
The final step is to update or set the list item using two of the Set field in current item actions. These set the fields in the list item to the values stored in the variables I created earlier, shown in Figure 9.
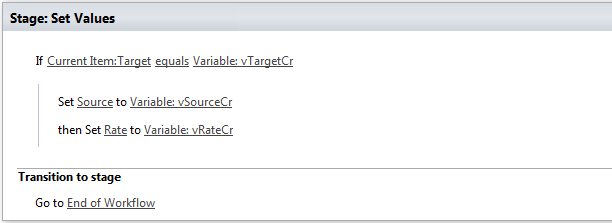 Figure 10. Update the List Item
In the form, the administrator creates a new item by entering the “Month” and “Target” fields per currency and the workflow will fetch and populate the “Source” and the “Rate” fields. The workflow will run again on modification of the same list item as the business requirement is get the exchange rate once a month. The URL is set dynamically from the Target field. If a new Target is entered equals that retrieved from the REST call then the “Source” and “Rate” fields will be populated.
And finally, we complete the Transition to stage section of the workflow stage.
- Add a Go To Stage action
- Save and publish the workflow
- Select End of workflow
Test the workflow
- Open a browser and navigate to your list in my case the “ExchangeRates” list.
- Added are seven exchange rate abbreviations or codes and the current month per entry. This is done only once as the workflow is designed to run again when modified. When the month is modified from say “Dec” to “Jan”, the current exchange rate is then fetched.
- I’ve design the workflow to “Start workflow automatically when an item is created” and “Start workflow automatically when an item is changed”. You can manually start the workflow for testing
- At this point the workflow will start and will query the web service.
- To see the result, I navigated back to the “ExchangeRates” list and refresh the page. It might take a few refreshes for the workflows to complete, but eventually it should look like the image in Figure 10. You should see list updated. Below you can see the “Source” and “Rate” columns populated. To get an update Rate, you’ll modify the list item.
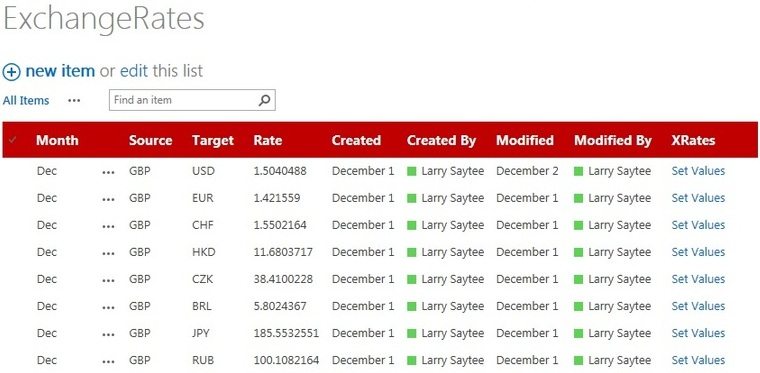 Figure 11. List Items Updated by the Workflow
SharePoint 2013 introduced a new workflow architecture facilitated by a new product, Workflow Manager 1.0. To ensure that all custom workflows worked regardless of the SharePoint 2013 deployment choice, either on-premises or hosted in Office 365, all workflows are now 100 percent declarative. The added support for calling web services from SharePoint Designer 2013-authored workflows provides a more flexible, powerful workflow authoring process than in previous versions.
Microsoft introduced support for calling web services in Workflow Manager using the new Call HTTP Web Service action in SharePoint Designer 2013. Workflow Manager also introduced support for creating structures to submit to web services as well as consuming their responses using the Dictionary variable type. When creating workflows, use the Dictionary type and associated actions in SharePoint workflows that use external web services.
