As an organization, you will often find you and your staff spend too much time working on the wrong tasks and projects, ultimately wasting money. What if I told you that you could take control of your workload by using a simple, helpful tool that can better help monitor and track the time you spend on your projects.
In this article, you will learn how to use SharePoint and the Microsoft Power Platform to build a simple mobile application that can track how long you are spending each day on your tasks. By the end of this post, you will have a functional timekeeping application, that stores your time spent against a given projects in SharePoint, using a Canvas app in Power Apps. After completing this short solution, you will have free reign to add additional functionality to suit your business needs, perhaps enhancing the app to calculate hourly rates into the solution. However, I’ll leave that part up to you.
To complete this short solution, you will need to create SharePoint lists in your desired SharePoint site and create, save, and publish mobile applications in Power Apps.
Creating the solution data infrastructure in SharePoint
Let’s begin with mapping out and creating the data infrastructure that will store the users time against a given project. We need to consider how our times recorded will be stored and calculated along with any other meta data needed to be stored against each record for the solution to work.
After creating my new blank SharePoint list named "Project Time Records", I began changing and adding columns.
First, I navigated to "+ Add column" drop down menu, selected "Show/hide columns", and made my "ID" column visible. This step will help with debugging and testing later.
I then added the following fields to my list:
- Start Time - Date & Time
- End Time - Date & Time
When adding the Start & End Time columns, ensure to enable "Include Time" from the properties pane. Then add the following fields:
- Time Spent - Number
- Project - Choice (Enter the different Projects to store time against)
For this example, I used a choice field to determine the user's project. However, you can enhance the solution further by using lookup fields, pointing to existing project lists if you choose to do so. Finally:
- Active Session – Yes/No
Ensure to set the "default value" to "No" to avoid any issues when our automation in the next step start using our data.

Before we move on to the next step, let’s look at our columns and examine how this data will be used in our solution.
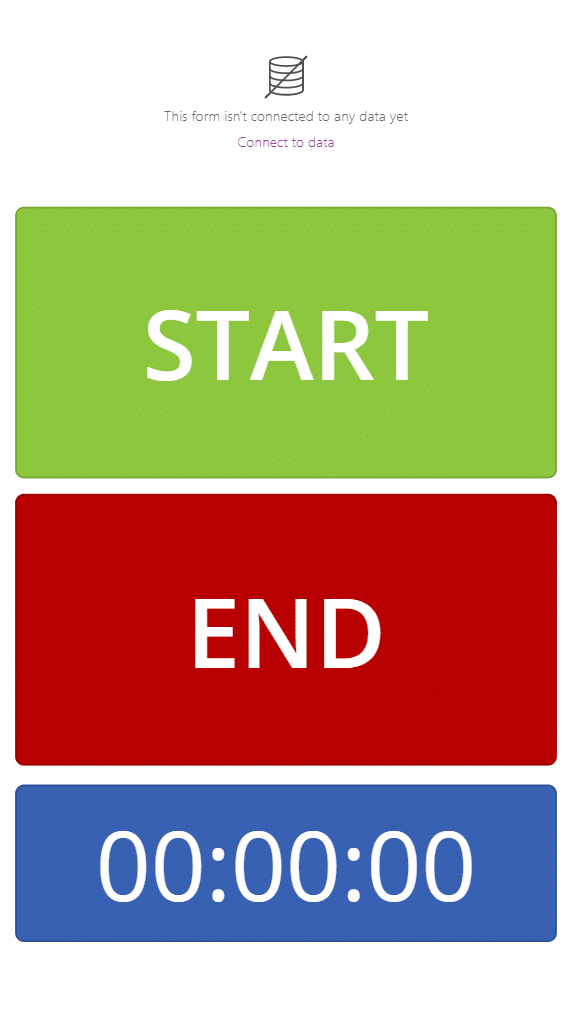
When users open our application, they will be presented with a start button and an end button. These buttons will allow our users to start and end a timer. When the start button is pressed, a new record will be created in the SharePoint list we have just created.
That record will store the logged in user’s email address in the title field, the start time, set at the time which SharePoint creates the new record, the project that the user has selected to record time for, and will have marked the session as an active session as the stop button has not yet been pressed.
The application will then do a validation check against the ID field of the newly created record to determine which record should be updated when the end button is pressed. This will mark the record as completed, set the End time and calculate the Time Spent. A simple application but very effective for its purpose.
Create the time recording app in Power Apps
Now we understand the data structure and have mapped out the workflow of our solution; we can navigate to Power Apps and crack on with the exciting stuff!
It’s time to build the application that our team members can use to record time spent on their projects. After navigating to Power Apps, we need to create a new “Canvas app from blank”. Our primary purpose is to use their mobile devices as a timer to avoid switching between windows on a desktop. For that reason, I use the mobile layout.
Once Power Apps studio has appeared, let’s run the same process as SharePoint and start implementing the fundamental components necessary for our application to work and behave how we want.
First, I will add two buttons on the screen, with the button text, “Start” and “End”.
Then, I will also add an "Edit Form" Form as this will allow us to select our project from our predefined list of projects in the choice field.
Then, I will finally add a "Timer"; after all, this is a timer app, and the user will want to see how long they have spent on their task visually.
Our app is beginning to take shape.
Top tip: - Remember it is best to name your components to something logical as you work through your app, e.g you start button might be named "btnStart". This means as your application gets more complicated, you will know which component you are selecting or referring to.
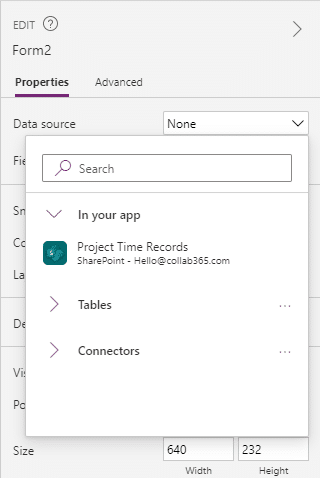
We need to connect our SharePoint list as a data source for Power Apps to use. This will then allow us to read and write to that SharePoint list right from within our application.
To do this select, the data tab on the left-hand side and select “Add data”, find the SharePoint connector, then select the SharePoint site location and the list from the properties on the right.
NB: At this point you may need to enter the SharePoint site URL if it is not a site you have recently connected to within Power Apps, you may also need to enter some Microsoft account credentials of the account you want your app to connect with.

With our data source connected, let’s first connect the Form we created to that data source and manipulate the cards within our form to allow the user to select the project.
Select the form from the tree view on the left. Then select the drop-down box next to “Data source” on the right-hand properties menu, and choose the SharePoint list we have just created.
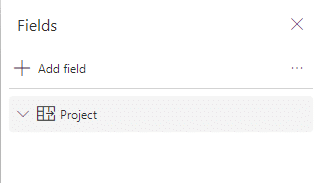
We can then select “Edit fields” next to the Fields property and remove all fields except the project field.
Now we can build some functionality into our buttons and have them create and amend records in our SharePoint list as required.
To do this, we are going to use the Patch formula. The Patch formula is very powerful as it allows us to create new records in a given list and amend fields as necessary. To learn more about the patch formula and how to use it, refer to the Microsoft Documentation for Power Apps.
Select our “Start” button and choose the "OnSelect" property in the top left. Here we write out the patch function as follows, ensuring that you replace your SharePoint list name and column names as appropriate.
Set(
varNewItem,
Patch(
'<SharePoint List Name>',
Defaults('<SharePoint List Name>'),
{
Title: User().Email,
Project: DataCardValue2.Selected,
'Start Time': Now(),
'Active Session': true
}
)
)
This patch function is going to create a new record in our SharePoint list (using "Defaults('SharePoint List Name')", which is then populated with values from Power Apps. These values are:
- Title - The current logged in users email
- Project - The value selected from the project selection list
- Start Time - The current date and time using the "Now()" function.
- Active Session - True
Take notice of the "Set" formula at the beginning of the expression; this is where I am setting the patch as a variable named "varNewItem", which I will be using to find the correct record in the "End" button formula.
You can test that your Start button works by running the app using the play icon on the right. Click on your Start button and return to your SharePoint list to verify that your new record is visible with the correct columns filled out.
The Start button is set up to create a record in our SharePoint list; we need to configure the "End" button to populate the End Time and calculate the time spent in the session.
Using the same method as previous, navigate to your End button and select the "OnSelect" property. Then paste the following into the formula bar replacing the SharePoint list name with your SharePoint list, and that the correct field names from the list are used.
Set(
varNewItem,
Patch(
'<SharePoint List Name>',
LookUp(
'<SharePoint List Name>', varNewItem.ID = ID
),
{
'Active Session': false,
'End Time': Now(),
'Time Spent': DateDiff(
varNewItem.'Start Time', Now(), Minutes
)
}
)
)
This formula, like before, is patching information to our SharePoint list. This time we do not want to create a new record. We want to update the fields of an existing one.
Instead of using the defaults expression, which creates a new record, we can validate which record we want to update by performing a validation check. In this case, the ID of "varNewItem" (the record variable we created with the start button) is equal to the ID of the SharePoint list item. This way, we will always update the same record created when the Start button was pressed.
The solution's primary purpose is to indicate how long a user has spent on their project, which I have implemented using the "DateDiff" function.
The "DateDiff" function allows me to pass in two dates (in my case, the Start time that was posted when the Start button was pressed, and the "Now" time giving me a time difference, which I have chosen to display in Minutes.
That completes the basic functionality that allows us to have a useable application that records a start and an end time and then calculates the time spent using those values.
Project Time Recording App - Further Enhancements
I hope this article has proven helpful for you, and I highly encourage you to watch my 30-minute video, where I dive deeper into conditional formatting in Power Apps, to bring your app to life. In addition, you'll learn how to disable buttons using variables and conditional logic using fields in SharePoint.
As with all Power Platform applications there are many enhancements that could be added to this app, here are a few:
- The project list could be sourced from a SharePoint list of projects, or a list of Planners, or list of Teams Teams.
- Each project could have dates against them for when they are active, so that they only appear in the app selection list when they are active.
- You could add maximum daily or weekly limits against each project, this would allow a Power Automate flow to be added that could trigger alerts to managers when a limit is reached.
- There could be a manual entry form to add records manually.
- Entries could trigger a Power Automate flow for manages to approve or be notified of each entry.
The Power Platform possibilities are endless!!
Want to see how this is built? Watch the video...
During this post we've given you an overview of what's possible. If you would like to see me build the entire app, watch the video on YouTube below: