
Have you ever wanted to create a registration form for an event that saves the attendees to a SharePoint List? Do you also want the form to work seamlessly on desktops, Android and iOS? If yes – then I will show exactly how to do this.
This tutorial shows how to create a complete end to end user registration system using:
- Microsoft PowerApps
- Microsoft Flow
- SharePoint Online
Related Content:
- The ultimate introduction to Microsoft Flow and PowerApps!
- The ultimate guide to Microsoft Forms
- How to post data to a SharePoint List using an external form with TypeForm and Microsoft Flow
- How to convert your InfoPath Forms to PowerApps
- Find an online PowerApps Developer / Expert
- Find an online SharePoint Developer / Administrator
- Find an online Flow Developer / Expert
Here are the steps that we will go through in this tutorial.
- First, we’ll create a list in a SharePoint online site to capture the user’s details.
- Open and create a PowerApps App using the SharePoint list Menu.
- Design a form using PowerApps designer and bind data with controls and then save the data back to SharePoint Online list.
- Open and create a Microsoft Flow to send email on item creation using SharePoint List.
- Finally, we’ll check the PowerApps functionality and configure an email to be sent from Microsoft Flow.
Sound good? Let’s begin …
1. Create a new list in your SharePoint Online site containing the required columns to capture the relevant User Registration details.

2. Now browse the SharePoint List and click on the ‘PowerApps menu’ within the SharePoint List screen and then click on ‘Create an app’ menu to create a PowerApps for this SharePoint List.

3. On the next screen, you need to provide a ‘Name’ for your app and click on ‘Create’ button to continue…

4. You’ll now be taken to the PowerApps portal and the app will be created for you (note, it may take a while!). See below.

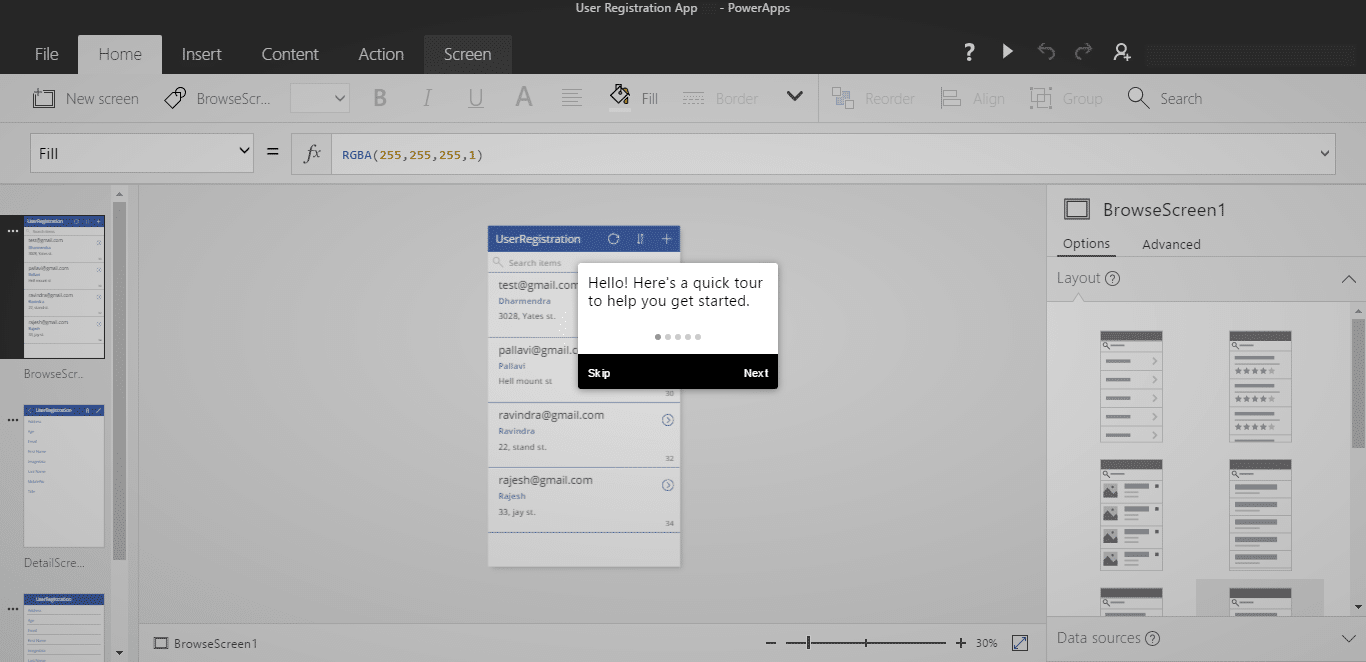
5. On the following screen, the app is created for you and you can see the data which is being displayed from the SharePoint List. BTW, you can skip the tour if you don’t want to complete it.
6. Now, you can add a new screen to create a User Registration form. Open PowerApps designer and click on ‘New screen’ to add a new screen.


7. As suggested on the screen, you can add items from the Insert tab or connect to data to design the screen. For our registration app, please add TextBox’s, TextInput’s and Camera controls as below:

8. You need to setup following formulas and properties for your controls. Let’s take a look at them one by one:
TextInput
• Set Reset property to Button1_1.Pressed
• Set PhotoDateTime to get System date time
Camera
• Set the camera control to use the formula below which will capture the image and clear the collection. Also, update the date time.
ClearCollect(CameraImage, Camera1.Photo); UpdateContext({PhotoDateTime: Now()})
Save Button
• Add this formula into the Save button to capture entered data in SharePoint List
Patch(UserRegistration, Defaults(UserRegistration),
{Title:"New",First_x0020_Name : TextInput1_6.Text,
Last_x0020_Name:TextInput1_1.Text,
Age:TextInput1_2.Text,
Email:TextInput1_3.Text,
MobileNo:TextInput1_7.Text,
Address:TextInput1_5.Text,
PictureDate:TextInput1.Text,
Imagedata: First(CameraImage).Url});
Navigate(Screen2, None)
9. Now, you can run your app and insert the data in your SharePoint list.

10. Let’s also add a new screen to display captured data in list grid view as depicted below.

To get the total count of the users, you can use below formula:
"Total Registered Users : " & CountRows(UserRegistration)
To Add ( ) new screen, you need to apply below formula:
Navigate(Screen1, None)
To refresh data on screen use formula:
Refresh(UserRegistration)
To delete:
Remove(UserRegistration, ThisItem)
To Back:
Back()
11. Save the app and go to the App settings to setup following;
• Icon
• Background color
• Screen Size and orientation

12. Click on Share, it will take you to a browser to setup following:
- Details – you check details of your app.
- Share – you can share the created app within the Organization.
- Versions – by clicking on this tab, you can check and delete versions of your app.
- Settings – you set an appropriate category for your app. You can use a maximum of 2 categories.

Note: You can’t share PowerApps outside your Organization/Office 365.
Create a Flow to send an email notification when a new person registers.
Now, you need to create a Flow to send email notification on item creation of SharePoint List. So, you can follow the steps below to create Microsoft Flow for your App.
1. Go to your SharePoint list and click on ‘Flow’ menu.

2. Click on ‘Create a flow’ and select ‘Send a customized email when a new SharePoint list item is added’ flow from the following screen.

3. On the next screen, you need to click on the ‘Continue’ button to proceed.

4. On the next screen, you can add and edit details for your flow. Click on ‘Create flow’ button to continue.

5. Now, your flow is created. You should be able to test it by creating a new item for the SharePoint list.

6. Create a list item and check your Inbox for the notification email.

7. You can install this app on your Windows, iOS and Android mobile device to test the functionality. Below are the screenshots of mobile screens.

![]()

Finally, you’re done!
By following steps of this blog, you have learned the following things:
- PowerApps connection with SharePoint list.
- Formulas of PowerApps to perform the following operations:
- Connect Camera control to app
- Save data in a SharePoint List
- Bind controls with data source (SharePoint list)
- Navigation for screens
- Add new screen
- Delete record using formula
- Clear controls value on button click
- Create flow for your SharePoint list and send email notification on new item creation in a list of SharePoint
- Setting up PowerApps
- Share your PowerApps within Organization
I hope, this will be helpful for you.
